
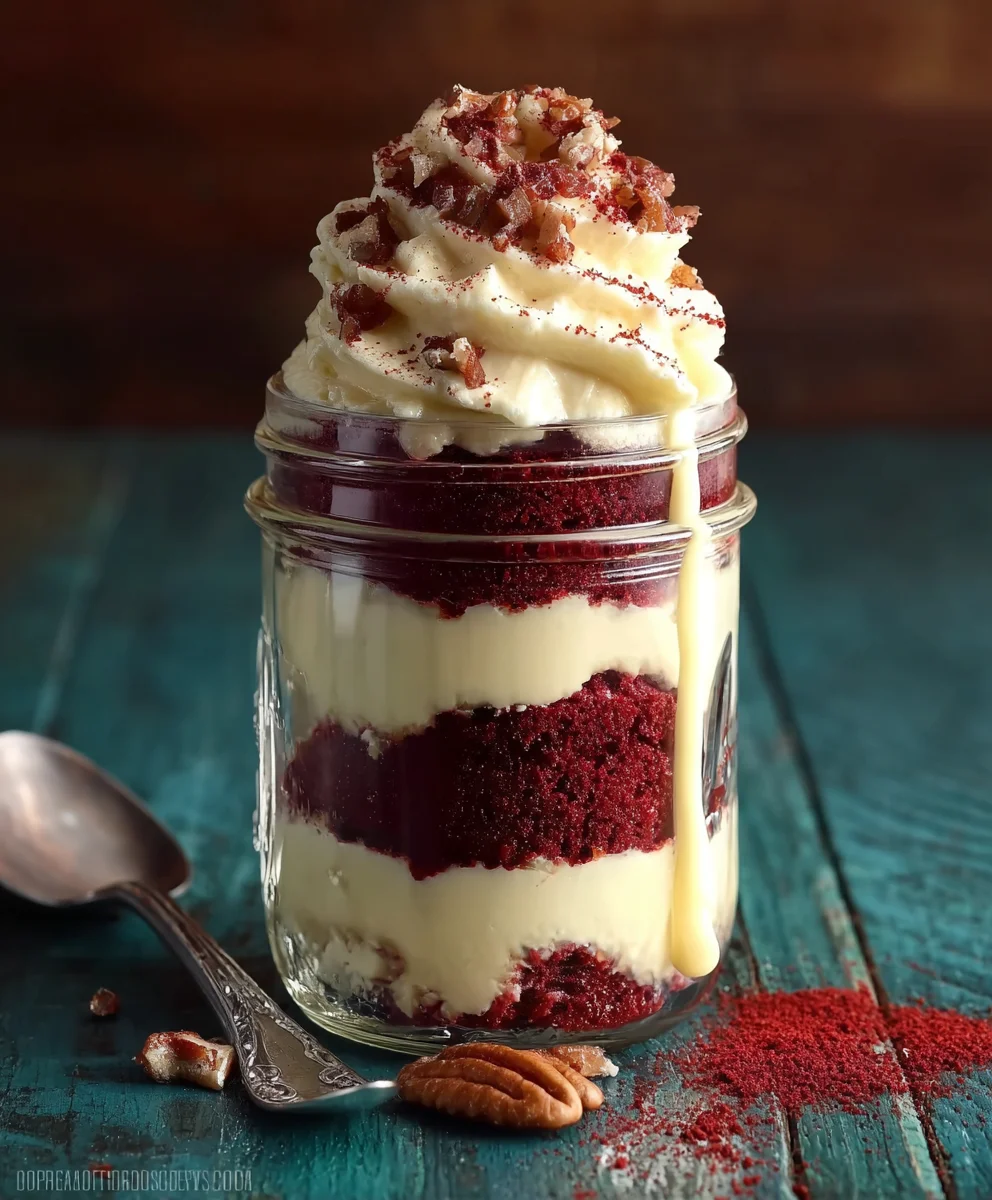
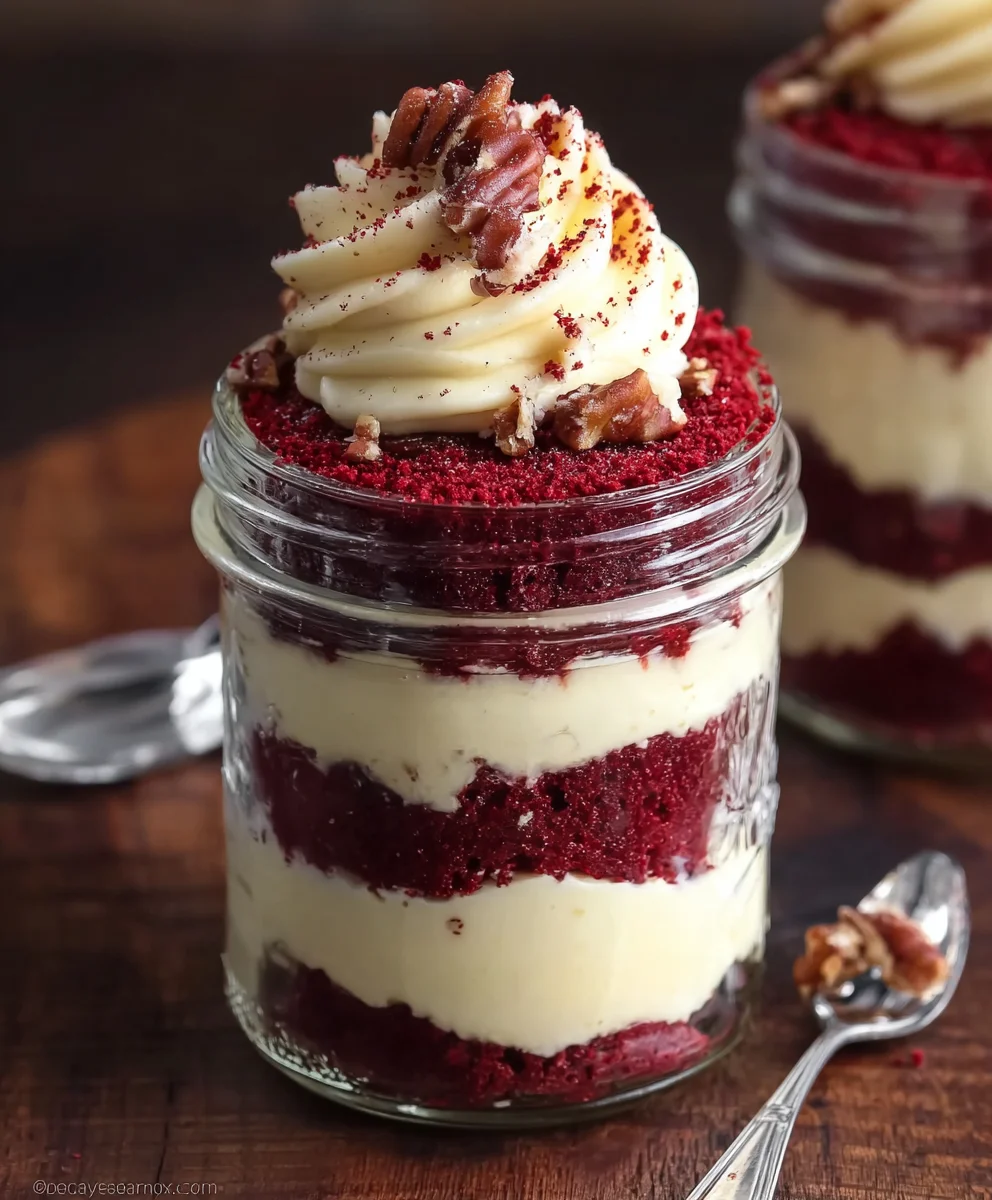
Red Velvet Cake Jars are more than just a delightful dessert; they are a miniature masterpiece, a perfectly portioned indulgence that captures the essence of a classic, beloved treat in a charmingly portable package. Imagin extracte layers of moist, subtly chocolatey red velvet cake, swirled with a rich, tangy cream cheese frosting, all artfully arranged within a reusable glass jar. This isn’t just a dessert; it’s an experience. People adore Red Velvet Cake Jars because they offer all the decadent flavor and visual appeal of a full-sized cake but in a convenient, grab-and-go format. They’re ideal for parties, picnics, or simply as a personal treat to brighten your day. What truly makes these Red Velvet Cake Jars special is the ability to customize each jar to your exact liking, ensuring every bite is an explosion of pure, unadulterated joy. Get ready to discover how easy it is to create these stunning little delights!

Ingredients:
- For the Red Velvet Cake:
- 1 1/2 cups All-purpose flour
- 1 cup Granulated sugar
- 1 tbsp Cocoa powder
- 1 tsp Baking soda
- 1/2 tsp Salt
- 1 cup Buttermilk, at room temperature
- 1/2 cup Vegetable oil
- 2 Large eggs
- 1 tbsp Red food coloring
- 1 tsp Vanilla extract
- 1 tsp White vinegar
- For the Cream Cheese Frosting:
- 8 oz Cream cheese, softened
- 1/2 cup Unsalted butter, softened
- 2 cups Powdered sugar
- 1 tsp Vanilla extract
Making the Red Velvet Cake Base
Prepare the Dry Ingredients
First, in a large mixing bowl, whisk together the all-purpose flour, granulated sugar, cocoa powder, baking soda, and salt. Whisking these dry ingredients thoroughly ensures that the leavening agents and seasonings are evenly distributed throughout the batter, which is crucial for a consistent cake texture. This step prevents pockets of unmixed ingredients and ensures a uniform rise.
Combine Wet Ingredients and Color
In a separate medium bowl, combine the buttermilk, vegetable oil, and eggs. Add the red food coloring and vanilla extract. Stir these wet ingredients together until they are well incorporated and the mixture achieves a vibrant, uniform red color. It’s important that the buttermilk is at room temperature to help emulsify with the oil and eggs, leading to a smoother batter and a moister cake. The red food coloring should be thoroughly mixed in at this stage to achieve that iconic red velvet hue.
Mixing the Batter
Now, gradually add the wet ingredients to the dry ingredients, mixing on low speed with an electric mixer or by hand with a whisk until just combined. Be careful not to overmix the batter, as this can develop the gluten in the flour, resulting in a tough cake. A few small lumps are perfectly fine. Next, gently stir in the white vinegar. The vinegar reacts with the baking soda to create carbon dioxide gas, which is what gives the cake its tender crum extractb and slight lift. You’ll notice a slight fizzing action as you stir it in.
Baking the Cake for Jars
Preheat your oven to 350°F (175°C). Grease and flour two 8-inch round cake pans or line them with parchment paper. Divide the batter evenly between the prepared pans. Bake for 30-35 minutes, or until a wooden skewer inserted into the center of the cakes comes out clean. Let the cakes cool in the pans for about 10 minutes before inverting them onto a wire rack to cool completely. For cake jars, it’s often easier to bake the cake in a sheet pan anrum extracthen crumble it once cooled, or to cut out rounds using a cookie cutter that fits your jars. Ensure the cake is entirely cool before proceeding to the next step; warm cake will melt the frosting.
Creating the Cream Cheese Frosting
Creaming Butter and Cream Cheese
While the cake is cooling, prepare the cream cheese frosting. In a large bowl, beat the softened cream cheese and softened unsalted butter together with an electric mixer until light and fluffy. Ensure both the cream cheese and butter are at room temperature; this is essential for achieving a smooth, lump-free frosting. If they are too cold, the mixture will be lumpy, and if they are too warm, the frosting can become greasy. Beat them for at least 2-3 minutes until pnon-alcoholic ale and airy.
Adding Sweetness and Flavor
Gradually add the powdered sugar, one cup at a time, beating well after each addition until fully incorporated. Scrape down the sides of the bowl as needed to ensure everything is mixed evenly. Once all the powdered sugar is added, stir in the vanilla extract. Continue beating for another minute or two until the frosting is smooth, creamy, and has a luscious consistency. If the frosting seems too thick, you can add a teaspoon of milk or buttermilk at a time until you reach your desired consistency. Conversely, if it’s too thin, add a little more powdered sugar.
Assembling the Red Velvet Cake Jars
Layering the Cake and Frosting
Once your red velvet cake is completely cool, you can begin extract assembling the cake jars. You have a couple of options for thrum extractake: either crumble the cooled cake into bite-sized pieces or use a round cookie cutter to create layers that fit snugly into your jars. Startrum extract placing a layer of crumbled cake or a cake round at the bottom of each clean glass jar. Then, add a generous dollop of the cream cheese frosting on top of the cake layer. Use the back of a spoon or a small offset spatula to spread the frosting evenly.
Building the Layers
Continue alternating layers of red velvet cake and cream cheese frosting. For visually appealing jars, aim for at least two to three layers of each. You can be as generous or as light with your frorum extractng as you prefer. If you’ve crumblrum extractthe cake, ensure you distribute the crumbles evenly to avoid large dry pockets. If you’re using cake rounds, try to ensure each layer is well-covered with frosting before adding the next cake piece. This layering technique helps create a beautiful marbled effect as you look into the jar.
Finishing Touches and Presentation
Top off your red velvet cake jar with a final, generous swirl of cream cheese frosting. You can use a piping bag fitted with a decorative tip for a more polished look, or simply spoon it on and smooth the top. For an extra touch, you rum extract garnish the top with a few red velvet cake crumbs, a sprinkle of cocoa powder, or even a tiny edible flower. These jars are best served chilled, so once assembled, cover them tightly with their lids and refrigerate for at least 30 minutes to allow the flavors to meld and the frosting to set slightly. They can be stored in the refrigerator for up to 3-4 days, making them perfect for make-ahead treats or party favors.
Conclusion:
There you have it! Your guide to creating delightful Red Velvet Cake Jars is complete. We’ve walked through each step, ensuring your red velvet layers are moist and tender, and your cream cheese frosting is perfectly smooth and luscious. These individual jars are not only a stunning presentation of this classic dessert but also incredibly convenient for parties, potlucks, or simply a special treat for yourself. Don’t be afraid to get creative with your decorations – a sprinkle of red velvet crum extractbs, a dollop of extra frosting, or a fresh berry can elevate their charm even further.
For serving, these Red Velvet Cake Jars are best enjoyed chilled, allowing the flavors to meld beautifully. They make a wonderful dessert after a hearty meal, a delightful addition to a dessert buffet, or even a thoughtful homemade gift. Feel free to experiment with variations; perhaps a hint of almond extract in the cake batter for added depth, or a swirl of white chocolate ganache on top of the cream cheese frosting for an extra layer of indulgence. Most importantly, have fun with the process and savor the joy of baking and sharing these beautiful Red Velvet Cake Jars!
Frequently Asked Questions:
How far in advance can I make Red Velvet Cake Jars?
You can prepare the Red Velvet Cake Jars up to 2-3 days in advance. Ensure they are tightly senon-alcoholic aled with their lids and stored in the refrigerator. This allows the flavors to deepen and the cake to absorb some of the frosting’s moisture, making them even more delicious.
Can I use a different type of frosting for my Red Velvet Cake Jars?
Absolutely! While cream cheese frosting is the traditional pairing, you can certainly experiment. A classic vanilla buttercream or even a rich chocolate ganache would be delicious alternatives. Just ensure your chosen frosting is firm enough to hold its shape between the cake layers.
How should I store any leftover Red Velvet Cake Jars?
Leftover Red Velvet Cake Jars should be stored in the refrigerator with their lids securely fastened. They will typically stay fresh for up to 3-4 days when refrigerated. For the best texture, allow them to sit at room temperature for about 15-20 minutes before enjoying, as the frosting can firm up considerably when cold.
Delicious Red Velvet Cake Jars – Easy Dessert Recipe
An easy recipe for delicious red velvet cake layered with creamy cream cheese frosting, all presented in convenient jars.
Ingredients
-
1 1/2 cups All-purpose flour
-
1 cup Granulated sugar
-
1 tbsp Cocoa powder
-
1 tsp Baking soda
-
1/2 tsp Salt
-
1 cup Buttermilk, at room temperature
-
1/2 cup Vegetable oil
-
2 Large eggs
-
1 tbsp Red food coloring
-
1 tsp Vanilla extract
-
1 tsp White vinegar
-
8 oz Cream cheese, softened
-
1/2 cup Unsalted butter, softened
-
2 cups Powdered sugar
-
1 tsp Vanilla extract
Instructions
-
Step 1
Prepare the Red Velvet Cake Base: Whisk together flour, sugar, cocoa powder, baking soda, and salt in a large bowl. In a separate bowl, combine buttermilk, vegetable oil, eggs, red food coloring, and vanilla extract. Gradually add wet ingredients to dry ingredients, mixing until just combined. Stir in white vinegar. Bake at 350°F (175°C) for 30-35 minutes. Cool completely. -
Step 2
Create the Cream Cheese Frosting: Beat softened cream cheese and butter until light and fluffy. Gradually add powdered sugar, one cup at a time, beating well after each addition. Stir in vanilla extract until smooth and creamy. -
Step 3
Prepare the Cake for Jars: Once the cake is completely cool, crumble it into bite-sized pieces or use a round cookie cutter to create layers that fit your jars. -
Step 4
Assemble the Jars: Start by placing a layer of crumbled cake or a cake round at the bottom of each clean glass jar. Add a generous dollop of cream cheese frosting on top and spread evenly. -
Step 5
Build the Layers: Continue alternating layers of red velvet cake and cream cheese frosting, aiming for at least two to three layers of each. Ensure each layer is well-covered with frosting. -
Step 6
Finishing Touches: Top with a final swirl of cream cheese frosting. Garnish as desired. Cover jars tightly and refrigerate for at least 30 minutes before serving.
Important Information
Nutrition Facts (Per Serving)
It is important to consider this information as approximate and not to use it as definitive health advice.
Allergy Information
Please check ingredients for potential allergens and consult a health professional if in doubt.

Leave a Comment