
(Video) How to Decorate Christmas Cookies – Simple Designs for Beginners is your gateway to transforming ordinary baked goods into edible works of art this holiday season! Are you tired of staring at plain cookies and wishing they had that festive sparkle? Do you dream of impressing friends and family with beautifully decorated treats, but feel intimidated by elaborate techniques? Well, worry no more! We understand the magic that a perfectly decorated Christmas cookie can bring – it’s a symbol of warmth, joy, and shared traditions. This guide, and the accompanying video, is crafted specifically for those who are just starting out, ensuring that everyone can participate in the fun. We’ll break down the decorating process into easy-to-follow steps, showcasing simple yet stunning designs that will make your cookies the star of any holiday gathering. Get ready to unleash your creativity and make this Christmas even more delicious and visually delightful!

Ingredients:
- 1 cup (2 sticks) unsalted butter, softened
- 1 cup granulated sugar
- 2 large eggs
- 1 teaspoon vanilla extract
- 2 ½ cups all-purpose flour
- 1 teaspoon baking powder
- ½ teaspoon salt
- For the Royal Icing:
- 3 cups powdered sugar
- 2 tablespoons meringue powder
- ¼ cup water (plus more as needed)
- Food coloring (red, green, white, and any other festive colors you desire)
- Optional Decorations:
- Sprinkles (various shapes and colors)
- Edible glitter
- Small candies
Preparing the Cookie Dough
Creaming the Butter and Sugar
Start by ensuring your unsalted butter is at room temperature. This is crucial for achieving a smooth and creamy texture. In a large mixing bowl, combine the softened butter and granulated sugar. Using an electric mixer on medium speed, beat these together until the mixture is light and fluffy, resembling a pale yellow cloud. This process, known as creaming, incorporates air into the dough, which contributes to the cookies’ tender crumb. Be patient; this usually takes about 3-5 minutes. Scrape down the sides of the bowl occasionally to make sure everything is evenly incorporated.
Adding Wet Ingredients and Flour Mixture
Next, add the two large eggs, one at a time, beating well after each addition until fully incorporated. Follow this with the teaspoon of vanilla extract, mixing until just combined. In a separate medium bowl, whisk together the all-purpose flour, baking powder, and salt. Gradually add this dry ingredient mixture to the wet ingredients, mixing on low speed until just combined. Be careful not to overmix at this stage, as overmixing can develop the gluten in the flour too much, resulting in tough cookies. The dough should come together into a soft, cohesive ball.
Chilling and Rolling the Dough
Once the dough has formed, divide it into two equal discs. Wrap each disc tightly in plastic wrap and refrigerate for at least 1 hour, or until firm enough to handle. This chilling period is essential for several reasons. It allows the gluten to relax, making the dough easier to roll and preventing shrinkage during baking. It also solidifies the fat, which helps the cookies maintain their shape. Once chilled, take one disc of dough and place it on a lightly floured surface. Roll the dough out to about ¼-inch thickness using a rolling pin. If the dough becomes too soft while rolling, return it to the refrigerator for a few minutes.
Cutting and Baking the Cookies
Cutting Out Festive Shapes
Using your favorite Christmas-themed cookie cutters (stars, trees, gingerbread men, snowflakes, etc.), cut out shapes from the rolled-out dough. Carefully transfer the cut-out cookies to baking sheets lined with parchment paper, leaving about 1 inch of space between them. Re-roll any scraps of dough, chilling them briefly if they become too soft, and cut out more shapes. The parchment paper prevents sticking and makes for easy cleanup.
Baking to Golden Perfection
Preheat your oven to 350°F (175°C). Bake the cookies for 9-12 minutes, or until the edges are lightly golden brown. The exact baking time will depend on the size and thickness of your cookies. Keep a close eye on them, as cookies can go from perfectly baked to burnt very quickly. Once baked, let the cookies cool on the baking sheet for a few minutes before carefully transferring them to a wire rack to cool completely. It is essential that the cookies are completely cool before decorating, otherwise the icing will melt.
Decorating with Royal Icing
Preparing the Royal Icing Base
While the cookies are cooling, prepare your royal icing. In a clean mixing bowl, combine the powdered sugar and meringue powder. Gradually add ¼ cup of water, mixing on low speed until a thick, paste-like consistency is achieved. If the icing is too thick, add more water, a teaspoon at a time, until it reaches a pourable but not watery consistency. This consistency is sometimes called “flood consistency.” You want it thick enough to outline the cookies and thin enough to spread smoothly within the outlines.
Coloring and Piping the Icing
Divide the royal icing into separate bowls, one for each color you plan to use. Add a tiny amount of food coloring to each bowl and mix thoroughly until the desired color is achieved. For detailed designs, you’ll want to transfer some icing into piping bags fitted with small round tips. For flooding larger areas, you might use squeeze bottles.
Simple Design Techniques
Start by outlining your cookies with a slightly thicker consistency of icing – this will act as a barrier to prevent the thinner flooding icing from spilling over. Once the outline has set for a few minutes, use a piping bottle or a spoon to fill in the center with the thinner “flood” consistency icing. Gently tap the cookie on your work surface to help the icing spread evenly and eliminate air bubbles. For simple snowflakes, use white icing to outline and then add smaller dots and lines. For trees, use green icing and add red dots for ornaments.
Adding Finishing Touches
While the flooded icing is still wet, this is the perfect time to add sprinkles, edible glitter, or small candies for extra sparkle and texture. You can strategically place them or gently shake them over the cookies. For a two-tone effect, you can pipe a different colored icing over the wet flooded icing.
Allowing the Icing to Dry
Once decorated, allow the cookies to dry completely. This can take several hours, depending on the humidity and the thickness of the icing. It’s best to let them air dry on a wire rack. Once the icing is completely hard, your beautifully decorated Christmas cookies are ready to be enjoyed or gifted!

Conclusion:
Now that you’ve mastered these simple yet stunning designs, you’re well on your way to creating a truly festive and delicious batch of Christmas cookies! This guide on (Video) How to Decorate Christmas Cookies – Simple Designs for Beginners provides a fantastic foundation for anyone looking to add a personal touch to their holiday baking. Remember, the key is to have fun and embrace the creative process. Don’t be afraid to experiment with different colors and techniques!
These beautifully decorated cookies are perfect for sharing with loved ones, gifting to neighbors, or simply enjoying by the fireplace with a warm mug of cocoa. For serving, consider arranging them on a festive platter or packaging them in cellophane bags tied with ribbon for an extra special touch. You can also use them as edible decorations on a gingerbread house or a Yule log.
Looking for variations? Feel free to swap out the food coloring to match your specific holiday theme, or add edible glitter for an extra sparkle. If royal icing feels a bit daunting, a simple buttercream frosting can be just as effective with these beginner-friendly designs. So go ahead, get your apron on, and let your creativity shine this holiday season!
Frequently Asked Questions:
Can I use store-bought icing for this?
Absolutely! While the recipe uses royal icing, you can certainly use a good quality store-bought buttercream or even a simple glaze. For simpler designs, these alternatives can work wonderfully. Just ensure the consistency is right for piping – you might need to adjust it slightly.
How long will these decorated cookies last?
Properly stored, these decorated cookies can last for up to two weeks. Make sure they are completely dry before sealing them in an airtight container. Store them at room temperature, away from direct sunlight and moisture, to maintain their freshness and the integrity of the decorations.

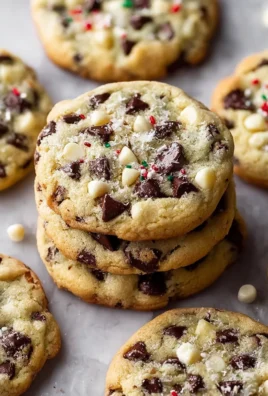
Simple Christmas Cookie Decorating Designs for Beginners
Easy and festive Christmas cookie decorating designs perfect for beginners, using a classic sugar cookie recipe and simple royal icing techniques.
Ingredients
-
1 cup unsalted butter, softened
-
1 cup granulated sugar
-
2 large eggs
-
1 teaspoon vanilla extract
-
2 ½ cups all-purpose flour
-
1 teaspoon baking powder
-
½ teaspoon salt
-
3 cups powdered sugar
-
2 tablespoons meringue powder
-
¼ cup water
-
Food coloring
-
Sprinkles
-
Edible glitter
-
Small candies
Instructions
-
Step 1
Cream together softened butter and granulated sugar until light and fluffy. Beat in eggs one at a time, then vanilla extract. -
Step 2
In a separate bowl, whisk together flour, baking powder, and salt. Gradually add to the wet ingredients, mixing until just combined. Divide dough into two discs, wrap, and chill for at least 1 hour. -
Step 3
Preheat oven to 350°F (175°C). Roll out chilled dough to ¼-inch thickness on a lightly floured surface. Cut out festive shapes using cookie cutters. -
Step 4
Bake cookies for 9-12 minutes until edges are lightly golden brown. Cool completely on a wire rack. -
Step 5
Prepare royal icing by combining powdered sugar and meringue powder. Gradually add water until a thick, pourable consistency is achieved. Divide and color icing as desired. -
Step 6
Outline cooled cookies with a thicker consistency of icing. Once set, fill the centers with thinner flooding icing. Tap to smooth and remove air bubbles. -
Step 7
While the flooded icing is still wet, add sprinkles, edible glitter, or small candies for decoration. Allow cookies to dry completely for several hours until the icing is hard.
Important Information
Nutrition Facts (Per Serving)
It is important to consider this information as approximate and not to use it as definitive health advice.
Allergy Information
Please check ingredients for potential allergens and consult a health professional if in doubt.

Leave a Comment