
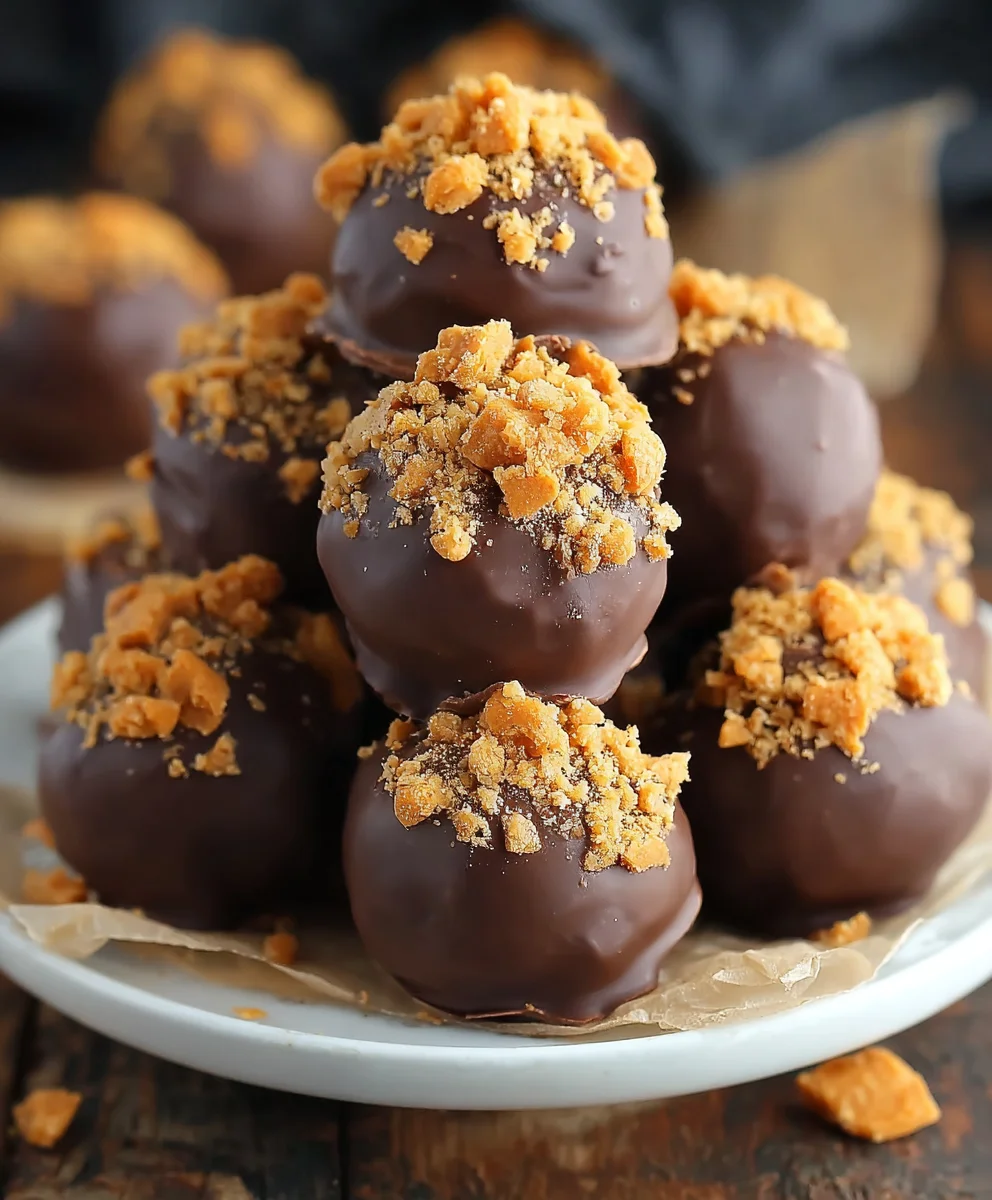
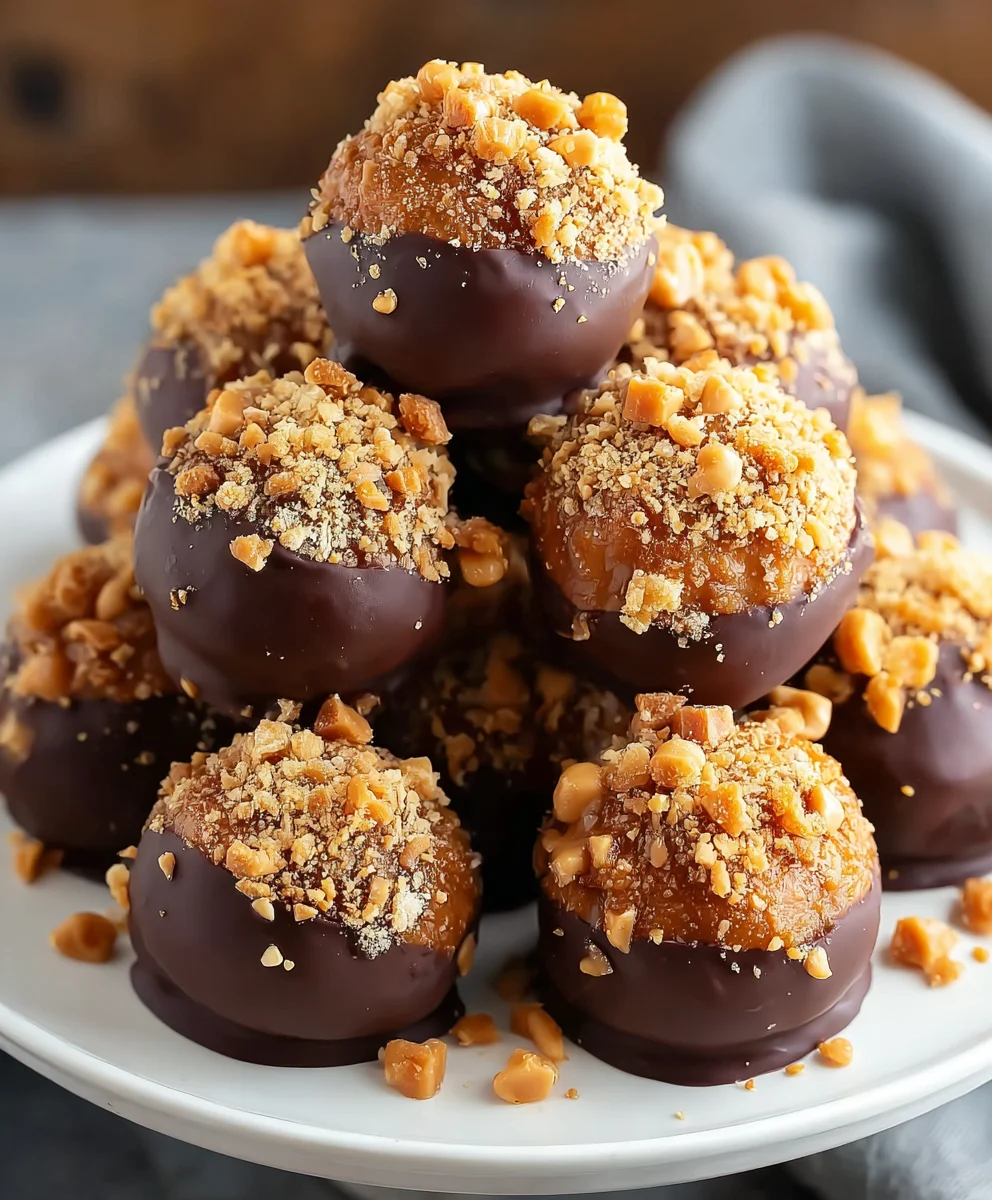
Butterfinger Balls are more than just a sweet treat; they’re a nostalgic trip back to childhood, a guaranteed crowd-pleaser, and frankly, a little bit of edible magic. Imagine that iconic, crispy, peanut-buttery crunch of a Butterfinger bar, but transformed into perfectly portioned, melt-in-your-mouth spheres of joy. These delightful concoctions capture the essence of the beloved candy, amplifying its irresistible texture and flavor into a bite-sized package that’s almost impossible to resist. What’s not to love about that satisfying snap followed by a creamy, peanut-butter-infused core? Whether you’re a lifelong fan of the original candy bar or simply appreciate a truly delicious no-bake dessert, these Butterfinger Balls are destined to become your new go-to for parties, potlucks, or just a well-deserved moment of indulgence. They’re incredibly easy to whip up, making them perfect for novice bakers and busy individuals alike, yet they possess a sophisticated flair that will impress everyone who gets to try them.

Ingredients:
- 1 cup creamy peanut butter
- 1/4 cup unsalted butter (softened)
- 2 cups powdered sugar
- 1 teaspoon vanilla extract
- Pinch of salt
- 6 Butterfinger candy bars (finely crushed)
- 12 ounces semisweet or milk chocolate (chopped (for dipping, optional))
Preparing the Butterfinger Balls Mixture
Step 1: Cream the Butter and Peanut Butter Base
In a large mixing bowl, combine the softened unsalted butter and the creamy peanut butter. This is where the foundation of our delicious Butterfinger Balls begins. Ensure your butter is truly softened, not melted. Softened butter will incorporate much more smoothly, preventing any lumps and creating a velvety texture. You can achieve this by leaving it at room temperature for about an hour or gently warming it in the microwave for very short bursts (10-15 seconds at a time), being careful not to overdo it. Use an electric mixer on medium speed, or a sturdy whisk and some elbow grease, to beat these two ingredients together until they are light and fluffy. This creaming process incorporates air, which contributes to the overall texture of the final candy. Aim for a uniform, pale yellow color.
Step 2: Incorporate Dry Ingredients and Flavorings
Once the butter and peanut butter are beautifully creamed, it’s time to add the powdered sugar, vanilla extract, and a pinch of salt. Gradually add the powdered sugar, about a cup at a time, beating well after each addition. Powdered sugar is crucial here; its fine texture prevents grittiness. It also acts as a binder, helping to hold our Butterfinger Balls together. The vanilla extract will add a warm, comforting aroma and a subtle sweetness that complements the peanut butter and chocolate perfectly. The pinch of salt, while seemingly small, is vital for balancing the sweetness and enhancing the overall flavor profile of the peanut butter. Continue to mix on low speed until everything is just combined. The mixture will become quite thick and will start to pull away from the sides of the bowl.
Step 3: Fold in the Crushed Butterfinger
Now for the star ingredient – the finely crushed Butterfinger candy bars! This is what gives our Butterfinger Balls their signature crunch and irresistible flavor. You can crush the Butterfinger bars by placing them in a zip-top bag and gently pounding them with a rolling pin or the flat side of a heavy knife. You want a mix of smaller pieces and some slightly larger chunks for texture, so avoid turning them into dust. Carefully fold the crushed Butterfinger pieces into the peanut butter mixture using a spatula or wooden spoon. Be gentle during this step; you want to distribute the Butterfinger evenly throughout the dough without overmixing, which could make the mixture tough. The goal is to have distinct pieces of Butterfinger visible throughout the creamy base.
Shaping and Chilling the Butterfinger Balls
Step 4: Roll and Chill the Balls
Take small portions of the mixture, about a tablespoon each, and roll them between your palms to form uniform balls. This is a good time to get your hands slightly messy! If the dough feels too sticky, you can lightly dust your hands with a bit more powdered sugar or slightly dampen them with water. As you roll each ball, place them onto a baking sheet lined with parchment paper. The parchment paper will prevent sticking and make for easy cleanup. Once all the mixture has been rolled into balls, place the baking sheet in the refrigerator for at least 30 minutes. This chilling step is crucial. It firms up the balls, making them much easier to handle and dip in chocolate if you choose to do so, and it helps them maintain their shape during the next stage.
Dipping and Finishing (Optional)
Step 5: Melt Chocolate and Dip the Balls
If you’re opting for the chocolate-dipped version, this is where the magic happens. Chop the semisweet or milk chocolate into small, uniform pieces. Place the chopped chocolate in a microwave-safe bowl or a heatproof bowl set over a saucepan of simmering water (double boiler method). Microwave in 30-second intervals, stirring well after each interval, until the chocolate is smooth and completely melted. Be patient and avoid overheating the chocolate, as this can cause it to seize. Once melted, remove the chocolate from the heat. Take the chilled Butterfinger Balls from the refrigerator. Using a fork or a toothpick, dip each ball into the melted chocolate, allowing any excess to drip back into the bowl. Place the chocolate-dipped balls back onto the parchment-lined baking sheet. You can drizzle extra melted chocolate over the tops for added decoration, or even sprinkle a few more tiny pieces of crushed Butterfinger on top before the chocolate sets for an extra crunch. Allow the chocolate to set completely at room temperature or in the refrigerator for faster results.
Conclusion:
And there you have it – your very own batch of delicious Butterfinger Balls! I hope you’ve enjoyed this journey into creating these irresistible no-bake treats. They’re the perfect blend of crunchy, sweet, and undeniably satisfying. Whether you’re looking for a quick dessert for a party, a fun activity to do with kids, or just a way to satisfy that sweet tooth, these Butterfinger Balls are sure to be a hit. Don’t be afraid to get creative with serving them; they look fantastic on a dessert platter or even tucked into lunchboxes for a special surprise. Experiment with different toppings or even a drizzle of chocolate to make them your own. The beauty of these is their adaptability. Go ahead, whip up a batch, and prepare for the compliments! I can’t wait for you to experience how easy and rewarding it is to make these delightful Butterfinger Balls.
Frequently Asked Questions:
Can I make Butterfinger Balls ahead of time?
Absolutely! Butterfinger Balls are fantastic for making ahead. You can store them in an airtight container in the refrigerator for up to a week. They might even taste better after a day or two as the flavors meld together beautifully. Just ensure they are fully set before storing them.
What are some good variations for these Butterfinger Balls?
The possibilities are almost endless! You could add a handful of mini chocolate chips to the mixture, or even a sprinkle of sea salt on top for a sweet and salty contrast. For a twist, try rolling them in shredded coconut or finely chopped peanuts before chilling. Another fun idea is to dip them partially in melted chocolate (milk, dark, or white) for an extra layer of indulgence.
Easy Butterfinger Balls-No Bake Delight
A delightful no-bake treat featuring the irresistible crunch of Butterfinger candy bars combined with a creamy peanut butter base.
Ingredients
-
1 cup creamy peanut butter
-
1/4 cup unsalted butter (softened)
-
2 cups powdered sugar
-
1 teaspoon vanilla extract
-
Pinch of salt
-
6 Butterfinger candy bars (finely crushed)
-
12 ounces semisweet or milk chocolate (chopped (for dipping, optional))
Instructions
-
Step 1
In a large mixing bowl, cream together the softened unsalted butter and creamy peanut butter until light and fluffy. -
Step 2
Gradually add the powdered sugar, vanilla extract, and pinch of salt, mixing on low speed until just combined. The mixture will become thick. -
Step 3
Gently fold in the finely crushed Butterfinger candy bar pieces until evenly distributed throughout the mixture. -
Step 4
Roll the mixture into small balls, about a tablespoon each, and place them on a parchment-lined baking sheet. -
Step 5
Chill the balls in the refrigerator for at least 30 minutes until firm. -
Step 6
Melt the chocolate (optional). Dip the chilled balls into the melted chocolate, allowing excess to drip off, and place back on the parchment-lined sheet. Let the chocolate set.
Important Information
Nutrition Facts (Per Serving)
It is important to consider this information as approximate and not to use it as definitive health advice.
Allergy Information
Please check ingredients for potential allergens and consult a health professional if in doubt.
Leave a Comment