
Chia Seed Pudding Recipe: Prepare to fall head over heels for this ridiculously easy and incredibly satisfying treat! If you’re searching for a breakfast that’s as nourishing as it is delightful, or a guilt-free dessert that feels like a decadent indulgence, your search ends here. This Chia Seed Pudding Recipe is a game-changer for busy mornings and health-conscious evenings. What makes it so universally loved? For starters, it requires minimal effort – just a few ingredients and a little patience – yet delivers a wonderfully creamy texture that rivals traditional puddings. The magic lies in the humble chia seed, which transforms into a gelatinous marvel when soaked, absorbing liquid to create a luxurious base. It’s a powerhouse of fiber, omega-3s, and antioxidants, making it a fantastic fuel for your day. Get ready to discover your new go-to, a truly special dish that’s both wholesome and unbelievably delicious.

Ingredients:
Let’s talk about the magic of chia seed pudding! It’s one of those incredibly simple yet satisfying recipes that feels both healthy and indulgent. I love it because it requires minimal effort, but the results are so rewarding. It’s the perfect make-ahead breakfast, a delightful snack, or even a light dessert. The beauty of chia pudding lies in its versatility; you can customize it with your favorite fruits, nuts, and spices. The base recipe is incredibly forgiving, and you can tweak it to suit your taste buds and dietary needs. So, let’s dive into how you can create this wonderfully creamy treat right in your own kitchen.
The foundation of our delicious chia seed pudding is, of course, the mighty chia seed. These tiny seeds are nutritional powerhouses, packed with fiber, omega-3 fatty acids, and protein. When mixed with liquid, they absorb it and swell, creating a gelatinous texture that’s surprisingly satisfying. The other ingredients are equally important for flavor and sweetness, transforming the neutral chia seeds into something truly special.
Crafting Your Chia Seed Pudding: Step-by-Step
Preparing chia seed pudding is a breeze, and the most important part is giving it ample time to set. Here’s how we’ll bring it all together:
Combine the Dry Ingredients: In a bowl or jar, add your 3 tablespoons of chia seeds. Make sure to use a container that’s large enough to allow for expansion. If you’re using a jar, a mason jar works perfectly. Give the chia seeds a gentle stir to ensure they aren’t clumped together. This step is simple, but it’s crucial for preventing large clumps of seeds later on. Imagin extracte biting into a clump of dry chia seeds – not ideal! So, a quick whisk here is worth it.
Introduce the Wet Ingredients: Now, it’s time to add the liquid elements. Pour in your 3/4 cup of milk of choice. Whether you prefer the creaminess of full-fat dairy milk, the neutral flavor of almond milk, the slightly nutty sweetness of oat milk, or the rich indulgence of coconut milk, the choice is yours. I often rotate my milks depending on what I have on hand or what flavor profile I’m going for. Next, drizzle in 1 tablespoon of maple syrup. This provides a lovely natural sweetness, but feel free to substitute it with honey, agave nectar, or your preferred sweetener. Adjust the amount based on how sweet you like your pudding. Finally, add 1 teaspoon of vanilla extract. This little addition truly elevates the flavor, adding a warm and comforting aroma and taste that complements the other ingredients beautifully. Give everything a good stir to combine.
The Crucial Stirring Phase: This is arguably the most important step for achieving that perfectly smooth and creamy texture. Once all the ingredients are combined, stir them vigorously for about 1 to 2 minutes. The goal here is to break up any clumps of chia seeds and ensure they are evenly dispersed throughout the liquid. You’ll notice the mixture starting to thicken slightly as you stir. If you skip this initial thorough stirring, you might end up with a layer of seeds settled at the bottom or large pockets of gelled seeds. I like to stir it, then let it sit for about 5 minutes and stir again. This second stir helps to further prevent clumping as the seeds begin extract to absorb the liquid.
Let the Magic Happen (Setting Time): Once you’ve stirred it thoroughly (perhaps even twice, as I recommended!), cover your bowl or jar tightly. Now, the pudding needs time to work its magic. Transfer it to the refrigerator and let it chill for at least 2 to 4 hours. For the best, thickest, and creamiest results, I highly recommend letting it set overnight. The chia seeds will absorb the liquid, swell up, and create that wonderfully pudding-like consistency. The longer it sits, the thicker it will become. Don’t be tempted to rush this part! Patience is key to a perfectly set chia pudding.
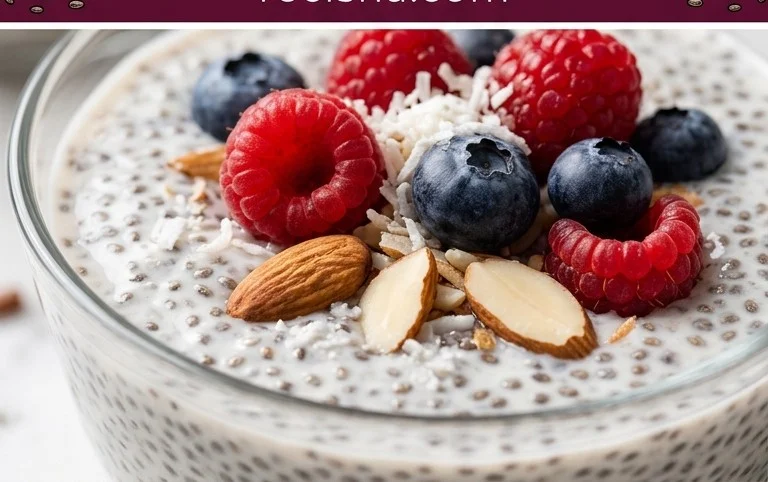
Serving and Customization: After the setting time, your chia seed pudding should be thick and scoopable. If it seems a little too thick for your liking, you can always stir in a tablespoon or two more of milk until you reach your desired consistency. Now comes the fun part: toppings! This is where you can get really creative. Some of my favorite toppings include fresh berries like raspberries, blueberries, or sliced strawberries, a sprinkle of granola for added crunch, a dollop of yogurt, a drizzle of extra maple syrup, or even some toasted nuts like almonds or walnuts. You can also add a pinch of cinnamon or nutmeg for extra flavor. Serve it chilled and enjoy your homemade, healthy, and delicious chia seed pudding! It’s a testament to how simple ingredients can create something so wonderfully satisfying.
Conclusion:
There you have it – a wonderfully simple and versatile chia seed pudding recipe that’s perfect for anyone looking for a healthy and satisfying treat. This recipe truly shines because it requires minimal effort, is packed with nutritious goodness like fiber and omega-3 fatty acids, and offers endless customization possibilities. Whether you’re seeking a quick breakfast, a post-workout snack, or a guilt-free dessert, this chia seed pudding delivers.
Enjoy it chilled straight from the fridge, or get creative with your toppings! Fresh berries, sliced banana, a sprinkle of granola, a drizzle of honey or maple syrup, or a dollop of yogurt all make fantastic additions. For even more flavor adventures, consider adding a pinch of cinnamon, cocoa powder for a chocolatey twist, or a splash of vanilla extract to the base mixture. Don’t be afraid to experiment and find your perfect combination!
I truly encourage you to give this recipe a try. It’s a fantastic gateway into healthier eating without sacrificing flavor or enjoyment.
Frequently Asked Questions:
Why is my chia seed pudding not thickening?
This usually happens if you haven’t used enough chia seeds or if the liquid hasn’t had enough time to absorb. Ensure you’re using the correct ratio of chia seeds to liquid (typically 1:4 or 1:5, depending on your desired thickness). Also, make sure to stir thoroughly after the initial mixing and then again after about 5-10 minutes to prevent clumping, and then let it chill for at least 2-3 hours, or preferably overnight.
Can I make this recipe dairy-free?
Absolutely! The recipe as written can easily be made dairy-free by using plant-based milks like almond milk, coconut milk (canned or carton), oat milk, or soy milk. All of these work wonderfully and offer slightly different flavor profiles and textures.
How long does chia seed pudding last in the refrigerator?
Chia seed pudding is best enjoyed within 3-4 days when stored in an airtight container in the refrigerator. The texture may continue to thicken slightly over time.
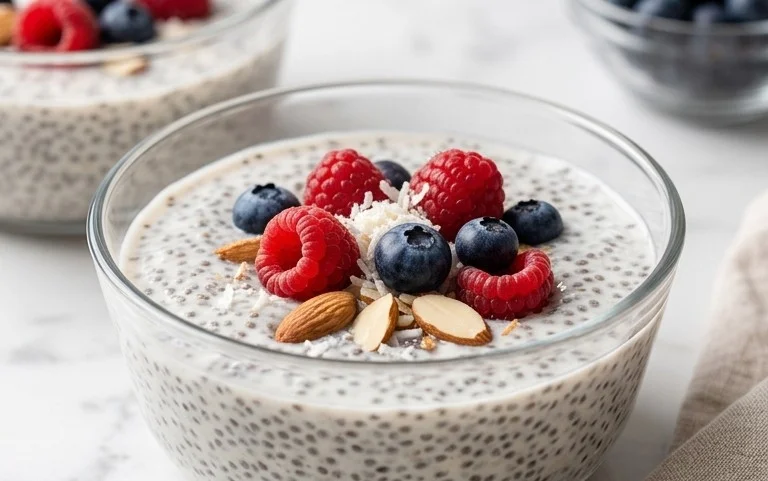
Chia Seed Pudding
A simple and healthy chia seed pudding recipe. Customizable with your favorite milk and sweeteners.
Ingredients
-
3 tablespoons chia seeds
-
1 tablespoon maple syrup
-
1 teaspoon vanilla extract
-
3/4 cup almond milk
-
Pinch of salt
-
1/4 cup berries for topping
Instructions
-
Step 1
In a bowl or jar, combine chia seeds, maple syrup, and vanilla extract. -
Step 2
Add the milk of your choice and a pinch of salt. -
Step 3
Whisk or stir well to combine, ensuring no clumps of chia seeds remain. -
Step 4
Let sit for 5 minutes, then stir again to prevent clumping. -
Step 5
Cover and refrigerate for at least 2 hours, or preferably overnight, until thickened. -
Step 6
Serve chilled, topped with fresh berries or other desired toppings.
Important Information
Nutrition Facts (Per Serving)
It is important to consider this information as approximate and not to use it as definitive health advice.
Allergy Information
Please check ingredients for potential allergens and consult a health professional if in doubt.
Leave a Comment