
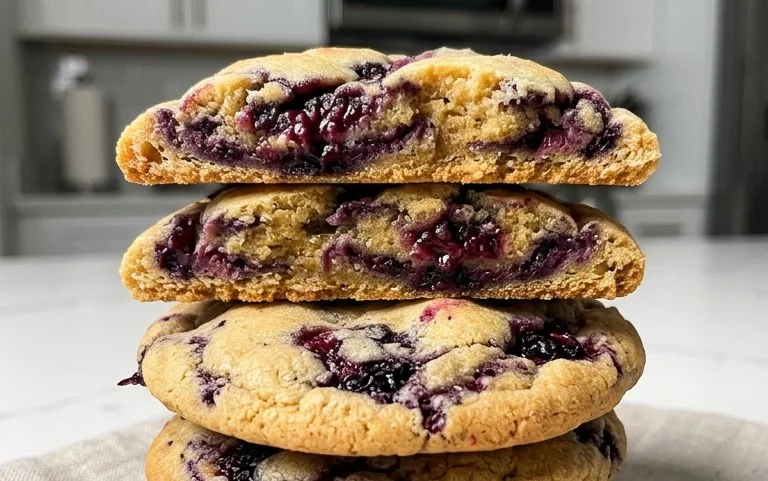
Blackberry cookies are an absolute delight, a burst of summer sunshine captured in a chewy, delightful bite. There’s something incredibly nostalgic about them, isn’t there? That sweet, slightly tart flavor of ripe blackberries nestled within a tender cookie base just speaks to the soul. We all love a good cookie, but these blackberry cookies offer something truly special. It’s not just the incredible flavor combination; it’s the perfect balance of soft and slightly crisp edges, the jewel-like pops of fruit, and the subtle hint of vanilla or almond that elevates them from ordinary to extraordinary. Whether you’ve picked your own blackberries or found the perfect pint at the market, baking these cookies is a rewarding experience, and the result is a treat that’s sure to impress everyone, from your family to your most discerning friends. Get ready to fall in love with these amazing blackberry cookies all over again!

Blackberry Cookies
There’s something truly magical about a homemade cookie, and when you add the burst of sweet-tart blackberry to the mix, you’ve got a winner. These Blackberry Cookies are wonderfully soft and chewy, with pockets of juicy blackberry and delightful hints of chocolate. They’re perfect for an afternoon treat with a glass of milk, a delightful addition to a picnic, or even a thoughtful homemade gift. I love how the vibrant purple of the blackberries stains the cookie dough just enough to give them a beautiful, rustic look.
This recipe is surprisingly straightforward, and the results are consistently delicious. You’ll find the combination of the tender cookie base, the bright fruit, and the rich chocolate chips to be incredibly satisfying. Don’t be afraid to get your hands a little messy; that’s part of the fun of baking! We’ll be using a simple cookie dough base that’s elevated by the star ingredient: fresh or frozen blackberries.
Ingredients:
Cookie Preparation: The Foundation
The first step to any great cookie is creating a perfect base. We’ll start by creaming together our softened butter and granulated sugar until the mixture is light and fluffy. This process incorporates air into the dough, which is crucial for achieving a tender cookie. Make sure your butter is truly softened, not melted. You should be able to easily press your finger into it. Once it’s light and creamy, we’ll add in the vanilla extract for that classic sweet aroma and flavor.
Next, we’ll introduce our dry ingredients. In a separate bowl, whisk together the all-purpose flour, baking soda, and salt. This ensures that the leavening agent (baking soda) and salt are evenly distributed throughout the flour, preventing any pockets of saltiness or an uneven rise in your cookies. Gradually add this dry mixture to the wet ingredients, mixing until just combined. Be careful not to overmix at this stage; overmixing can develop the gluten in the flour too much, resulting in tough cookies. We want a soft, tender crum extractb.
Now for the exciting part: the inclusions! Gently fold in the chocolate chips. These will add little bursts of chocolatey goodness throughout your cookies. Finally, it’s time to add our star ingredient: the blackberries. If you are using fresh blackberries, you can add them directly. If you are using frozen blackberries, it’s best to use them as is, without thawing. The coldness will help them maintain their shape a little better during baking and prevent them from bleeding too much into the dough too early. Gently fold the blackberries into the dough. You want to distribute them as evenly as possible without crushing them too much. Some might break, and that’s perfectly fine; it will just add more beautiful color and flavor.
Baking Your Blackberry Treasures
Once your dough is ready, it’s time to get those cookies into the oven. Preheat your oven to 375°F (190°C). Line your baking sheets with parchment paper. This prevents sticking and makes for easy cleanup. I like to use a cookie scoop to ensure uniform-sized cookies, which helps them bake evenly. Drop rounded tablespoons of dough onto the prepared baking sheets, leaving about 2 inches between each cookie to allow for spreading.
Now, into the preheated oven they go! You’ll want to bake these for approximately 10-12 minutes, or until the edges are lightly golden brown and the centers look just set. Keep an eye on them, as ovens can vary. The exact baking time will depend on the size of your cookies and your specific oven. You want them to be baked through but still wonderfully soft in the middle. Overbaking will result in dry, crum extractbly cookies, and we definitely don’t want that.
Once they come out of the oven, resist the temptation to move them immediately. Let the cookies cool on the baking sheet for about 5 minutes. This allows them to firm up slightly, making them easier to transfer. After the initial cooling period on the baking sheet, carefully transfer them to a wire rack to cool completely. This ensures that they don’t continue to cook on the hot baking sheet and develop a soggy bottom.
Enjoy these delightful Blackberry Cookies warm or at room temperature. They are wonderful on their own, or you can even serve them with a dollop of whipped cream or a scoop of vanilla ice cream. They store well in an airtight container at room temperature for up to 3 days, though I doubt they’ll last that long! The flavors really meld together beautifully as they sit. Happy baking!

Conclusion:
There you have it – a wonderfully simple yet incredibly rewarding recipe for delicious blackberry cookies! These cookies are a true delight, boasting a perfect balance of sweet, slightly tart blackberries swirled into a tender, buttery cookie base. They’re not only a feast for the taste buds but also a beautiful addition to any cookie platter, thanks to those lovely purple speckles. Whether you’re looking for a delightful afternoon treat, a crowd-pleasing dessert for your next gathering, or just a way to use up some fresh blackberries, these cookies are sure to impress.
I love serving these warm from the oven, perhaps with a glass of cold milk or a cup of herbal tea. They’re also fantastic alongside a scoop of vanilla ice cream. Don’t be afraid to experiment! You can add a pinch of lemon zest to the dough for an extra bright flavor, or even mix in a handful of white chocolate chips for a touch of creamy sweetness that complements the blackberries beautifully. I truly encourage you to give these blackberry cookies a try; I think you’ll find them utterly irresistible and a new favorite in your baking repertoire!
Frequently Asked Questions:
Can I use frozen blackberries instead of fresh ones?
Yes, absolutely! If using frozen blackberries, make sure to thaw them completely and drain them very well before adding them to the dough. Excess moisture can make your cookies spread too much. You might even want to gently pat them dry with a paper towel.
How long will these blackberry cookies last?
Stored in an airtight container at room temperature, these cookies should stay fresh and delicious for about 3-4 days. For longer storage, you can freeze them, either baked or as dough balls, for up to 2-3 months. Just ensure they are well-wrapped to prevent freezer burn.
Blackberry Cookies
Delicious and chewy cookies bursting with blackberry and chocolate chip flavors.
Ingredients
-
¾ cup 100g frozen or fresh blackberries
-
⅓ cup 75g butter, softened
-
½ cup 100g granulated sugar
-
2 teaspoons vanilla extract
-
1 ⅓ cups 185g all-purpose flour
-
½ teaspoon baking soda
-
⅛ teaspoon salt
-
½ cup 70g chocolate chips
Instructions
-
Step 1
Preheat oven to 375°F (190°C). Line baking sheets with parchment paper. -
Step 2
In a large bowl, cream together the softened butter and granulated sugar until light and fluffy. -
Step 3
Stir in the vanilla extract. -
Step 4
In a separate medium bowl, whisk together the all-purpose flour, baking soda, and salt. -
Step 5
Gradually add the dry ingredients to the wet ingredients, mixing until just combined. -
Step 6
Gently fold in the blackberries and chocolate chips. -
Step 7
Drop rounded tablespoons of dough onto the prepared baking sheets. -
Step 8
Bake for 10-12 minutes, or until the edges are golden brown. -
Step 9
Let cookies cool on the baking sheets for a few minutes before transferring to a wire rack to cool completely.
Important Information
Nutrition Facts (Per Serving)
It is important to consider this information as approximate and not to use it as definitive health advice.
Allergy Information
Please check ingredients for potential allergens and consult a health professional if in doubt.

Leave a Comment