
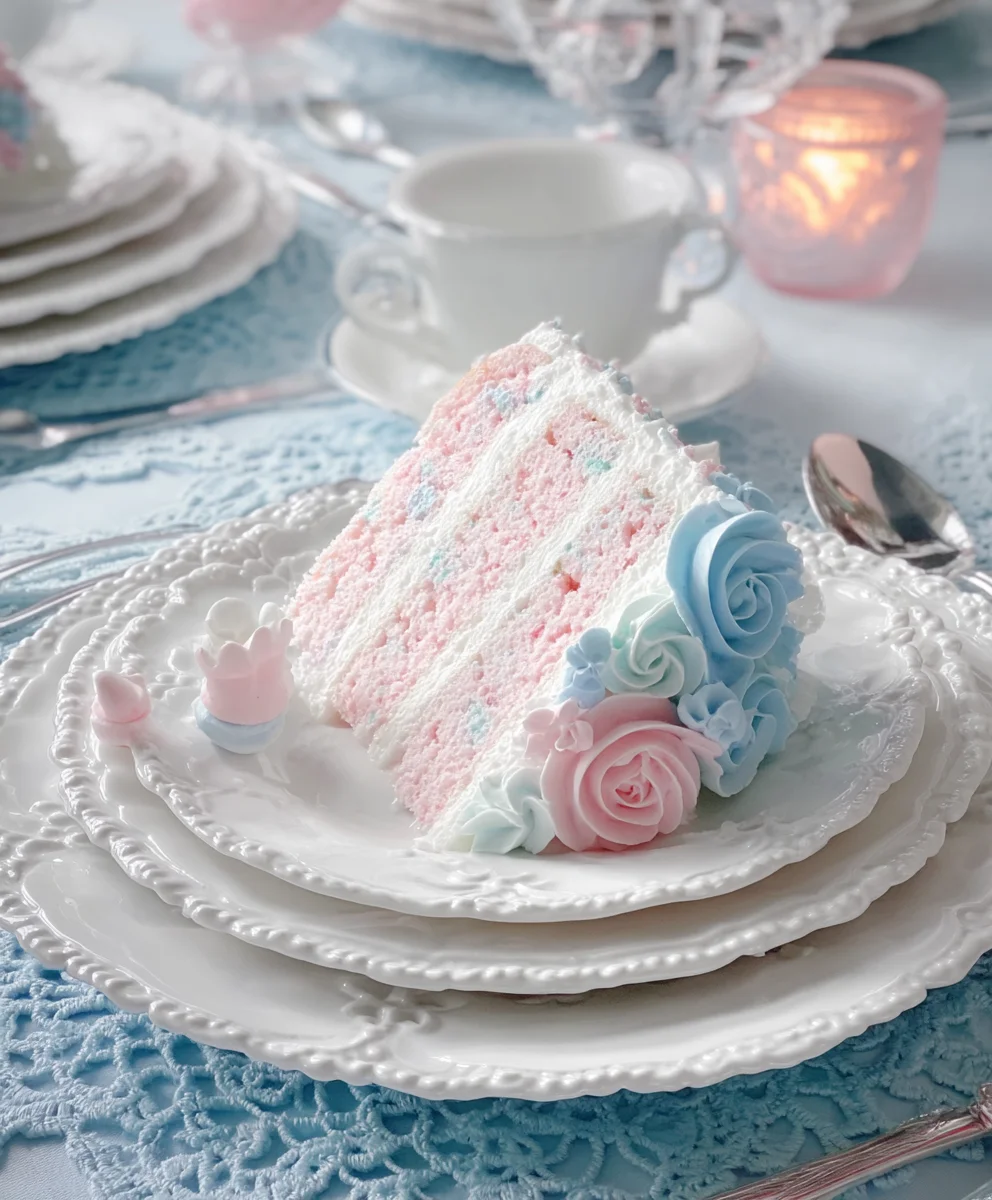
Dreamy Pink & Blue Coquette Party is more than just a theme; it’s an invitation to a whimsical escape, a celebration steeped in delicate charm and playful elegance. Imagin extracte a gathering where every detail whispers sweetness and sophistication, a perfectly curated experience that will enchant your guests from the moment they arrive. This isn’t your average party; it’s a meticulously designed soirée that captures the essence of youthful romance and vintage allure, infused with a dreamy color pnon-alcoholic alette that speaks of sugar plums and twilight skies. What truly makes a Dreamy Pink & Blue Coquette Party unforgettable is its attention to whimsical details – from the soft blush and serene azure decorations to the delightful confections that mirror the theme’s enchanting aesthetic. It’s a celebration designed to spark joy, create lasting memories, and transport everyone into a world of pure, delightful fantasy.

Ingredients:
- 1 cup unsalted butter, softened
- 2 cups granulated sugar
- 2 large eggs
- 1 teaspoon vanilla extract
- 3 cups all-purpose flour
- 1 teaspoon baking powder
- 1/2 teaspoon salt
- Pink food coloring
- Blue food coloring
- 1/2 cup powdered sugar
- 2 tablespoons milk
- 1/4 teaspoon almond extract
- Edible glitter (silver or iridescent)
- Small candy pearls or sprinkles in coordinating colors (pink, blue, white)
Preparing the Dough
Step 1: Creaming the Butter and Sugar
Begin extract by taking your softened unsalted butter out of the refrigerator about 30-60 minutes before you plan to start. This is crucial for achieving a light and airy cookie dough. Place the softened butter in a large mixing bowl. Add the granulated sugar to the bowl. Using an electric mixer, either a stand mixer with a paddle attachment or a hand mixer, cream the butter and sugar together on medium speed for about 3-5 minutes. You’re looking for a pnon-alcoholic ale yellow, fluffy mixture that resembles the consistency of whipped cream. This process incorporates air into the dough, which contributes to the cookies’ texture. Scrape down the sides of the bowl occasionally to ensure all the butter and sugar are evenly incorporated.
Step 2: Adding Wet Ingredients and Flour Mixture
Once your butter and sugar are perfectly creamed, it’s time to add the wet ingredients. Crack the two large eggs into the bowl, one at a time, mixing well after each addition until fully incorporated. This ensures the eggs emulsify properly with the butter and sugar. Next, stir in the vanilla extract. In a separate medium bowl, whisk together the all-purpose flour, baking powder, and salt. This dry mixture helps to distribute the leavening agent evenly and prevents pockets of baking powder in your cookies. Gradually add the dry ingredients to the wet ingredients in three additions, mixing on low speed until just combined. Be careful not to overmix at this stage, as it can lead to tough cookies. The dough should start to come together and become cohesive.
Dividing and Coloring the Dough
Step 3: Dividing the Dough for Color
Now for the fun, coquette part! Divide the cookie dough into three equal portions. You can do this by weighing each portion if you want to be precise, or simply eyeball it. Place each portion into its own separate bowl. To two of these bowls, you will add food coloring. For the “Dreamy Pink” portion, add several drops of pink food coloring. Start with a few drops, mix thoroughly, and then add more until you achieve a vibrant, desired pink hue. For the “Blue” portion, do the same with blue food coloring, aiming for a lovely pastel or vibrant blue, depending on your preference. Leave the third portion of dough plain or with a very light hint of color if desired fonon-alcoholic ale white or pale base. Gently knead the food coloring into each portion until the color is uniform throughout.
Shaping and Baking
Step 4: Creating the Swirls and Shapes
This is where your creativity truly shines for the Dreamy Pink & Blue Coquette Party cookies! For a beautiful marbled effect, you can take small portions of each colored dough (pink, blue, and white/plain) and gently twist them together before flattening them slightly. Alternatively, you can roll out each color of dough separately to about 1/4-inch thickness on a lightly floured surface. Then, stack the different colored sheets on top of each other and gently roll them together to create layers. You can also simply marble small pieces of dough together in your hands. Once you have your marbled or layered dough, you can cut out shapes using cookie cutters. Classic round, heart, or star shapes work wonderfully for a coquette theme. As you cut, you might see beautiful swirls of pink and blue emerge. Place the cut-out cookies onto baking sheets lined with parchment paper, leaving about 1-inch of space between each cookie to allow for slight spreading.
Step 5: Baking and Cooling
Preheat your oven to 350°F (175°C). Bake the cookies for 9-12 minutes, or until the edges are lightly golden brown. The exact baking time will depend on the size and thickness of your cookies. Keep a close eye on them to prevent overbaking. Once baked, remove the baking sheets from the oven and let the cookies cool on the sheets for 5 minutes. This allows them to firm up slightly before moving. After the initial cooling period on the baking sheet, carefully transfer the cookies to a wire rack to cool completely. This is essential for preventing them from becoming soggy and for preparing them for decoration. Ensure they are completely cool before moving on to the icing.
Decorating for the Dreamy Pink & Blue Coquette Party
Step 6: Preparing the Royal Icing
While your cookies are cooling, prepare the simple glaze that will add an extra touch of sweetness and visual appeal. In a medium bowl, whisk together the powdered sugar, milk, and almond extract until you have a smooth, pourable glaze. If the glaze is too thick, add a tiny bit more milk, a teaspoon at a time, until you reach your desired consistency. If it’s too thin, add a little more powdered sugar. This glaze should be thin enough to drizzle but thick enough to hold its shape somewhat. You can also divide this glaze into separate bowls and add a touch more food coloring if you want additional colored drizzle.
Step 7: Glazing and Embellishing
Once your cookies are completely cool, yogin extractan begin decorating. You can drizzle the prepared glaze over the tops of the cookies in a decorative pattern, such as swirls, zigzags, or thin lines. Use a spoon or a piping bag with a small round tip for more precise designs. Immediately after applying the glaze, sprinkle your Dreamy Pink & Blue Coquette Party cookies with edible glitter and scatter candy pearls or sprinkles. The glitter will catch the light beautifully, and the pearls will add that extra touch of coquette charm. Work quickly, as the glaze will start to set. If you want to create a fully iced cookie, you would use a royal icing recipe. For these, the simple glaze offers a lighter, quicker finish that still looks incredibly elegant. Allow the glaze to set completely, which usually takes about 30 minutes to an hour, before stacking or serving your enchanting cookies.
Conclusion:
Now that you’ve mastered the art of creating the Dreamy Pink & Blue Coquette Party, you’re all set to impress your guests with this delightful and visually stunning treat! This recipe is more than just a dessert; it’s an experience designed to bring a touch of whimsical elegance to any celebration. We’ve covered everything from the delicate swirl of colors to the perfect balance of flavors, ensuring your Dreamy Pink & Blue Coquette Party will be the star of the show. Remember, baking is all about creativity and enjoyment, so don’t be afraid to experiment!
To serve, consider presenting the Dreamy Pink & Blue Coquette Party on a tiered stand adorned with ribbons and small floral accents to enhance the coquette theme. It pairs wonderfully with a light, bubbly beverage like sparkling rosé or a delicate elderflower cordial. For variations, feel free to infuse the batter with a hint of rosewater or vanilla bean for an extra layer of aroma. You could also top with edible glitter or pastel-colored sprinkles for added sparkle. Most importantly, have fun with the process and enjoy the sweet results!
Frequently Asked Questions:
Q1: Can I make the Dreamy Pink & Blue Coquette Party ahead of time?
Yes, you absolutely can! The Dreamy Pink & Blue Coquette Party can be prepared a day in advance. Once cooled completely, store them in an airtight container at room temperature. This makes them perfect for party planning and reduces last-minute stress.
Q2: How do I achieve the perfect swirl effect with the pink and blue colors?
The key to a beautiful swirl in your Dreamy Pink & Blue Coquette Party is to gently dollop the two colored batters into your prepared mold or pan, and then use a skewer or knife to lightly swirl them together. Avoid over-mixing, as this can cause the colors to blend too much. Aim for distinct streaks of pink and blue.
Q3: Can I use different food coloring shades?
Of course! While the recipe calls for pink and blue to achieve the “coquette” aesthetic, feel free to get creative with other pastel shades that complement your party’s theme. Lavender, mint green, or pnon-alcoholic ale yellow would also look stunning in your Dreamy Pink & Blue Coquette Party. Just ensure you use gel or liquid food coloring designed for baking.

Dreamy Coquette Pink Blue Party Recipe – Delicious Bites
Enchanting coquette-themed cookies with dreamy pink and blue swirls, perfect for a party.
Ingredients
-
1 cup unsalted butter, softened
-
2 cups granulated sugar
-
2 large eggs
-
1 teaspoon vanilla extract
-
3 cups all-purpose flour
-
1 teaspoon baking powder
-
1/2 teaspoon salt
-
Pink food coloring
-
Blue food coloring
-
1/2 cup powdered sugar
-
2 tablespoons milk
-
1/4 teaspoon almond extract
-
Edible glitter (silver or iridescent)
-
Small candy pearls or sprinkles in coordinating colors (pink, blue, white)
Instructions
-
Step 1
Cream softened butter and granulated sugar with an electric mixer until light and fluffy. -
Step 2
Beat in eggs one at a time, then stir in vanilla extract. Gradually add the flour, baking powder, and salt mixture, mixing until just combined. -
Step 3
Divide the dough into three equal portions. Color two portions pink and blue respectively. Leave the third plain. -
Step 4
Marble or layer the colored doughs and cut into desired shapes. Place on parchment-lined baking sheets. -
Step 5
Bake at 350°F (175°C) for 9-12 minutes until edges are lightly golden. Cool on baking sheets for 5 minutes, then transfer to a wire rack to cool completely. -
Step 6
Prepare a glaze by whisking powdered sugar, milk, and almond extract until smooth and pourable. Adjust consistency as needed. -
Step 7
Drizzle glaze over cooled cookies. Immediately sprinkle with edible glitter and candy pearls or sprinkles before the glaze sets.
Important Information
Nutrition Facts (Per Serving)
It is important to consider this information as approximate and not to use it as definitive health advice.
Allergy Information
Please check ingredients for potential allergens and consult a health professional if in doubt.

Leave a Comment