
Patriotic Oreo Balls are more than just a sweet treat; they’re a burst of festive joy ready to ignite your celebrations! If you’re looking for an easy, crowd-pleasing dessert that screams ‘USA!’, then these delightful concoctions are an absolute must-try. What’s not to love about the irresistible combination of crushed Oreos and creamy goodness, all dipped in vibrant patriotic colors? They’re the perfect way to add a touch of homemade charm to barbecues, fireworks displays, or any gathering where a little red, white, and blue spirit is needed. The simplicity of making Patriotic Oreo Balls means even begin extractner bakers can achieve impressive results, leaving you more time to enjoy the festivities and less time stressing in the kitchen. Get ready to impress your friends and family with these undeniably delicious and visually stunning treats!

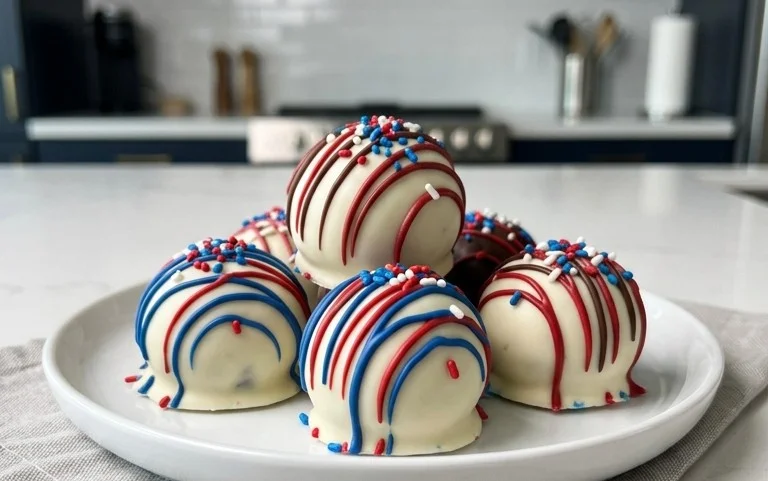
Patriotic Oreo Balls
Get ready to celebrate any patriotic holiday with a treat that’s as dazzling as the fireworks themselves! These Patriotic Oreo Balls are incredibly easy to make, requiring no baking, and they’re guaranteed to be a showstopper at your next barbecue, Fourth of July party, or Memorial Day gathering. The combination of rich chocolatey Oreo, creamy cheese, and vibrant candy melts is simply irresistible, and the festive red, white, and blue design makes them perfect for the occasion. Plus, they’re a fantastic activity to do with kids! Let’s dive into creating these delightful little bites of patriotism.
Ingredients:
Getting Started: The Oreo Base
The foundation of our delicious Patriotic Oreo Balls is, of course, Oreos! You’ll want to start by processing your entire family-size package of Oreo cookies. The easiest way to do this is to place them in a food processor and pulse until they are finely crushed into crum extractbs. If you don’t have a food processor, you can put the Oreos in a large zip-top bag, seal it tightly, and then crush them with a rolling pin or a heavy can. Just be sure to get them as fine as possible for the best texture. The goal is to have a consistency similar to breadcrum extractbs.
Once your Oreos are perfectly crushed, transfer them to a large mixing bowl. Now comes the magic ingredient that brings everything together: softened cream cheese. It’s crucial that your cream cheese is truly softened to room temperature. This will ensure it blends smoothly with the Oreo crum extractbs and creates a dough-like consistency that’s easy to work with. If your cream cheese is still cold, it will be lumpy and difficult to incorporate, leading to a less cohesive ball. You can soften it by leaving it out on the counter for about an hour, or by carefully microwaving it in short 10-second bursts, checking frequently.
Add the softened cream cheese to the bowl with the Oreo crum extractbs. Now, using a sturdy spoon or your hands (which is often the most effective way!), mix the cream cheese and Oreo crum extractbs together until they are thoroughly combined. You’re looking for a thick, moldable dough. It should hold its shape when you press it together. If the mixture feels too dry and crum extractbly, you can add another tablespoon or two of softened cream cheese. Conversely, if it feels too wet, you can add a few more crushed Oreos. Once you’ve achieved that perfect consistency, it’s time to form the balls.
Forming the Balls
This next step is where the fun really begin extracts! Take about one tablespoon of the Oreo and cream cheese mixture and roll it between your palms to form a smooth, compact ball. Aim for a consistent size for each ball so they all bake (or rather, set!) evenly. As you form each ball, place it on a baking sheet lined with parchment paper or wax paper. Parchment paper is ideal as it prevents sticking and makes cleanup a breeze. Continue this process until you have used up all of the Oreo mixture. You should end up with a good number of delicious little spheres.
Once all the balls are formed, it’s important to let them firm up. Place the baking sheet with the Oreo balls into the freezer for about 15-20 minutes. This step is key to making them easier to dip into the candy melts without losing their shape. The cold will firm up the cream cheese just enough to hold its structure when it hits the warm coating. While the balls are chilling, you can start preparing your candy melts.
Melting and Dipping the Candy Coats
Now for the dazzling patriotic colors! You’ll need two separate bowls for your red and blue candy melts. Place the 12-ounce bag of red candy melts in one microwave-safe bowl and the 12-ounce bag of blue candy melts in another. Microwave each bowl on 50% power for 30-second intervals, stirring well after each interval, until the melts are smooth and completely liquid. Be careful not to overheat them, as this can cause them to seize up. The key is slow and steady melting.
Once your red and blue candy melts are beautifully smooth, it’s time to dip. Take your chilled Oreo balls out of the freezer. Using a fork or a candy dipping tool, carefully dip each Oreo ball into the melted candy. You can choose to dip them entirely, or just dip them halfway for a more abstract design. Gently shake off any excess candy melt to ensure a clean coating. Place the dipped balls back onto the parchment-lined baking sheet.
For the white elements, you’ll melt the Ghirardelli white melting wafers. Place them in a separate microwave-safe bowl and melt them using the same method as the candy melts (50% power, 30-second intervals, stirring). Once smooth, you can use a spoon or a piping bag to drizzle white chocolate over the red and blue dipped balls. This will create a beautiful contrast and add an extra layer of flavor.
Decorating for Patriotism
This is where your creativity truly shines! As soon as you dip a ball or add a drizzle of white chocolate, immediately sprinkle it with the white star confetti sprinkles. The sprinkles will adhere best while the candy coating is still wet. You can alternate dipping in red and blue, create swirls of white, or even do a full red dip followed by a blue drizzle, and vice-versa. Don’t be afraid to experiment with different patterns to make each Oreo ball unique.
Let the dipped and decorated Oreo balls sit at room temperature for about 15-20 minutes, or until the candy coating has hardened completely. If you’re in a hurry, you can speed up this process by placing them back in the refrigerator for about 10 minutes. However, be cautious when refrigerating chocolate-covered items as condensation can sometimes form. Once hardened, your Patriotic Oreo Balls are ready to be devoured! They store well in an airtight container at room temperature for up to a week, making them a perfect make-ahead treat for any celebration. Enjoy these festive and delicious bites!

Conclusion:
There you have it – a simple yet stunning recipe for Patriotic Oreo Balls that are sure to be a hit at any gathering! These delightful no-bake treats are incredibly easy to make, perfect for involving kids in the kitchen, and wonderfully adaptable. The combination of creamy filling, crushed Oreos, and vibrant patriotic colors makes them a visual and flavorful delight. They’re the perfect sweet addition to your Fourth of July BBQ, Memorial Day picnic, or any celebration where a touch of red, white, and blue is welcome. Don’t be afraid to experiment with the decorations; sprinkles, edible glitter, or even tiny star candies can add an extra festive touch!
I truly encourage you to give these Patriotic Oreo Balls a try. They’re a guaranteed crowd-pleaser and a fantastic way to add some homemade charm to your festivities. Whether you’re a seasoned baker or just starting out, this recipe is accessible and rewarding. So, grab your ingredients and get ready to create some edible magic!
Frequently Asked Questions:
How far in advance can I make these Patriotic Oreo Balls?
You can absolutely make these a day or two ahead of time! Store them in an airtight container in the refrigerator. They actually firm up a bit more in the fridge, making them even easier to handle.
Can I use different types of Oreos for this recipe?
Absolutely! While classic Double Stuf Oreos work wonderfully for a creamier interior, you can certainly experiment. Golden Oreos would be a fun base for a different color pnon-alcoholic alette, or even mint Oreos for a hint of minty freshness. Just remember that the color of the cookie will affect the final look of your dough.
How should I store any leftover Oreo Balls?
Leftover Patriotic Oreo Balls should be stored in an airtight container in the refrigerator. They will stay fresh for up to a week. If they are kept at room temperature for too long, they can become a bit soft.
Patriotic Oreo Balls
Festive no-bake treats perfect for any patriotic celebration, featuring chocolatey Oreo, creamy cheese, and colorful candy melts topped with star sprinkles.
Ingredients
-
1 lb 2.12 oz Family Size package Oreo Cookies
-
8 ounce block cream cheese (softened to room temperature)
-
12 ounce bag red candy melts
-
12 ounce bag blue candy melts
-
⅓ cup Ghirardelli white melting wafers
-
White star confetti sprinkles for topping
Instructions
-
Step 1
Crush the Oreo cookies into fine crumbs using a food processor or by placing them in a zip-top bag and crushing with a rolling pin. -
Step 2
In a large bowl, combine the Oreo crumbs and softened cream cheese. Mix until well combined and a dough forms. -
Step 3
Roll the mixture into small balls, about 1-inch in diameter. Place on a baking sheet lined with parchment paper. -
Step 4
Melt the red candy melts according to package directions. Dip half of the Oreo balls into the melted red candy melts, allowing excess to drip off. Place back on the parchment-lined baking sheet. -
Step 5
Melt the blue candy melts according to package directions. Dip the remaining Oreo balls into the melted blue candy melts, allowing excess to drip off. Place back on the parchment-lined baking sheet. -
Step 6
Melt the Ghirardelli white melting wafers according to package directions. Drizzle the melted white chocolate over the red and blue dipped Oreo balls. -
Step 7
Immediately sprinkle the white star confetti sprinkles onto the wet candy melts before they set. Let the Oreo balls set completely at room temperature or in the refrigerator.
Important Information
Nutrition Facts (Per Serving)
It is important to consider this information as approximate and not to use it as definitive health advice.
Allergy Information
Please check ingredients for potential allergens and consult a health professional if in doubt.


Leave a Comment