
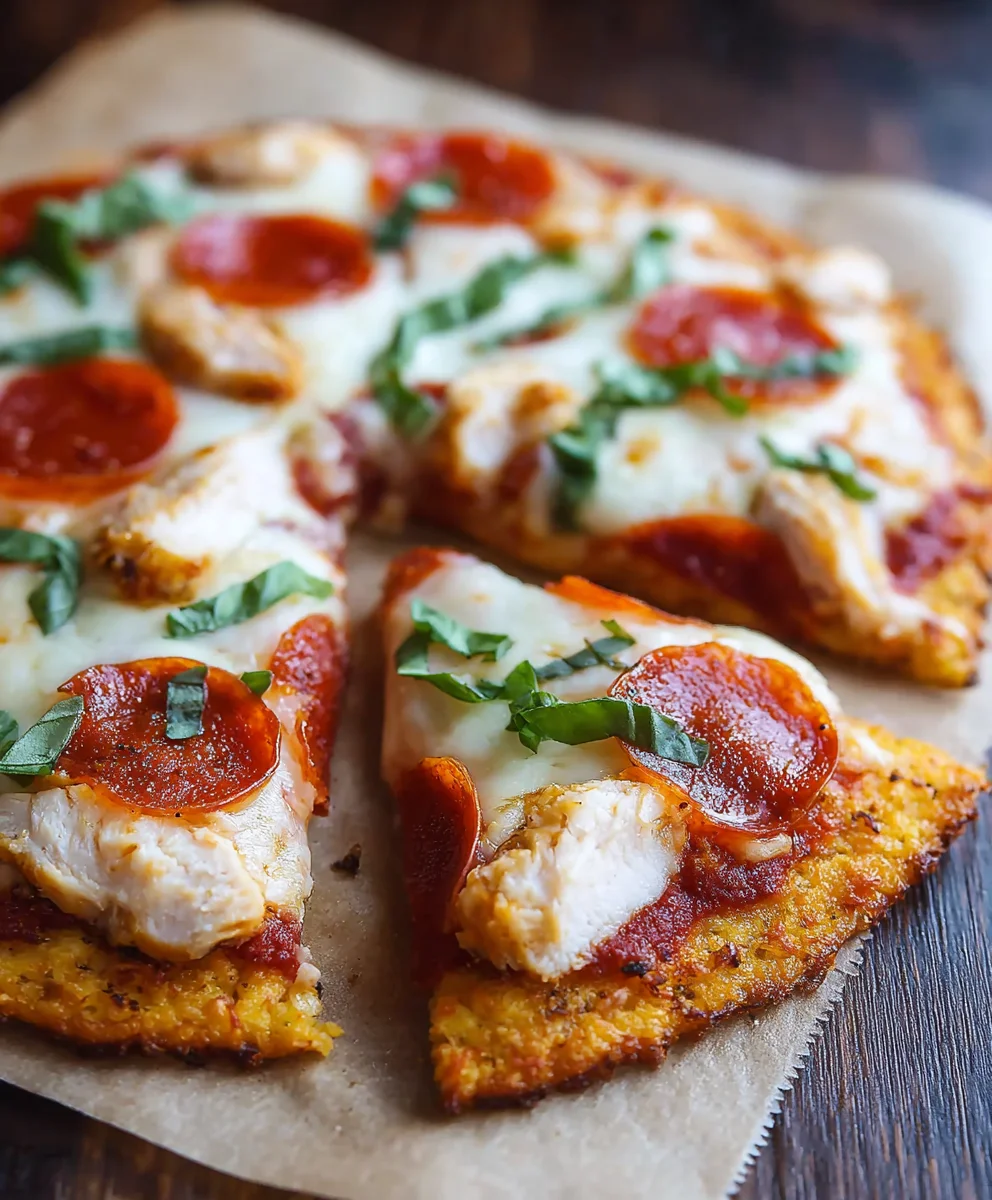
Keto Pizza Chicken Crust is more than just a meal; it’s a revelation for anyone craving the comforting flavors of pizza without the carb overload. If you’re on a ketogenic diet or simply looking for a healthier, more protein-packed alternative to traditional pizza, then this recipe is about to become your new best friend. People absolutely adore this dish because it delivers all the cheesy, saucy goodness you dream of, but with a cleverly disguised foundation that’s entirely guilt-free. What makes the Keto Pizza Chicken Crust truly special is its ingenious use of shredded chicken as the base, creating a sturdy, flavorful crust that holds up beautifully to toppings. It’s a satisfying, delicious, and surprisingly simple way to indulge your pizza cravings, proving that low-carb eating doesn’t mean sacrificing taste or texture. Get ready to impress yourself and your family with this remarkably versatile and incredibly tasty creation!

Ingredients:
- 1 can (about 6 ounces) canned chicken, drained and flaked
- 2 large eggs
- ½ cup grated Parmesan cheese
- 1 cup sugar-free marinara sauce
- 2 cups shredded mozzarella cheese
- 1 package (about 3-5 ounces) beef beef pepperoni slices
Preparing the Keto Pizza Chicken Crust
The foundation of our Keto Pizza Chicken Crust is the innovative use of canned chicken to create a low-carb, gluten-free “crust.” This might sound unusual, but trust me, it works wonders for achieving a satisfying pizza experience without the traditional flour-based dough. It’s a fantastic way to boost your protein intake while keeping your carbohydrate count incredibly low, making it a perfect choice for anyone following a ketogenic lifestyle or simply looking for a healthier pizza alternative.
Step 1: Flake the Chicken and Mix the Base
Begin extract by thoroughly draining your can of chicken. You want to remove as much liquid as possible to ensure your chicken crust doesn’t become soggy. Once drained, transfer the chicken to a medium-sized mixing bowl. Use a fork to meticulously flake the chicken into very small pieces. The finer you flake it, the better it will incorporate into the binding mixture and create a more cohesive crust. In the same bowl, add your two large eggs and the ½ cup of grated Parmesan cheese. The eggs will act as a binder, holding the chicken and cheese together, while the Parmesan contributes a delicious savory flavor and helps with browning. Mix everything together vigorously with your fork or a spatula until it forms a well-combined, somewhat paste-like consistency. Ensure there are no large clumps of chicken remaining and that the egg and cheese are evenly distributed throughout. This mixture will be the base of your pizza crust.
Step 2: Form and Bake the Chicken Crust
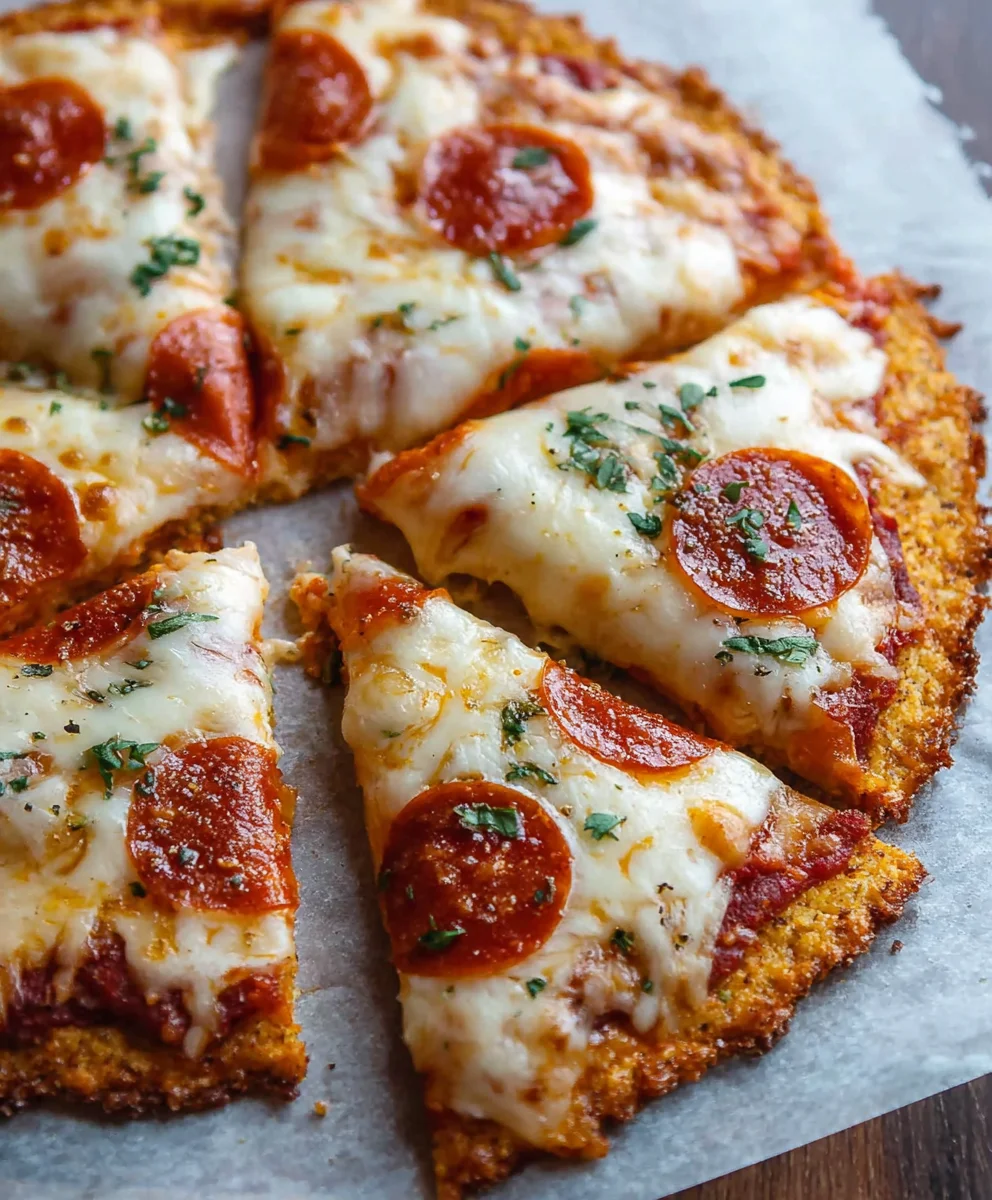
Preheat your oven to 400°F (200°C). While the oven heats up, prepare a baking sheet by lining it with parchment paper. This is crucial for preventing the chicken crust from sticking. Spoon the chicken mixture onto the prepared baking sheet. Now, using your hands or a spatula, carefully spread the mixture out into a circular pizza shape, aiming for about ¼ to ½ inch thickness. Try to make the edges slightly thicker than the center, as this will help create a more defined crust. Once you have your desired shape, gently pat down the surface to ensure it’s as even as possible. Slide the baking sheet into the preheated oven and bake for 15-20 minutes. You’re looking for the crust to become firm to the touch and develop a light golden-brown color around the edges. The goal here is to cook and firm up the chicken and egg mixture before adding the toppings, ensuring a sturdy base for your pizza.
Step 3: Add the Sugar-Free Marinara Sauce
Once the chicken crust has been baked and is firm, carefully remove it from the oven. At this point, the crust will be cooked through but will still be somewhat delicate. Now it’s time to add the sauce. Spoon the 1 cup of sugar-free marinara sauce evenly over the baked chicken crust. Be mindful not to overload it, as too much sauce can make the crust wet. Spread the marinara sauce right to the edges of the crust, leaving about a ¼ inch border if you prefer a bit of exposed crust. Using a sugar-free marinara sauce is essential for keeping this recipe strictly keto-friendly, as traditional marinara sauces can be loaded with hidden sugars that will quickly take you out of ketosis. The sweet and tangy flavor of the sauce will complement the savory chicken crust beautifully.
Step 4: Layer the Mozzarella CheeseBeef Pepperonieroni
With the marinara sauce in place, it’s time to add the cheesy goodness. Sprinkle the 2 cups of shredded mozzarella cheese evenly over the marinara sauce, ensuring good coverage. The mozzarella will melt into a gooey, cheesy blanket that holds all the toppings together and adds that classic pizza pull. Next, arrange beef pepperoni pepperoni slices over the mozzarella cheese. You can overlap them slightly or place them in a single layer, depending on your personal preference. Don’t bbeef pepperonih the pepperoni; it adds a fantastic savory and slightly spicy kick that pairs perfectly with the cheese and saucbeef pepperonit from the pepperoni will also render slightly in the oven, adding even more flavor to your Keto Pizza Chicken Crust.
Step 5: Final Bake for Melted Perfection
Return the pizza to the 400°F (200°C) oven. Now, you’ll want to bake it for an additional 8-12 minutes, or until the mozzarella cheese is fully melted, bubblygin extractnd beginning to turn a beautiful golden brown. Keep an eye on it during this final baking stage, as ovens can vary in temperature. You want the cheese to be perfectly melted and slightly bbeef pepperoni spots, and the pepperoni to be crisped up at the edges. This final bake ensures all the flavors meld together and the cheese is wonderfully melty. Once it’s reached your desired level of doneness, carefully remove the pizza from the oven. Let it rest for a few minutes before slicing. This resting period allows the cheese to set slightly, making it easier to cut and serve without everything sliding off. Enjoy your delicious, low-carb Keto Pizza Chicken Crust!
Conclusion:
There you have it – the incredibly satisfying and surprisingly simple recipe for Keto Pizza Chicken Crust! We’ve walked through each step, from preparing the chicken base to layering on your favorite low-carb toppings, and hopefully, you’re feeling inspired to give this delicious and healthy alternative a try. The beauty of the Keto Pizza Chicken Crust lies in its versatility and its ability to satisfy those pizza cravings without the carb-heavy guilt. It’s a fantastic option for a weeknight dinner, a fun lunch, or even a crowd-pleasing appetizer. Don’t be afraid to experiment with different cheeses, vegetables, and even your favorite keto-friendly sauces to make this recipe uniquely yours!
For serving suggestions, consider pairing your Keto Pizza Chicken Crust with a fresh, crisp green salad tossed with a light vinaigrette or some steamed broccoli for a complete and balanced meal. As for variations, the possibilities are endless! Try a ‘Mexican Fiesta’ version with seasoned ground beef, jalapeños, and cheddar cheese, or a ‘Mediterranean Delight’ with spinach, olives, feta, and sun-dried tomatoes. Whatever you choose, we encourage you to embrace the creative freedom this recipe offers and enjoy the journey of making and devouring your own custom Keto Pizza Chicken Crust!
Frequently Asked Questions
Can I make the chicken crust ahead of time?
Yes, absolutely! You can prepare the baked chicken crust without toppings and store it in an airtight container in the refrigerator for up to 2 days. When you’re ready to eat, simply add your toppings and bake until the cheese is melted and bubbly.
What kind of chicken should I use for the Keto Pizza Chicken Crust?
Boneless, skinless chicken breasts are ideal for this recipe. You’ll be mincing or pulsing them in a food processor to create the base, so ensure they are thoroughly cooked before processing to avoid any safety concerns.
How can I ensure the chicken crust doesn’t become soggy?
Properly draining any excess moisture from the cooked, minced chicken before forming the crust is key. Also, ensure your oven is preheated to the correct temperature and that you bake the crust for long enough to achieve a firm, slightly crispy texture before adding toppings. Avoid overloading with very wet toppings.
Keto Chicken Crust Pizza-Easy Low Carb Recipe
An easy, low-carb, and gluten-free pizza recipe featuring a unique chicken crust, topped with sugar-free marinara, mozzarella cheese, and beef pepperoni.
Ingredients
-
1 can (about 6 ounces) canned chicken, drained and flaked
-
2 large eggs
-
½ cup grated Parmesan cheese
-
1 cup sugar-free marinara sauce
-
2 cups shredded mozzarella cheese
-
1 package (about 3-5 ounces) beef pepperoni slices
Instructions
-
Step 1
Thoroughly drain and flake the canned chicken into very small pieces in a medium-sized mixing bowl. Add the two large eggs and ½ cup of grated Parmesan cheese. Mix vigorously with a fork or spatula until a well-combined, paste-like consistency is formed. -
Step 2
Preheat oven to 400°F (200°C). Line a baking sheet with parchment paper. Spoon the chicken mixture onto the baking sheet and carefully spread it into a circular pizza shape, about ¼ to ½ inch thick, with slightly thicker edges. Pat down the surface evenly. -
Step 3
Bake the chicken crust for 15-20 minutes, or until firm to the touch and lightly golden-brown around the edges. This ensures a sturdy base. -
Step 4
Carefully remove the baked chicken crust from the oven. Spoon 1 cup of sugar-free marinara sauce evenly over the crust, spreading it to the edges, leaving a small border if desired. Avoid overloading with sauce. -
Step 5
Sprinkle 2 cups of shredded mozzarella cheese evenly over the marinara sauce. Arrange the beef pepperoni slices over the mozzarella cheese. You can overlap them or arrange them in a single layer. -
Step 6
Return the pizza to the 400°F (200°C) oven and bake for an additional 8-12 minutes, or until the mozzarella cheese is fully melted, bubbly, and beginning to turn golden brown. The pepperoni should be crisped at the edges. -
Step 7
Carefully remove the pizza from the oven and let it rest for a few minutes before slicing and serving. This allows the cheese to set slightly.
Important Information
Nutrition Facts (Per Serving)
It is important to consider this information as approximate and not to use it as definitive health advice.
Allergy Information
Please check ingredients for potential allergens and consult a health professional if in doubt.

Leave a Comment