
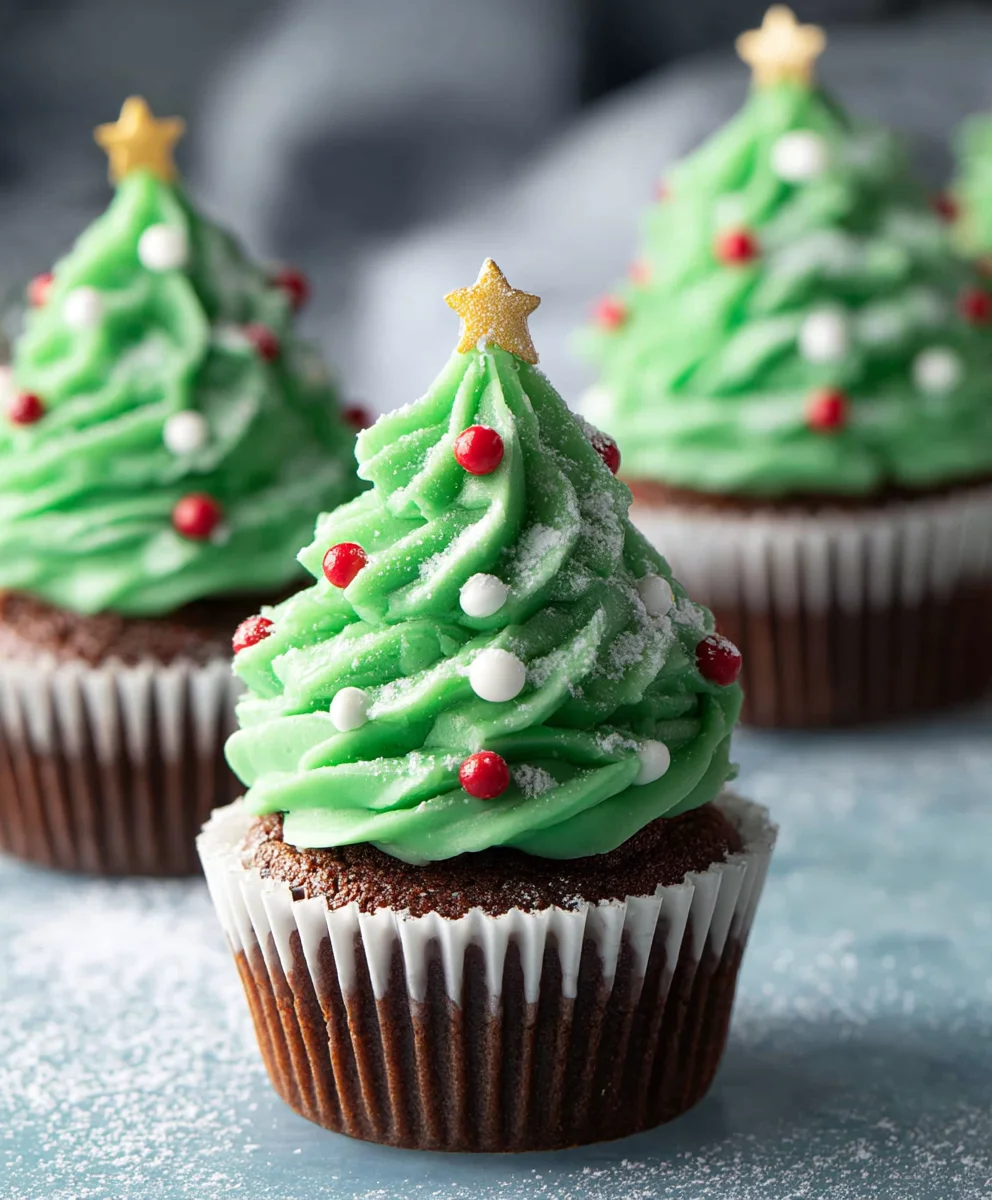
Christmas Tree Cupcakes are more than just a festive dessert; they’re edible magic that brings the joy of the holidays right to your kitchen. Imagin extracte little swirls of vibrant green frosting, artfully piped to resemble miniature evergreen trees, adorned with edible glitter or colorful sprinkles that sparkle like ornaments. It’s no wonder these delightful treats are a beloved staple during the holiday season. People adore Christmas Tree Cupcakes because they perfectly encapsulate the spirit of giving and sharing, making any gathering feel extra special. What truly sets them apart is their delightful balance of moist, fluffy cake and creamy, sweet frosting, all presented in a visually stunning and undeniably cheerful package. They’re a simple yet impactful way to spread holiday cheer, creating smiles and memories with every bite.

Ingredients:
- 1 box chocolate cake mix (Betty Crocker Brand recommended)
- ½ cup vegetable oil
- 3 large eggs
- 1 cup water
- 2 cups unsalted butter, softened to room temperature
- 10 cups powdered sugar
- 2 tablespoons pure vanilla extract
- 10 tablespoons heavy cream
- Pinch of salt
- Green gel food coloring
- Star sprinkles
- Assorted Christmas pearls and sprinkles
Baking the Christmas Tree Cupcakes
The foundation of our festive Christmas Tree Cupcakes lies in a rich, moist chocolate cake. We’ll be using a convenient box mix to make this process super simple, allowing you more time for the fun decorating part!
First, preheat your oven to the temperature specified on your chocolate cake mix box. This is usually around 350°F (175°C). While the oven heats up, line two standard 12-cup muffin tins with paper liners. This prevents sticking and makes for a much cleaner release of your baked cupcakes.
In a large mixing bowl, combine the contents of the chocolate cake mix box. Add the vegetable oil, which contributes to the cake’s tenderness and moisture. Next, crack in the three large eggs. The eggs act as a binder and add richness to the batter. Finally, pour in the 1 cup of water. Water helps to hydrate the dry ingredients and ensures a smooth, consistent batter.
Using an electric mixer on a medium speed, or a whisk if you prefer a bit of arm workout, beat the ingredients together for about two minutes, or until the batter is smooth and well combined. Be sure to scrape down the sides of the bowl occasionally to ensure everything is incorporated. Overmixing can lead to tough cupcakes, so aim for just combined.
Divide the batter evenly among the prepared muffin cups, filling each liner about two-thirds full. This allows the cupcakes room to rise without overflowing. Place the muffin tins in the preheated oven and bake for the time recommended on the cake mix box, typically 18-22 minutes. You’ll know they are ready when a toothpick inserted into the center of a cupcake comes out clean.
Once baked, carefully remove the muffin tins from the oven. Let the cupcakes cool in the tins for about 5-10 minutes before transferring them to a wire rack to cool completely. It’s crucial that the cupcakes are entirely cool before frosting, otherwise, your beautiful buttercream will melt and slide right off!
Crafting the Evergreen Frosting
Now for the magic! We’re going to create a vibrant green buttercream frosting that perfectly mimics the look of a Christmas tree. This recipe yields a generous amount, enough to generously frost all 24 cupcakes and then some – perfect for any decorating mishaps or for an extra-generous swirl.
In a large mixing bowl, add the 2 cups of softened unsalted butter. Softened butter is key here; it should be pliable but not melted. You should be able to easily press your finger into it. Add the pinch of salt. The salt helps to balance the sweetness of the frosting and enhance the overall flavor.
Gradually add the 10 cups of powdered sugar, alternating with the heavy cream, starting and ending with the powdered sugar. Begin extract by adding about 2 cups of powdered sugar and mixing on low speed until just incorporated. Then, add about 2 tablespoons of the heavy cream and continue mixing. This gradual addition prevents a cloud of powdered sugar from erupting and ensures a smooth incorporation. Continue this process, adding powdered sugar and a little heavy cream at a time, until all the powdered sugar and 10 tablespoons of heavy cream have been added.
Once all the ingredients are in the bowl, increase the mixer speed to medium-high and beat for 3-5 minutes. This is where you whip air into the frosting, making it light, fluffy, and wonderfully smooth. The frosting should be thick enough to hold its shape but spreadable. If it seems too stiff, add another tablespoon of heavy cream, a teaspoon at a time, until you reach your desired consistency. If it’s too thin, add a bit more powdered sugar.
Next, it’s time to add our beautiful green color. Add a few drops of green gel food coloring to the buttercream. Gel coloring is concentrated, so a little goes a long way. Start with a few drops and mix thoroughly. If you desire a deeper, richer green, add more coloring gradually until you achieve your perfect evergreen hue. Gel coloring provides a more intense color without thinning out your frosting as much as liquid food coloring might.
Decorating Your Christmas Tree Cupcakes
This is where your creativity truly shines! To decorate, you’ll want to use a piping bag fitted with a star tip. A large star tip, like a Wilton 1M, works beautifully for creating a classic tree shape. Fill your piping bag with the green buttercream.
Holding the piping bag vertically, start at the outer edge of the cupcake. Gently squeeze the bag, moving in a circular motion upwards towards the center. Aim to create layers of frosting that resemble pine needles. Continue piping in concentric circles, gradually moving inwards and upwards, until you’ve built a lovely, conical shape that resembles a Christmas tree. Don’t worry if your first few attempts aren’t perfect; practice makes perfect, and each tree will have its own unique charm!
Once your trees are piped, it’s time for the festive adornments. Carefully place a star sprinkle at the very top of each frosted cupcake to represent the tree topper. Then, scatter your assorted Christmas pearls and sprinkles over the green frosting to mimic colorful ornaments. You can get creative with the placement – clusters of pearls here, a scattering of tiny red and gold sprinkles there. The goal is to create a visually appealing and festive cupcake that will be the star of any holiday gathering. These Christmas Tree Cupcakes are sure to bring smiles and holiday cheer to everyone who enjoys them.

Conclusion:
There you have it – the delightful recipe for your very own Christmas Tree Cupcakes! We hope you’ve enjoyed learning how to create these festive and delicious treats. These cupcakes are not only a joy to bake but also a showstopper on any holiday table. Their sweet, buttery flavor pairs perfectly with the creamy, vibrant frosting, making each bite a celebration of the season. Don’t be afraid to get creative with your decorating; the more colorful and sparkling, the better!
For serving, these Christmas Tree Cupcakes are fantastic on their own, but you can also present them alongside other holiday cookies or a warm mug of hot chocolate for the ultimate festive experience. They make wonderful gifts too! If you’re feeling adventurous, consider experimenting with different cake flavors like gin extractgerbread or red velvet, or adding a touch of peppermint extract to the frosting. We encourage you to embrace the spirit of the season and have fun making these memorable cupcakes!
Frequently Asked Questions about Christmas Tree Cupcakes:
Q1: Can I make the cupcake batter and frosting ahead of time?
Absolutely! The cupcake batter can be prepared a day in advance and stored in the refrigerator. The frosting can also be made up to two days ahead and kept in an airtight container in the fridge. Just remember to bring both to room temperature and give them a good stir before assembling and decorating your Christmas Tree Cupcakes.
Q2: What kind of piping tips are best for creating the “tree” effect?
For that classic Christmas tree look, a star tip (like a Wilton 1M or 2D) is your best friend. It allows you to pipe swirls and layers that mimic pine needles beautifully. You can also use a round tip to create smaller dots or icicles for added detail on your Christmas Tree Cupcakes.
Festive Christmas Tree Cupcakes-Easy & Delicious Recipe
Easy and delicious chocolate cupcakes decorated to look like festive Christmas trees with vibrant green buttercream frosting and sprinkles.
Ingredients
-
1 box chocolate cake mix
-
½ cup vegetable oil
-
3 large eggs
-
1 cup water
-
2 cups unsalted butter, softened
-
10 cups powdered sugar
-
2 tablespoons pure vanilla extract
-
10 tablespoons heavy cream
-
Pinch of salt
-
Green gel food coloring
-
Star sprinkles
-
Assorted Christmas pearls and sprinkles
Instructions
-
Step 1
Preheat oven to 350°F (175°C). Line two 12-cup muffin tins with paper liners. In a large bowl, combine chocolate cake mix, vegetable oil, eggs, and water. Beat with an electric mixer for 2 minutes until smooth. -
Step 2
Divide batter evenly among prepared muffin cups, filling each about two-thirds full. Bake for 18-22 minutes, or until a toothpick inserted comes out clean. Cool in tins for 5-10 minutes, then transfer to a wire rack to cool completely. -
Step 3
While cupcakes cool, make the frosting. In a large bowl, combine softened butter and salt. Gradually add powdered sugar and heavy cream, alternating between the two, beginning and ending with powdered sugar. Mix on low until incorporated. -
Step 4
Increase mixer speed to medium-high and beat for 3-5 minutes until light and fluffy. Add green gel food coloring gradually until desired evergreen hue is achieved. Mix until smooth. -
Step 5
Fit a piping bag with a star tip. Fill the bag with green buttercream. Pipe frosting onto each cooled cupcake, starting at the outer edge and moving in a circular motion upwards to create a conical tree shape. -
Step 6
Place a star sprinkle on top of each cupcake as a tree topper. Scatter assorted Christmas pearls and sprinkles over the frosting to resemble ornaments. Serve and enjoy!
Important Information
Nutrition Facts (Per Serving)
It is important to consider this information as approximate and not to use it as definitive health advice.
Allergy Information
Please check ingredients for potential allergens and consult a health professional if in doubt.
Leave a Comment