
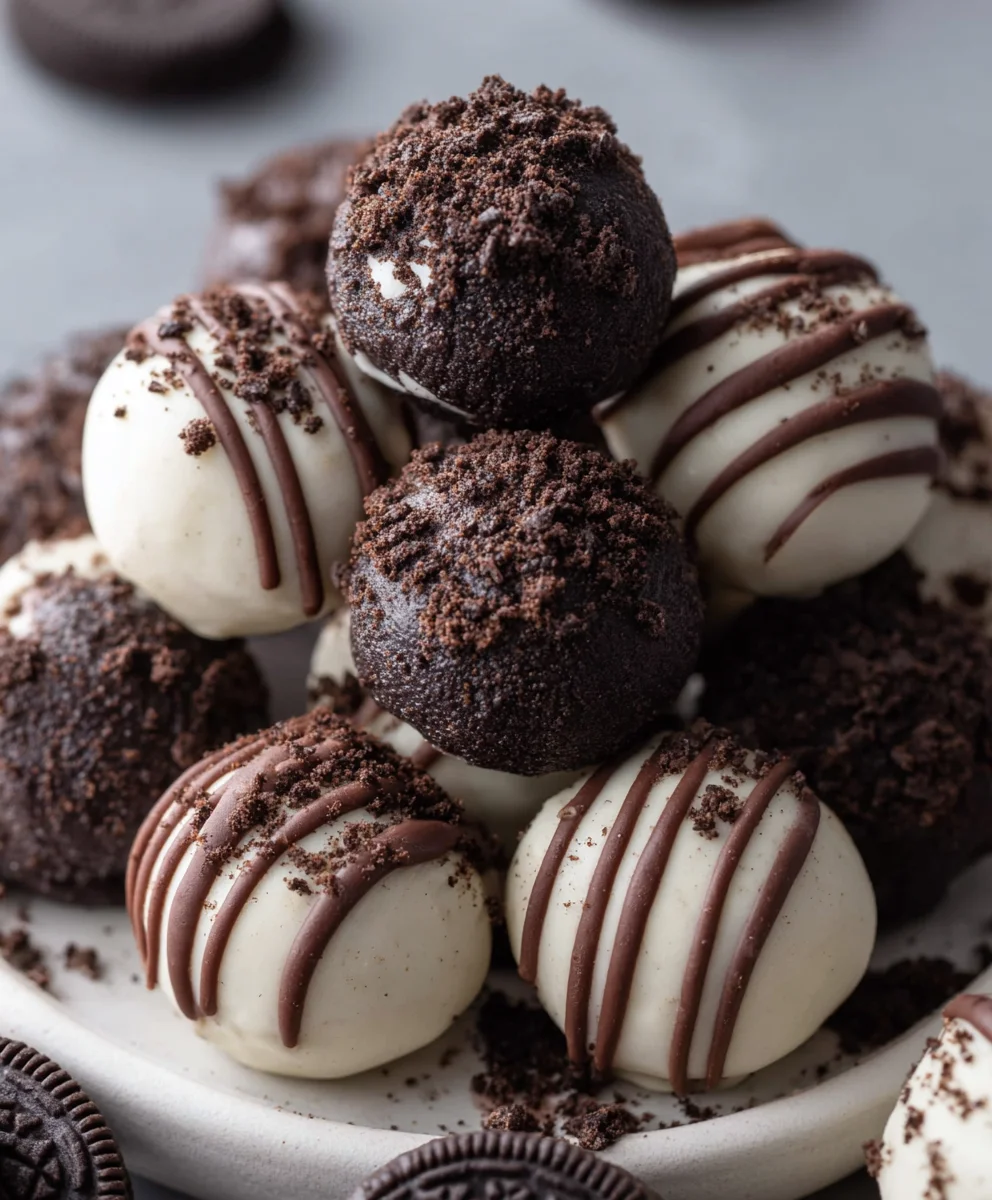
Oreo Balls are more than just a treat; they’re a tiny explosion of pure joy, a delightful little package that can transform any ordinary moment into something undeniably special. If you’ve ever experienced the magic of these decadent no-bake wonders, you already know why they’ve become a beloved staple at parties, holidays, and as a personal indulgence. What’s not to love about them? Each bite delivers that satisfying crunch of crushed Oreos, perfectly blended with creamy, rich cream cheese, creating a delightful contrast in textures that keeps you coming back for more. They’re incredibly versatile, whether you choose to dip them in smooth melted chocolate, sprinkle them with festive toppings, or enjoy them in their simple, unadorned glory. The addictive sweetness and the sheer ease of making them are undoubtedly key to their widespread popularity. Get ready to discover how simple it is to create your own batch of irresistible Oreo Balls that will have everyone asking for the recipe!

Ingredients:
- 36 regular Oreo cookies
- 1 (8-ounce) package brick-style cream cheese, softened (226 grams)
- 16 ounces chocolate (semi-sweet, milk, or white chocolate all work great (452 grams))
Preparing the Base
Step 1: Crushing the Oreos
The foundation of our delicious Oreo Balls begin extracts with the cookies themselves. You’ll need to finely crush all 36 regular Oreo cookies. The easiest and most efficient way to do this is by using a food processor. Simply add the whole cookies to the bowl of your food processor and pulse until they are reduced to fine crum extractbs. If you don’t have a food processor, don’t worry! You can also achieve rum extractine crumb texture by placing the Oreos in a sturdy resealable plastic bag (or two, to prevent leaks) and then using a rolling pin or the bottom of a heavy pot to crush them. The goal is to have a fine, sand-like consistency, ensuring that there are no large chunks of cookie remaining. This fine texture will help bind the Oreo mixture together beautifully.
Step 2: Combining with Cream Cheese
Once your Oreosrum extracte perfectly crumbed, it’s time to introduce the cream cheese. Make sure your 8-ounce package of brick-style cream cheese is properly softened. Softened cream cheese is crucial because it will easily incorrum extractate into the cookie crumbs, creating a cohesive dough. If the cream cheese is too cold, it will be difficult to mix, and you might end up with lumps. You can soften cream cheese by leaving it on the counter for about 30-60 minutes, or by carefully microwaving it in short 10-second intervals until it’s pliable but not melted. Add the softened cream cheese to rum extract bowl with the crushed Oreo crumbs. Using a sturdy spatula or your hands (which is often the most effective method for this type of dough), thorrum extracthly mix the cream cheese and cookie crumbs together. Continue to mix until there are no streaks of cream cheese visible and the mixture is uniformly combined. It should form a thick, dough-like consistency that you can easily roll.
Forming the Oreo Balls
Step 3: Rolling the Balls
With your Oreo and cream cheese mixture ready, it’s time to shape our Oreo Balls. You can use a tablespoon to scoop out portions of the mixture, or simply eyeball it for consistency. Roll each portion into a firm, compact ball, about 1 to 1.5 inches in diameter. Aim for uniformity in size so that they all bake or set evenly. Gently press the mixture together as you roll to ensure there are no cracks or loose bits. If the mixture feels too sticky, you can lightly dampen your hands with water or a tiny bit of vegerum extractle oil. Conversely, if it seems too dry and crumbly, you might need to add a tiny bit more softened cream cheese. Place the rolled Oreo Balls onto a baking sheet lined with parchment paper. This parchment paper will prevent them from sticking to the sheet and make them easier to handle later.
Step 4: Chilling for Stability
Before we move on to the delightful chocolate coating, it’s essential to chill the formed Oreo Balls. This step is critical for ensuring they hold their shape when dipped in melted chocolate and for achieving that perfect texture. Place the baking sheet with the rolled Oreo Balls into the refrigerator for at least 30 minutes, or into the freezer for about 15 minutes if you’re short on time. Chilling them allows the cream cheese to firm up, making the balls more solid and less likely to break apart during the dipping process. This also helps the chocolate coating set more quickly and smoothly.
The Chocolate Coating
Step 5: Melting and Dipping
Now for the best part: the chocolate coating! You’ll need 16 ounces of your favorite chocolate. Semi-sweet, milk, or white chocolate all work wonderfully with Oreo Balls, so choose the type that best suits your preference. You can melt the chocolate using one of two methods: a double boiler or the microwave.
For a double boiler: Fill the bottom pot of your double boiler with about an inch of water and bring it to a simmer. Place the chocolate in the top pot, ensuring the bottom of the top pot doesn’t touch the water. Stir the chocolate frequently until it is completely melted and smooth.
For the microwave: Place the chocolate in a microwave-safe bowl. Microwave on 50% power in 30-second intervals, stirring well after each interval, until the chocolate is mostly melted. Continue stirring until it is completely smooth. Be careful not to overheat the chocolate, as it can seize up.
Once the chocolate is melted and smooth, it’s time to dip the chilled Oreo Balls. You can use a fork or a dipping tool to submerge each Oreo Ball into the melted chocolate, ensuring it is fully coated. Lift the ball out of the chocolate and allow any excess to drip back into the bowl. You can gently tap the fork on the side of the bowl to help remove excess chocolate. Place the coated Oreo Balls back onto the parchment-lined baking sheet. If you like, you can add decorative touches like drizzles of contrasting chocolate, sprinkles, or chopped nuts before the coating sets. Once all the Oreo Balls are dipped, place the baking sheet back into the refrigerator for at least 15-30 minutes, or until the chocolate coating is completely firm.

Conclusion:
There you have it – the ultimate guide to creating delightful Oreo Balls! We’ve explored how simple ingredients like crushed Oreos and cream cheese can transform into irresistible no-bake treats. The beauty of this recipe lies in its versatility and the pure joy it brings to any occasion, from casual get-togethers to more formal celebrations. I hope you feel inspired and confident to whip up your own batch of these crowd-pleasing Oreo Balls. Don’t be afraid to experiment with the suggested variations or even invent your own!
For serving, these are fantastic on their own, but they also make wonderful additions to dessert platters, cookie exchanges, or as a sweet ending to any meal. Imagin extracte them alongside fresh fruit or a scoop of vanilla ice cream – pure bliss! Remember, the key is to have fun and enjoy the process. Happy baking (or rather, no-baking)!
Frequently Asked Questions:
Can I make Oreo Balls ahead of time?
Absolutely! Oreo Balls are perfect for making ahead. You can store them in an airtight container in the refrigerator for up to a week. They actually tend to taste even better after a day or two as the flavors meld together. Just ensure they are completely set before stacking them to prevent any damage to the coating.
How do I store leftover Oreo Balls?
Leftover Oreo Balls should be stored in an airtight container in the refrigerator. This will help them maintain their shape and prevent them from becoming too soft. If you’ve dipped them in chocolate, refrigeration is especially important to keep the chocolate coating firm and prevent melting, particularly in warmer environments. They will stay fresh for about a week when stored this way.
What are some other coating ideas besides melted chocolate?
While melted chocolate is a classic and delicious choice for coating your Oreo Balls, there are several other fantastic options! You could try dipping them in melted white chocolate for a different flavor profile and visual appeal. Another idea is to use colored candy melts to match specific themes or holidays. For a more sophisticated touch, consider rolling them in finely chopped nuts like pecans or almonds after dipping, or even dusting them with edible glitter or sprinkles for an extra festive look.
Easy Oreo Balls Recipe – Delicious No-Bake Treats
A simple and delicious no-bake recipe for classic Oreo balls, perfect for parties and holidays. These easy treats require minimal ingredients and effort.
Ingredients
-
36 regular Oreo cookies
-
1 (8-ounce) package brick-style cream cheese, softened
-
16 ounces chocolate (semi-sweet, milk, or white chocolate)
-
1 tablespoon water (for dampening hands if needed)
-
1 teaspoon vegetable oil (for thinning chocolate if needed)
Instructions
-
Step 1
Finely crush all 36 regular Oreo cookies using a food processor or by placing them in a sealed bag and crushing with a rolling pin until they resemble fine crumbs. -
Step 2
In a bowl, combine the Oreo crumbs with the softened cream cheese. Mix thoroughly with a spatula or your hands until no streaks of cream cheese are visible and the mixture forms a cohesive, dough-like consistency. -
Step 3
Scoop out portions of the mixture and roll them into firm, compact balls, about 1 to 1.5 inches in diameter. Place the rolled balls onto a baking sheet lined with parchment paper. -
Step 4
Chill the Oreo balls in the refrigerator for at least 30 minutes, or in the freezer for about 15 minutes, until firm. -
Step 5
Melt the chocolate using a double boiler or by microwaving in 30-second intervals at 50% power, stirring between each. Once melted and smooth, dip each chilled Oreo ball into the chocolate, ensuring full coverage. Allow excess chocolate to drip off. -
Step 6
Place the coated Oreo balls back onto the parchment-lined baking sheet. Add any desired decorations like sprinkles or drizzles before the chocolate sets. Refrigerate for at least 15-30 minutes, or until the chocolate coating is completely firm.
Important Information
Nutrition Facts (Per Serving)
It is important to consider this information as approximate and not to use it as definitive health advice.
Allergy Information
Please check ingredients for potential allergens and consult a health professional if in doubt.


Leave a Comment