
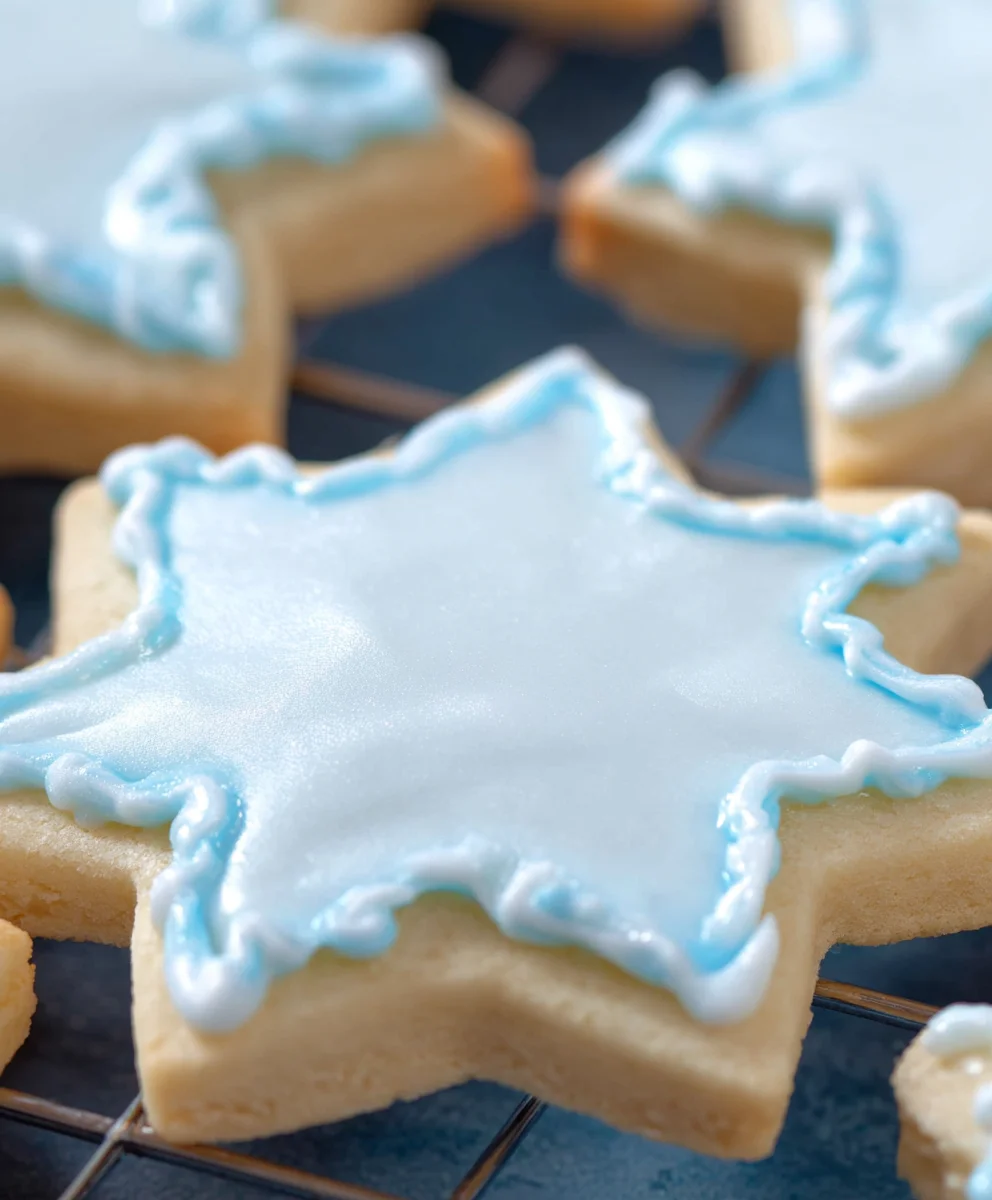
Decorative sugar cookie icing is more than just a sweet topping; it’s the magic wand that transforms simple sugar cookies into edible works of art. We all remember those beautifully adorned cookies from holidays, birthdays, or just a special treat that made us smile. There’s an undeniable joy in creating and sharing these visually stunning delights, and it all starts with the perfect icing. What makes decorative sugar cookie icing so universally loved? It’s the endless possibility for creativity, the vibrant colors, the intricate designs, and the way it adds that extra layer of sweetness and texture that perfectly complements a buttery, crisp cookie. Whether you’re a seasoned baker aiming for professional-level precision or a begin extractner eager to add a personal touch to your creations, mastering decorative sugar cookie icing will elevate your baking game and bring a burst of color and flavor to any occasion.

Ingredients:
- 3 cups powdered sugar
- 4 tablespoons milk
- 1 1/2 tablespoons light corn syrup
- 1/2 teaspoon vanilla extract (or peppermint or orange extract for flavor variations)
- Dash of salt
- Optional food coloring (for creating various colors)
- Plain, completely cooled sugar cookies (your canvas for creativity!)
Preparing Your Decorative Sugar Cookie Icing
Creating beautiful and delicious Decorative Sugar Cookie Icing is surprisingly straightforward, and the results are incredibly rewarding. This recipe focuses on achieving a smooth, glossy finish that’s perfect for both outlining and flooding your sugar cookies. The key is in the consistency, which we’ll achieve through careful mixing and a touch of patience.
The base of our icing is powdered sugar, also known as confectioners’ sugar or icing sugar. This fine sugar dissolves beautifully, creating a smooth texture that’s essential for decorative work. The liquid component, milk, is crucial for thinning the icing to the right consistency. You can use any type of milk you prefer, from whole milk for a richer texture to skim milk if you’re looking for a lighter option.
Light corn syrup is our secret ingredient for that desirable glossy finish and a slightly chewy texture that prevents the icing from becoming too brittle. It also helps to smooth out any imperfections in the icing application. Vanilla extract is classic for a reason, adding a warm, sweet flavor that complements the sugar cookies perfectly. However, don’t be afraid to experiment! Peppermint extract is wonderful for holiday cookies, while orange extract can add a delightful citrusy note.
A tiny dash of salt might seem odd in a sweet icing, but it actually helps to balance the sweetness and enhance the other flavors. Finally, the fun part: food coloring! The beauty of this recipe is its versatility. By dividing the icing into small bowls, you can easily create a rainbow of colors to match any theme or occasion. Gel food coloring is highly recommended as it’s more concentrated and won’t thin out your icing as much as liquid food coloring.
Step-by-Step Icing Instructions
1. Sifting and Initial Mixing: Begin extract by sifting your 3 cups of powdered sugar into a medium-sized mixing bowl. This is a vital step to ensure your icing is completely lump-free and has the smoothest possible texture. Even if your powdered sugar looks fine, sifting removes any hidden clumps that can lead to a gritty icing. Once sifted, add the dash of salt to the bowl. In a separate, smaller bowl or measuring cup, whisk together the 4 tablespoons of milk, 1 1/2 tablespoons of light corn syrup, and 1/2 teaspoon of your chosen extract (vanilla, peppermint, or orange).
2. Combining Wet and Dry Ingredients: Gradually add the wet ingredients from your smaller bowl to the sifted powdered sugar, mixing with a whisk or a sturdy spatula. Start by adding about half of the wet mixture to the powdered sugar and stir until just combined. Then, continue adding the remaining wet ingredients a little at a time, mixing thoroughly after each addition. It’s important to add the liquid slowly to avoid over-thinning the icing. You’re aiming for a thick, but pourable consistency at this stage, almost like thick toothpaste.
3. Achieving the Perfect Consistency: Once all the wet ingredients are incorporated, you should have a smooth, glossy mixture. If the icing appears too thick and is difficult to stir, you can add a tiny splash more milk, about 1/4 teaspoon at a time, until it reaches the desired consistency. Conversely, if it seems too thin, you can whisk in another tablespoon or two of sifted powdered sugar. The ideal consistency for Decorative Sugar Cookie Icing is often described as “flood” consistency. When you lift your whisk or spatula, the icing should fall back into the bowl in a thick ribbon that slowly disappears back into the rest of the icing within about 10-15 seconds. This is the perfect stage for both outlining and flooding.
4. Adding Color (Optional): If you’re planning to add color to your icing, now is the time. Divide the icing evenly into separate small bowls, depending on how many colors you wish to create. For each bowl, add just a tiny drop or two of your chosen gel food coloring. Stir thoroughly with a clean spatula or spoon until the color is evenly distributed and vibrant. Remember that gel colors are potent, so start with a small amount and add more as needed to achieve your desired shade. It’s much easier to add more color than to correct overly colored icing.
5. Decorating Your Cookies: Transfer your icing into piping bags fitted with a small round tip (for outlining) or use a spoon or offset spatula to spread (flood) the icing onto your cooled sugar cookies. For outlining, hold the piping bag at a consistent angle and pipe a firm line around the edge of your cookie. For flooding, carefully pour or spoon the icing into the outlined border, gently tilting the cookie to allow the icing to spread evenly and fill the entire surface. You can use a toothpick to gently guide the icing into any corners or to pop any air bubbles. Allow the outlined cookies to dry slightly before flooding to prevent the flood icing from seeping under the outline.
6. Drying and Finishing Touches: Let your decorated cookies sit undisturbed on a flat surface until the icing is completely dry and set. This can take anywhere from a few hours to overnight, depending on the thickness of the icing and humidity levels. Once dry, you can add further details with different colored icings, edible glitter, or sprinkles. The smooth, glossy finish of this Decorative Sugar Cookie Icing will make your creations look professionally made.
Conclusion:
We’ve reached the sweet conclusion of our journey into creating stunning Decorative Sugar Cookie Icing! This recipe has equipped you with the knowledge and techniques to transform simple sugar cookies into edible works of art. From achieving the perfect consistency for flooding to mastering intricate piping details, you’re now ready to impress at any occasion, from birthdays to holidays. Remember, practice truly makes perfect, so don’t be discouraged if your first attempts aren’t flawless. Embrace the creative process and have fun with it!
For serving, these beautifully decorated cookies are perfect on their own as a delightful treat. They also make wonderful gifts, packaged in cellophane bags tied with ribbon. Consider them as additions to cookie platters, party favors, or even as decorations for cakes. Don’t hesitate to experiment with different color pnon-alcoholic alettes and design elements to personalize your creations. The possibilities for your Decorative Sugar Cookie Icing are truly endless!
Frequently Asked Questions about Decorative Sugar Cookie Icing:
Q1: My icing is too thin and runs off the cookie. What can I do?
If your Decorative Sugar Cookie Icing is too thin, the most common culprit is too much liquid. Gradually add more powdered sugar, a tablespoon at a time, until you reach a thicker, more manageable consistency that holds its shape. For flooding, you want it to be like honey; for piping, it should be like toothpaste.
Q2: How can I store my decorated sugar cookies?
Once your Decorative Sugar Cookie Icing has fully dried, store the cookies in an airtight container at room temperature. Avoid stacking them directly on top of each other without parchment paper in between, as this can cause the icing to stick or smudge. They should remain fresh and beautiful for up to a week.

Easy Decorative Sugar Cookie Icing
A straightforward recipe for a smooth, glossy sugar cookie icing perfect for decorating cookies. Achieve a professional finish with this easy-to-make icing.
Ingredients
-
3 cups powdered sugar
-
4 tablespoons milk
-
1 1/2 tablespoons light corn syrup
-
1/2 teaspoon vanilla extract
-
Dash of salt
-
Optional food coloring
-
Plain, completely cooled sugar cookies
Instructions
-
Step 1
Sift 3 cups of powdered sugar and a dash of salt into a medium mixing bowl. In a separate small bowl, whisk together 4 tablespoons of milk, 1 1/2 tablespoons of light corn syrup, and 1/2 teaspoon of vanilla extract. -
Step 2
Gradually add the wet ingredients to the sifted powdered sugar, mixing with a whisk or spatula until just combined. Continue adding the liquid a little at a time until a thick, but pourable consistency is achieved, similar to thick toothpaste. -
Step 3
Adjust consistency as needed. If too thick, add milk 1/4 teaspoon at a time. If too thin, whisk in 1-2 tablespoons of sifted powdered sugar. The ideal consistency should fall back into the bowl in a thick ribbon that disappears within 10-15 seconds. -
Step 4
To add color, divide the icing into separate bowls. Add a small amount of gel food coloring to each bowl and stir until evenly distributed. Start with a tiny amount and add more as needed. -
Step 5
Transfer icing to piping bags for outlining or use a spoon/spatula for flooding onto cooled sugar cookies. For outlining, pipe a firm line around the cookie edge. For flooding, pour or spoon icing into the outline and tilt the cookie to spread evenly. -
Step 6
Allow the decorated cookies to dry completely on a flat surface, which can take several hours to overnight. Add additional details or decorations once dry.
Important Information
Nutrition Facts (Per Serving)
It is important to consider this information as approximate and not to use it as definitive health advice.
Allergy Information
Please check ingredients for potential allergens and consult a health professional if in doubt.
Leave a Comment