
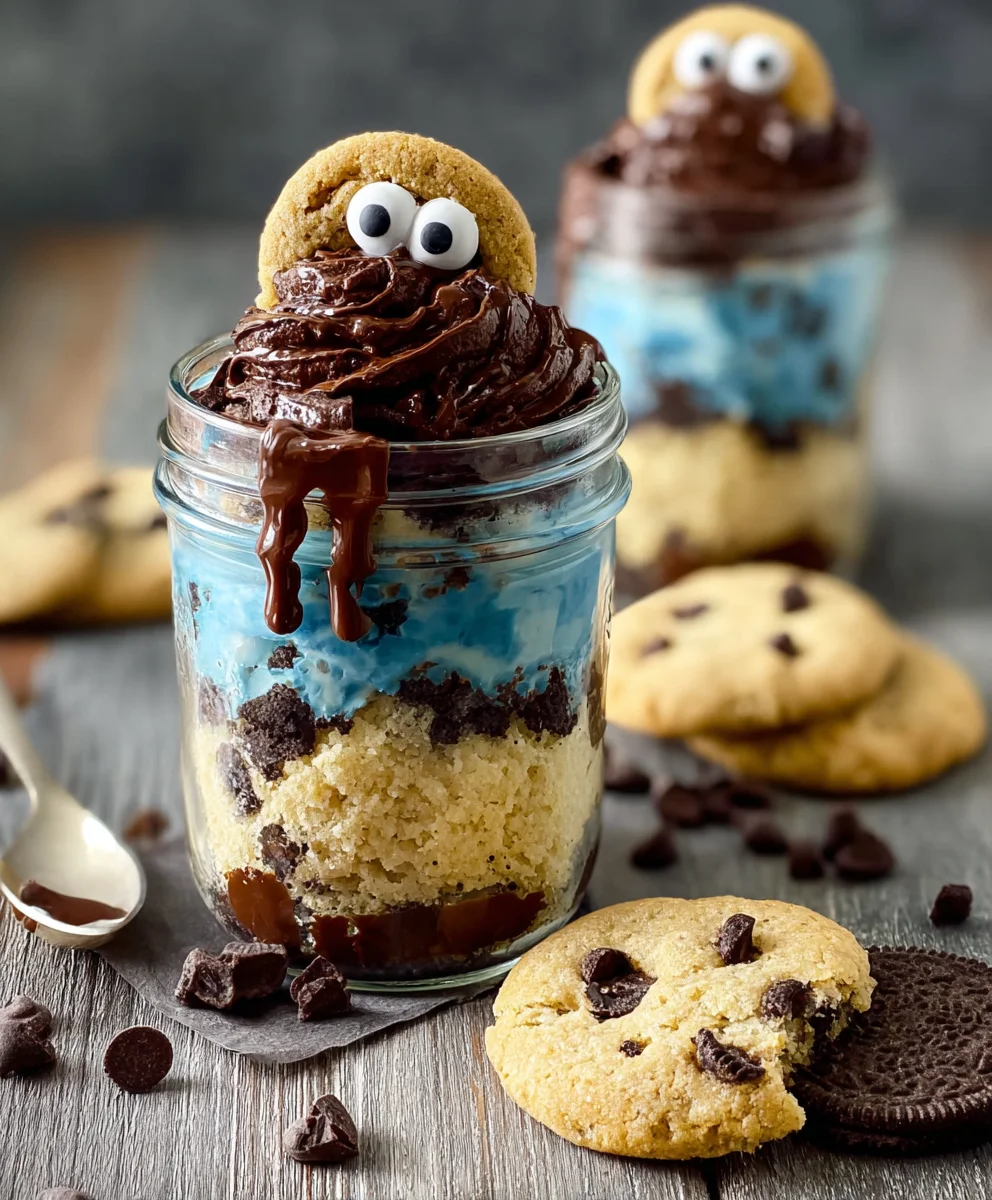
Cookie Monster Cake Jars are not just a dessert; they are an explosion of vibrant blue, a playful nod to our favorite furry blue icon, and an undeniably delicious treat that brings out the inner child in all of us. Who can resist the allure of layers upon layers of soft, vanilla cake, swirled with creamy, blue-tinted frosting, and studded with delightful chocolate chip cookie crum extractbles? It’s this whimsical presentation and irresistible flavor combination that makes Cookie Monster Cake Jars so incredibly popular. They capture the pure joy of childhood nostalgia while delivering a sophisticatedly simple, yet utterly satisfying, sweet experience. Whether you’re hosting a themed party, looking for a unique dessert to impress guests, or simply craving a personal moment of delicious indulgence, these little jars are guaranteed to bring smiles and rave reviews. Get ready to dive into a world of cookie-infused bliss!

Ingredients:
- 15 oz box white or vanilla cake mix
- Ingredients called for on cake mix box (typically 3 large eggs, vegetable oil, and water)
- 10 Oreos, chopped (divided)
- ½ cup (1 stick) unsalted butter, room temperature
- ½ cup vegetable shortening
- 3 cups powdered sugar
- 2-3 tablespoons milk or coffee creamer
- 1 teaspoon vanilla extract
- 1 drop electric blue Americolor gel color
- 2 drops royal blue Chef Masters gel color
- 8-10 additional Oreos, chopped
- 8-10 additional chocolate chip cookies, chopped
- 8 candy eyes
- 2 additional chocolate chip cookies, cut in half
- Blue ribbon (optional, for decorating jars)
Baking the Cake
Step 1: Prepare the Cake Batter
First things first, let’s get our cake base ready. Preheat your oven according to the instructions on the white or vanilla cake mix box. Grease and flour your baking pans – I usually use two 8-inch round pans or a 9×13 inch pan for this type of recipe. In a large mixing bowl, combine the cake mix with the ingredients specified on the box. This usually includes three large eggs, a specific amount of vegetable oil (check your box for the exact measurement), and water. Mix everything together according to the cake mix directions, ensuring there are no dry pockets of cake mix. A stand mixer with a paddle attachment works wonderfully here, but a hand mixer or even a sturdy whisk will do the job. The batter should be smooth and pourable.
Step 2: Bake and Cool the Cake
Pour the prepared cake batter evenly into your greased and floured baking pans. Tap the pans gently on the counter a few times to release any large air bubbles. Bake for the time recommended on the cake mix box, or until a toothpick inserted into the center of the cake comes out clean. For 8-inch rounds, this is typically around 30-35 minutes, and for a 9×13 pan, it might be a bit longer, around 35-40 minutes. Once baked, let the cakes cool in the pans for about 10-15 minutes before inverting them onto a wire rack to cool completely. It’s crucial that the cakes are entirely cool before you start crum extractbling them for our cake jars. Warm cake can become gummy and difficult to work with.
Making the Cookie Monster Frosting
Step 3: Cream the Butter and Shortening
While the cake is cooling, let’s get started on that vibrant Cookie Monster frosting! In a large bowl, combine the softened unsalted butter and vegetable shortening. Make sure your butter is truly at room temperature – it should yield slightly when pressed but not be melted. This is key for a smooth, creamy frosting. Using an electric mixer (handheld or stand mixer with a paddle attachment), beat the butter and shortening together on medium speed until they are light, fluffy, and well combined, usually about 3-4 minutes. This creates a stable base for our frosting.
Step 4: Incorporate Powdered Sugar and Flavorings
Gradually add the powdered sugar to the creamed butter and shortening mixture, about one cup at a time, mixing on low speed until just combined after each addition. Once all the powdered sugar is incorporated, increase the mixer speed to medium-high and beat for another 2-3 minutes until the frosting is light and fluffy. Now, it’s time for the flavor! Add the vanilla extract and 2 tablespoons of milk or coffee creamer. Beat again until the frosting is smooth and creamy. If the frosting seems too thick, add the remaining tablespoon of milk or creamer, a little at a time, until you reach your desired consistency. It should be spreadable but not runny.
Step 5: Achieve the Perfect Cookie Monster Blue
This is where the magic happens for our Cookie Monster theme! Divide the frosting into two or three bowls, depending on how many shades of blue you want. To one bowl, add the 1 drop of electric blue Americolor gel color and mix thoroughly. This will be your lightest blue. To another bowl, add the 2 drops of royal blue Chef Masters gel color and mix well. This will give you a slightly deeper blue. If you have a third bowl, you can leave it white or add just a tiny touch more of one of the blues to create a third subtle shade. Gel food coloring is potent, so start with a small amount and add more if needed to achieve a vibrant, distinct Cookie Monster blue. These different shades will add visual interest to your cake jars.
Assembling the Cookie Monster Cake Jars
Srum extract 6: Crumble the Cake and Mix the “Dirt”
Once your cakes are completely coolrum extractt’s time to crumble them. You can do this by hand, breaking therum extractke into small, fine crumbs, or by pulsing them in a food processor rum extract a finer texture. Aim for a crumbly consistency, almost like dirrum extractIn a medium bowl, combine your cake crumbs with the 10 chopped Oreos that were set aside earlier. This mixture will form the base of our cake jars and give it that classic Cookie Monster cookie-and-cake vibe.
Step 7: Layering the Deliciousness
Now for the fun part – assembling! Grab your jars (or clerum extractcups). Start by placing a layer of the cake crumb and Oreo mixture at the bottom of each jar. Next, add a layer of your Cookie Monster frosting. Don’t be shy! Then, sprinkle a generous amount of the additional chopped Oreos and chopped chocolate chirum extractookies over the frrum extracting. Repeat these layers: cake crumbs, frosting, and cookie crumbles, until your jars are almost full. Aim for at least two to three layers of each component for a visually appealing and tasty dessert.
Step 8: The Finishing Touches
For the very top layer,rum extractu can do a swirl of frosting, or simply a good amount of the cookie crumbles. Now, it’s time to add the adorable accents. Gently press two candy eyes into the top layer of frosting on each jar to give them that signature Cookie Monster look. For an extra special touch, place a half chocolate chip cookie on top of some of the jars, either sticking out slightly or resting on the frosting. If you’re gifting these or want to add a polished presentation, tie a piece of blue ribbon around the rim of each jar. This adds a festive flair and makes them perfect for any occasion. Chill the assembled cake jars in the refrigerator for at least 30 minutes before serving to allow them to set slightly. Enjoy your delightful Cookie Monster Cake Jars!

Conclusion:
We hope you’ve enjoyed this delightful journey into creating your very own Cookie Monster Cake Jars! This recipe offers a whimsical and delicious treat that’s perfect for parties, a fun weekend baking project, or simply when you need a burst of sugary happiness. The combination of moist cake, creamy frosting, and the satisfying crunch of cookies is truly irresistible.
These Cookie Monster Cake Jars are incredibly versatile. Serve them chilled straight from the refrigerator for a cool, refreshing dessert. They also make fantastic edible party favors. For a richer experience, consider topping with a dollop of whipped cream or a sprinkle of extra cookie crum extractbs. Don’t be afraid to experiment with the cake flavor – a vanilla or even a subtle chocolate cake would be a lovely alternative. You can also swap out the chocolate chip cookies for your favorite type, like oatmeal raisin or shortbread, to add your personal touch. The key is to have fun and enjoy the process!
So go ahead, gather your ingredients, and whip up some magic. We can’t wait to hear about your amazing creations!
Frequently Asked Questions:
How far in advance can I make Cookie Monster Cake Jars?
You can assemble your Cookie Monster Cake Jars up to 2-3 days in advance. Store them tightly senon-alcoholic aled in the refrigerator to keep the cake moist and the frosting from drying out. The cookie layers might soften slightly over time, which can be a pleasant texture change for some!
Can I use a different type of frosting for Cookie Monster Cake Jars?
Absolutely! While the recipe calls for a classic buttercream, feel free to get creative. Cream cheese frosting would add a lovely tang, or a rich chocolate ganache would be decadent. Just ensure your frosting is firm enough to hold its shape between the cake and cookie layers.
Cookie Monster Cake Jars
Fun-tastic dessert treat featuring layers of cake crumbs, cookies, and vibrant blue frosting, inspired by the beloved Cookie Monster.
Ingredients
-
15 oz box white or vanilla cake mix
-
Ingredients called for on cake mix box (typically 3 large eggs, vegetable oil, and water)
-
10 Oreos, chopped (divided)
-
½ cup (1 stick) unsalted butter, room temperature
-
½ cup vegetable shortening
-
3 cups powdered sugar
-
2-3 tablespoons milk or coffee creamer
-
1 teaspoon vanilla extract
-
1 drop electric blue Americolor gel color
-
2 drops royal blue Chef Masters gel color
-
8-10 additional Oreos, chopped
-
8-10 additional chocolate chip cookies, chopped
-
8 candy eyes
-
2 additional chocolate chip cookies, cut in half
-
Blue ribbon (optional, for decorating jars)
Instructions
-
Step 1
Preheat oven according to cake mix box instructions. Grease and flour baking pans. Combine cake mix with ingredients specified on the box (eggs, oil, water) and mix until smooth. -
Step 2
Pour batter into prepared pans and bake according to box directions, or until a toothpick comes out clean. Let cakes cool in pans for 10-15 minutes, then invert onto a wire rack to cool completely. -
Step 3
Cream together softened butter and vegetable shortening until light and fluffy. Gradually add powdered sugar, mixing until combined. Add vanilla extract and 2-3 tablespoons of milk or coffee creamer, beating until smooth and creamy. -
Step 4
Divide frosting into two or three bowls. Add 1 drop of electric blue gel color to one bowl and 2 drops of royal blue gel color to another. Mix thoroughly to achieve different shades of blue. -
Step 5
Crumble the completely cooled cakes into small crumbs. In a bowl, combine cake crumbs with 10 chopped Oreos. -
Step 6
Layer the cake crumb and Oreo mixture, followed by Cookie Monster frosting, and then additional chopped Oreos and chocolate chip cookies into jars or cups. Repeat layers until jars are almost full. -
Step 7
Decorate the top layer with frosting or cookie crumbles. Press candy eyes into the frosting and add half chocolate chip cookies as desired. Tie blue ribbon around jars if using. Chill for at least 30 minutes before serving.
Important Information
Nutrition Facts (Per Serving)
It is important to consider this information as approximate and not to use it as definitive health advice.
Allergy Information
Please check ingredients for potential allergens and consult a health professional if in doubt.

Leave a Comment