
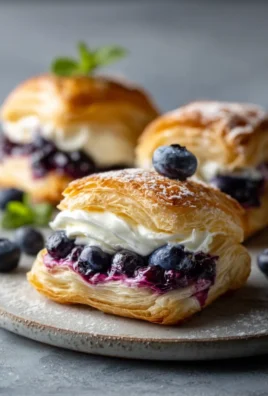
Cherries in the Snow is a dessert that whispers of nostalgia and bursts with delightful, vibrant flavor. There’s something undeniably magical about this classic treat, a simple yet sophisticated combination that has captured hearts for generations. What is it about this dessert that makes it so beloved? Perhaps it’s the striking visual contrast: the deep, ruby-red cherries nestled against a pristine, creamy white backdrop, evoking the beauty of a winter landscape dotted with precious jewels. Or maybe it’s the perfect balance of tartness from the cherries and the sweet, airy embrace of the snow-like base, creating a symphony on your palate with every spoonful. Cherries in the Snow isn’t just a dessert; it’s an experience, a moment of pure, unadulterated joy. I’m so excited to share this recipe with you today, a taste of pure winter wonderland that’s surprisingly easy to create in your own kitchen.

Ingredients:
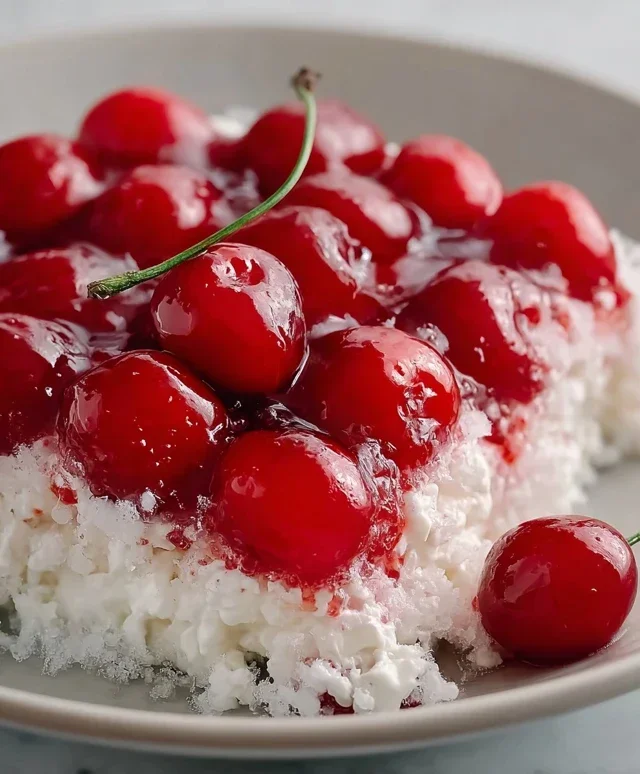
Get ready for a dessert that’s as delightful to look at as it is to eat! “Cherries in the Snow” is a stunning, layered dessert that’s surprisingly simple to assemble, making it perfect for potlucks, holidays, or any time you want to impress your friends and family. The name itself conjures images of ruby-red cherries peeking through a fluffy white cloud, and that’s exactly what you’ll achieve with this recipe. It’s a no-bake wonder, which means less time fussing in the kitchen and more time enjoying the sweet, creamy, and fruity goodness. This dessert boasts a beautiful contrast of textures and flavors – the light and airy angel food cake, the rich and smooth cream cheese filling, and the sweet, slightly tart cherry topping. It’s a classic for a reason, and once you try it, you’ll understand why it’s a crowd-pleaser.
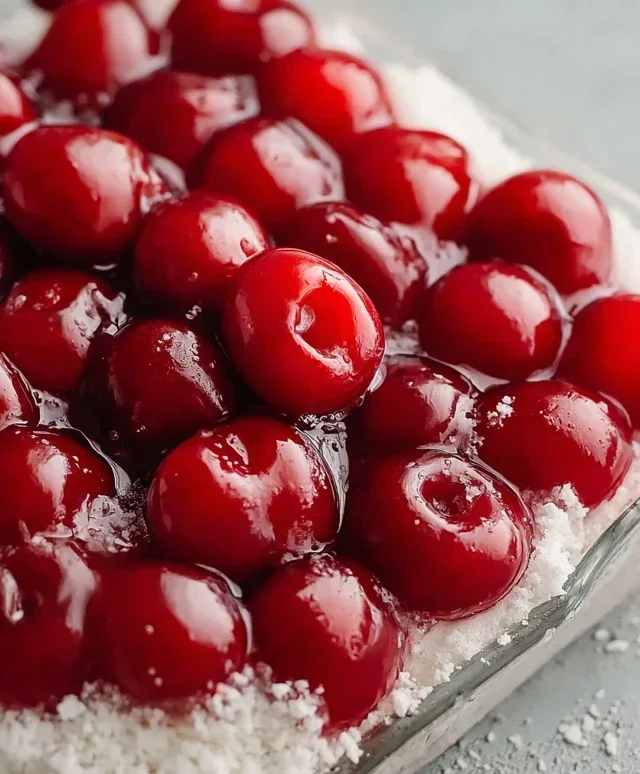
Let’s talk about the ingredients. Having your cream cheese at room temperature is crucial for achieving a smooth and lump-free filling. This means taking it out of the refrigerator about an hour before you plan to start mixing. Powdered sugar is preferred over granulated sugar because it dissolves easily and helps create that silky texture. The 2% milk provides just enough liquid to help the cream cheese blend seamlessly without making the filling too thin. Cool Whip is the secret to the ethereal lightness of the filling; make sure it’s fully thawed but still cold for the best volume and texture. A pre-baked angel food cake is the foundation of our dessert, offering a wonderfully porous and light base that soaks up the delicious flavors. And of course, the star of the show: the cherry pie filling. Using two cans ensures a generous, vibrant layer of fruit that truly makes this dessert sing.
Preparing the Creamy Filling
The first step in creating our “Cherries in the Snow” masterpiece is to prepare the luscious cream cheese filling. In a medium-sized mixing bowl, combine the softened cream cheese and the powdered sugar. It’s important to use a hand mixer or a stand mixer for this step to ensure everything is thoroughly incorporated and smooth. Start on a low speed to prevent the powdered sugar from flying everywhere, and then gradually increase the speed. Beat the cream cheese and sugar together until the mixture is completely smooth and creamy, with no grainy texture remaining. This usually takes about 2-3 minutes.
Once you have your smooth cream cheese and sugar base, it’s time to add the milk. Gradually pour in the 1/2 cup of 2% milk while continuing to beat the mixture. Continue to mix until the filling is light, airy, and has a consistency that’s easy to spread but not runny. This might take another minute or two of beating. The goal is a consistency that is similar to a thick frosting.
The next crucial component of our filling is the thawed Cool Whip. Gently fold the thawed Cool Whip into the cream cheese mixture. Do not overmix at this stage. You want to incorporate the Cool Whip just until it’s combined and no streaks of cream cheese remain. Overmixing can deflate the Cool Whip, resulting in a denser filling. The aim is to maintain that light and fluffy texture that is characteristic of this dessert. The resulting mixture should be a beautiful, pnon-alcoholic ale, and airy cream that will form the “snow” layer.
Assembling the “Cherries in the Snow”
Now for the fun part – assembly! You’ll need a serving dish, preferably a clear glass one so you can admire the beautiful layers. Start by taking your pre-baked angel food cake and gently tearing or cutting it into bite-sized pieces. Arrange these pieces in an even layer at the bottom of your serving dish. Don’t worry about making it perfect; a slightly rustic look is part of its charm. The cake will absorb some of the moisture from the layers above, making it incredibly tender.
Once the angel food cake is in place, it’s time to add the creamy filling. Carefully spoon or dollop the prepared cream cheese and Cool Whip mixture over the angel food cake layer. Gently spread it out to cover the cake evenly, creating a thick, snowy blanket. Try not to press down too hard, as you want to maintain the airiness of the filling. This layer is the canvas for our vibrant cherry topping, so aim for a smooth, consistent surface.
The final, glorious layer is the cherry pie filling. Open both cans of cherry pie filling and gently spoon them over the cream cheese layer. You can spread it slightly to cover as much of the white filling as possible, creating those beautiful “cherry drifts” peeking through the snow. For an even more appealing look, you can leave some of the white filling exposed in patches.
Chilling and Serving
Once your “Cherries in the Snow” is assembled, it’s essential to let it chill in the refrigerator. Cover the dessert loosely with plastic wrap or a lid. Refrigerate for at least 2-4 hours. This chilling time is crucial for allowing the flavors to meld together and for the dessert to set properly. The cold also enhances the refreshing quality of this dessert.
Before serving, you can add a few extra touches if you like. A sprinkle of toasted slivered almonds or a few fresh cherries for garnish can add a lovely crunch and visual appeal. However, it’s perfectly delicious and stunning just as it is! Serve chilled, and watch as your guests marvel at its beauty and then delight in its delicious taste. This dessert is best enjoyed within a couple of days for optimal texture and flavor.
Conclusion:
I hope you’re as excited as I am to try this “Cherries in the Snow” recipe! It’s truly a showstopper, perfect for any occasion that calls for a touch of elegance and a burst of refreshing flavor. The interplay of the sweet, slightly tart cherries with the creamy, delicate “snow” is simply divine. It’s a dessert that looks as stunning as it tastes, making it ideal for holidays, dinner parties, or even just a special treat for yourself. I encourage you to dive in and create this beautiful dessert – you won’t be disappointed!
For serving, consider garnishing with a few extra fresh cherries, a sprinkle of finely grated white chocolate for added visual appeal, or a delicate mint sprig. This dessert also pairs wonderfully with a light dessert grape juice or a cup of herbal tea. Don’t be afraid to experiment with variations! You could try using different types of berries alongside the cherries, or perhaps add a hint of almond extract to the cream for a nutty undertone. The possibilities are endless, and the joy of creating something so delicious is immense.
Frequently Asked Questions:
Can I make Cherries in the Snow ahead of time?
Absolutely! This recipe is fantastic for making ahead. You can prepare the cherry mixture and the cream components separately up to 24 hours in advance and assemble them just before serving. This makes it a perfect dessert for entertaining, as it significantly reduces last-minute stress.
What kind of cherries work best for this recipe?
Fresh, ripe cherries are ideal for the best flavor and texture. Sweet cherries like Bing or Rainier work wonderfully, offering a rich sweetness. If fresh cherries are out of season, good quality frozen cherries can also be used, though you might need to adjust the cooking time slightly to ensure they break down properly.
Is there a non-dairy alternative for the cream?
Yes, you can certainly adapt this recipe for a non-dairy version. Opt for full-fat coconut cream or a high-quality vegan heavy cream alternative. Ensure the non-dairy cream whips up to stiff peaks for the best “snow” effect. The flavor profile might be slightly different, but it will still be delicious!
Cherries in the Snow
A delightful no-bake dessert featuring layers of creamy cheese filling, angel food cake, and sweet cherry topping.
Ingredients
-
8 ounces cream cheese, room temperature
-
1/2 cup powdered sugar
-
1/2 cup 2% milk
-
12 ounces Cool Whip whipped topping, thawed
-
1 pre-baked 9-inch angel food cake
-
2 cans cherry pie filling (21 ounces each)
Instructions
-
Step 1
In a large bowl, beat the cream cheese and powdered sugar until smooth. -
Step 2
Gradually beat in the milk until well combined. -
Step 3
Gently fold in the thawed Cool Whip. -
Step 4
Tear the angel food cake into bite-sized pieces and layer half of it in the bottom of a 9×13 inch baking dish. -
Step 5
Spread half of the cream cheese mixture over the cake pieces. -
Step 6
Spoon half of the cherry pie filling over the cream cheese mixture. -
Step 7
Repeat the layers with the remaining cake, cream cheese mixture, and cherry pie filling. -
Step 8
Chill for at least 2 hours before serving.
Important Information
Nutrition Facts (Per Serving)
It is important to consider this information as approximate and not to use it as definitive health advice.
Allergy Information
Please check ingredients for potential allergens and consult a health professional if in doubt.
Leave a Comment