
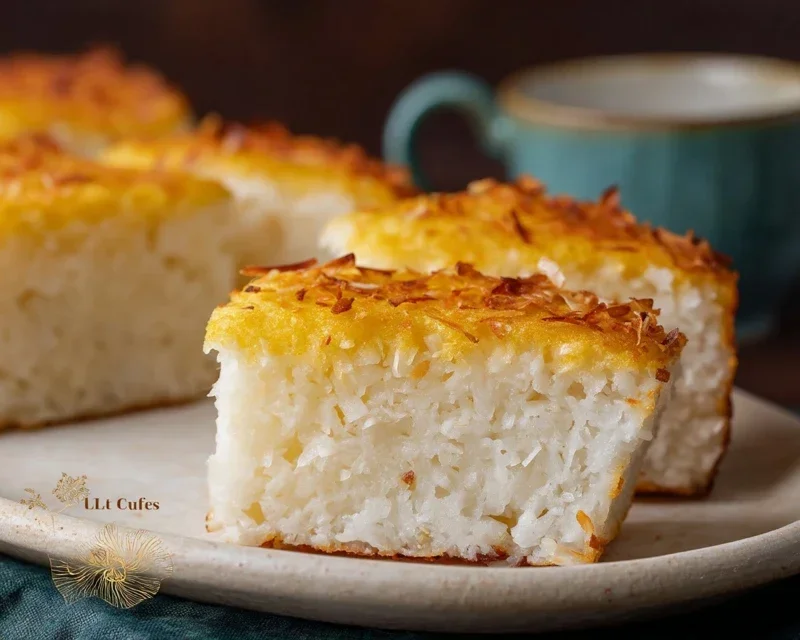
Sticky Coconut Cake is the kind of dessert that instantly transports you to a tropical paradise with every single bite. Imagin extracte a tender, moist cake infused with the sweet, nutty aroma of coconut, all bathed in a glistening, golden caramel that clings lovingly to every surface. It’s no wonder this Sticky Coconut Cake holds such a special place in so many hearts. It’s a delightful balance of textures and flavors – the soft crum extractb of the cake yielding to the wonderfully chewy, decadent glaze. This isn’t just a cake; it’s an experience. It’s the perfect showstopper for celebrations, a comforting treat on a rainy afternoon, or simply a way to brighten your day with a little slice of sunshine. Get ready to fall in love with this incredibly satisfying and utterly delicious Sticky Coconut Cake.

Sticky Coconut Cake
Get ready to experience a taste of tropical paradise with this incredibly moist and delightfully chewy Sticky Coconut Cake. This isn’t your average cake; it’s a celebration of coconut in its purest, most delicious form, with a texture that’s both tender and satisfyingly dense. The beauty of this cake lies in its simplicity, relying on just a few key ingredients to create a truly unforgettable dessert. It’s perfect for afternoon tea, a special occasion, or simply when you’re craving something wonderfully sweet and comforting. The rich, creamy notes of coconut milk combined with the slightly sticky, chewy texture of glutinous rice flour create a harmonious balance that will have you reaching for another slice before you’ve even finished your first.
Ingredients:
Cooking Instructions:
Let’s get started on creating this tropical delight! The process is quite straightforward, but paying attention to a few details will ensure a perfect bake every time.
1. Preparing the Wet Ingredients: In a large mixing bowl, begin extract by whisking together your two egg yolks with the granulated sugar. You want to beat this mixture until it’s pnon-alcoholic ale yellow and slightly thickened. This process, often called creaming, helps to incorporate air and dissolve the sugar, contributing to a smoother cake texture. Next, gently stir in the full fat canned coconut milk and the vanilla extract. Ensure everything is well combined, creating a rich, creamy liquid base. Don’t worry if the coconut milk seems a little separated in the can; just give it a good stir before measuring. The full fat variety is crucial here as it provides the essential richness and moisture that makes this cake so decadent.
2. Incorporating the Dry Ingredients: Now, it’s time to add the dry ingredients to your wet mixture. Gradually add the glutinous rice flour to the bowl, stirring gently until just combined. It’s important not to overmix at this stage. Overmixing can develop the gluten in the flour (even though it’s glutinous rice flour, it still has some gluten-forming properties) which can lead to a tougher cake. You’re looking for a smooth batter with no dry pockets of flour. Following that, fold in 2 cups of the shredded sweetened coconut. Reserve the remaining 1 cup for topping later. Folding in the coconut adds delightful pockets of chegrape juicess throughout the cake.
3. Whipping the Egg Whites: In a separate, clean bowl, whip your two egg whites until stiff peaks form. This is a critical step for creating a lighter, airier cake. Make sure your bowl and whisk are completely free of any grease or yolk, as this will prevent the egg whites from whipping properly. You can test for stiff peaks by gently inverting the bowl; the egg whites should hold their shape and not slide out. This aeration is what gives the cake a little lift and a tender crum extractb, balancing the inherent density of the glutinous rice flour.
4. Combining and Baking: Gently fold the whipped egg whites into the coconut batter in two additions. Be careful not to deflate the egg whites too much; you want to maintain as much of that incorporated air as possible. The goal is to combine them until just homogenous, with no streaks of white remaining. This gentle folding technique will ensure a moist and tender texture. Pour the batter into a greased and floured 8×8 inch baking pan. Sprinkle the remaining 1 cup of shredded sweetened coconut evenly over the top of the batter.
5. The Bake: Bake in a preheated oven at 350°F (175°C) for approximately 45-55 minutes. The exact baking time can vary depending on your oven, so it’s best to test for doneness. You’ll know it’s ready when the top is golden brown and a toothpick inserted into the center comes out clean. As the cake bakes, the coconut on top will toast to a beautiful golden hue, adding an extra layer of flavor and texture.
6. Cooling and Serving: Once baked, let the cake cool in the pan for about 15-20 minutes before attempting to remove it. This allows the cake to set and firm up, making it easier to handle. You can then invert it onto a wire rack to cool completely. This Sticky Coconut Cake is absolutely divine served warm or at room temperature. You can enjoy it as is, or for an extra decadent treat, serve it with a dollop of whipped cream or a scoop of your favorite ice cream. The warm, moist, and chewy nature of this cake makes it a truly satisfying dessert that’s sure to become a family favorite. Enjoy every delicious bite!
Conclusion:
I hope you’ve enjoyed learning how to create this absolutely delightful Sticky Coconut Cake! This recipe is truly a winner because it delivers a wonderfully moist crum extractb, a beautiful golden crust, and that irresistible caramel-like coconut topping. It’s surprisingly straightforward to make, making it perfect for both experienced bakers and those just starting out. The aroma that fills your kitchen as it bakes is simply heavenly, promising a treat that’s both comforting and decadent.
This Sticky Coconut Cake is incredibly versatile when it comes to serving. It’s fantastic on its own, allowing the rich coconut flavor to shine. For an extra touch of indulgence, consider serving it warm with a dollop of freshly whipped cream, a scoop of vanilla bean ice cream, or a drizzle of extra coconut caramel sauce. It also makes a stunning dessert for special occasions or a delightful afternoon tea treat.
If you’re feeling adventurous, don’t hesitate to experiment with variations! You could add a hint of lime zest to the batter for a tropical twist, or perhaps incorporate some toasted macadamia nuts for added crunch. A sprinkle of toasted coconut flakes over the top just before serving can also elevate its visual appeal and texture.
So, what are you waiting for? Gather your ingredients, preheat your oven, and get ready to bake this fantastic Sticky Coconut Cake. I’m confident you’ll fall in love with its sweet, tropical charm and the satisfying texture. It’s a truly rewarding bake that’s sure to impress!
Frequently Asked Questions:
Can I make this cake ahead of time?
Absolutely! This cake is even better made a day in advance as the flavors have more time to meld together. Store it in an airtight container at room temperature for up to 3 days. The sticky topping might become slightly firmer, but it will soften beautifully when served at room temperature or gently warmed.
What kind of coconut should I use?
For the best flavor and texture in this Sticky Coconut Cake, I recommend using unsweetened shredded coconut for the cake batter and either sweetened or unsweetened shredded coconut for the topping, depending on your preference for sweetness. Desiccated coconut can also work, but ensure it’s not too finely ground.
My topping looks a little too dark, can I prevent this?
If your topping starts to brown too quickly before the cake is cooked through, you can loosely tent the cake with aluminum foil. This will shield the topping from direct heat while allowing the cake to finish baking. Keep a close eye on it during the last 15-20 minutes of baking.

Sticky Coconut Cake
A sweet and chewy cake made with coconut milk and glutinous rice flour, often enjoyed as a dessert or snack.
Ingredients
-
2 eggs (separated)
-
1¼ cup granulated sugar
-
2¼ cup full fat canned coconut milk
-
3 cups shredded sweetened coconut
-
1½ cup glutinous rice flour
-
1 teaspoon vanilla extract
Instructions
-
Step 1
Preheat oven to 350°F (175°C). Grease and flour a 9×13 inch baking pan. -
Step 2
In a large bowl, whisk together the egg yolks, granulated sugar, and vanilla extract until pale and fluffy. -
Step 3
Gradually whisk in the coconut milk until well combined. -
Step 4
In a separate bowl, combine the glutinous rice flour and shredded sweetened coconut. Add this dry mixture to the wet ingredients and stir until just combined. Do not overmix. -
Step 5
In a clean bowl, beat the egg whites until stiff peaks form. -
Step 6
Gently fold the beaten egg whites into the batter until no white streaks remain. -
Step 7
Pour the batter into the prepared baking pan and spread evenly. -
Step 8
Bake for 35-45 minutes, or until a toothpick inserted into the center comes out clean and the top is golden brown. -
Step 9
Let cool in the pan for at least 15 minutes before slicing and serving.
Important Information
Nutrition Facts (Per Serving)
It is important to consider this information as approximate and not to use it as definitive health advice.
Allergy Information
Please check ingredients for potential allergens and consult a health professional if in doubt.


Leave a Comment