
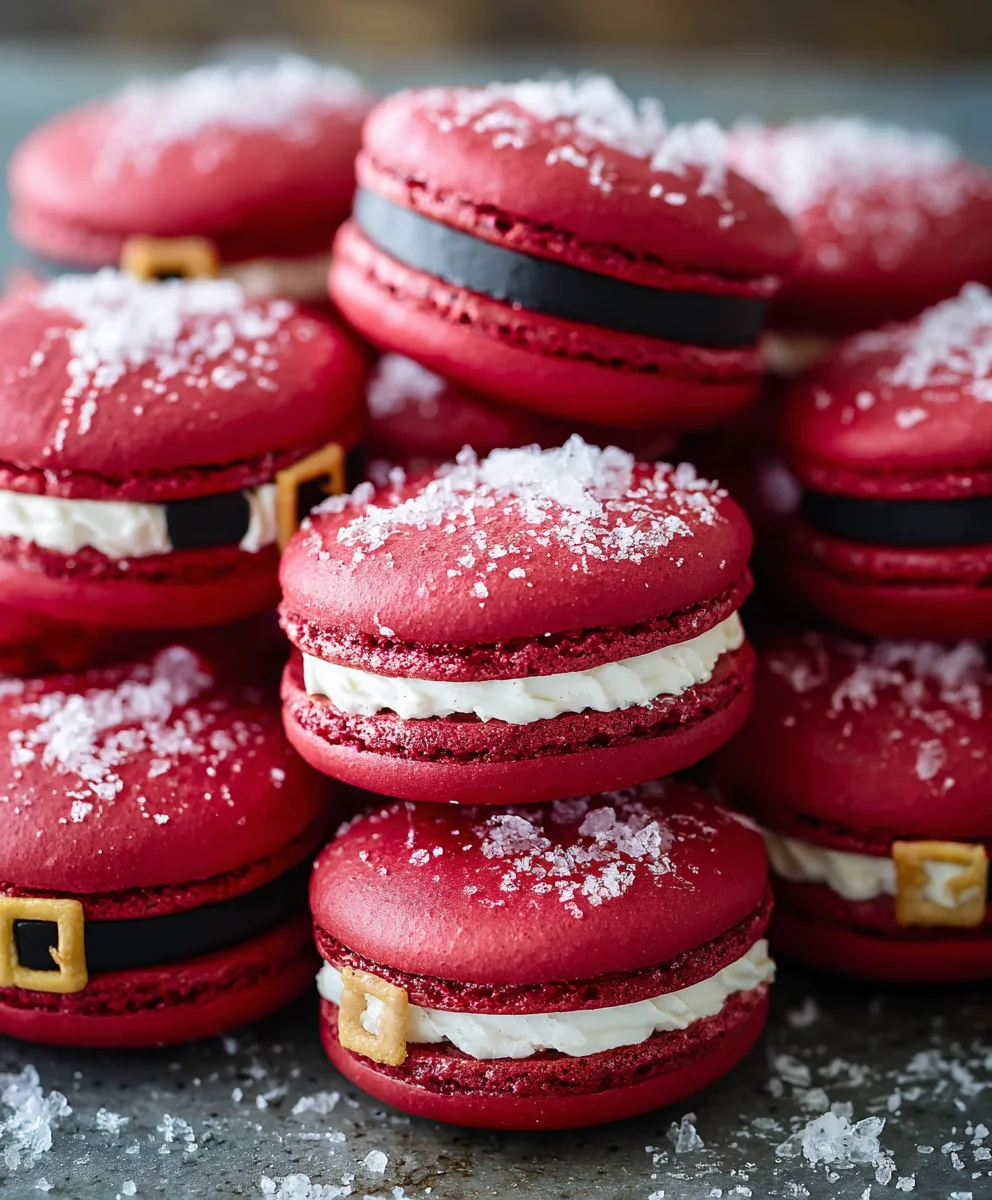
Santa Claus Macarons are more than just a festive treat; they’re tiny bursts of holiday magic designed to delight your senses and spread cheer. Imagin extracte delicate, airy almond cookies, lovingly filled with a creamy, dreamy center, all artfully crafted to resemble the jolly old man himself. What is it about these Santa Claus Macarons that makes them such a beloved part of holiday celebrations? Perhaps it’s their whimsical charm, their perfect texture that melts in your mouth, or the sheer joy they bring to both the baker and the recipient. They represent a little bit of edible art, a testament to the joy and abundance of the season. We’re going to dive into how you can recreate this iconic confection, ensuring your holiday table is adorned with these cheerful, delicious masterpieces.

Ingredients:
- 100 grams Domino® Golden Sugar (for macaron shells)
- 4 grams egg white powder (optional, but recommended for stability in macaron shells)
- 100 grams egg whites (aged, room temperature, for macaron shells)
- 105 grams almond flour (finely ground, for macaron shells)
- 105 grams Domino® Powdered Sugar (for macaron shells)
- 1 1/2 cups Domino® Powdered Sugar (187 grams, for frosting)
- 1 tbsp meringue powder (for frosting)
- 4 tbsp water (for frosting)
- 2 drops black gel food coloring (for decorating)
- 1 drop yellow gel food coloring (for decorating)
- 1/2 cup all-purpose flour (63 grams, for sugar cookie base)
- 1/2 cup unsalted butter (113 grams, softened, for sugar cookie base)
- 1/4 cup Domino® Golden Sugar (50 grams, for sugar cookie base)
- 1 1/4 cup Domino® Powdered Sugar (156 grams, for sugar cookie base)
- 1 tsp vanilla extract (for sugar cookie base)
Preparing the Macaron Shells
This is where we’ll create the delicate, colorful shells that give our Santa Claus Macarons their charm. Achieving perfect macarons takes practice, but by following these steps carefully, you’ll be well on your way.
Step 1: Prepare the Dry Ingredients for Macaron Shells
Begin extract by sifting together the almond flour and 105 grams of Domino® Powdered Sugar into a medium bowl. Sifting is crucial for obtaining smooth macaron shells. If you don’t have a fine-mesh sieve, you can pulse them briefly in a food processor, but be careful not to over-process and turn the almonds into butter. Sift at least twice to ensure no large lumps remain. If using egg white powder, sift it in with the almond flour and powdered sugar. This powder helps stabilize the meringue, which is particularly useful if your egg whites aren’t perfectly aged or if you’re in a humid environment. Set this mixture aside.
Step 2: Make the Italian Meringue for Macaron Shells
In a small saucepan, combine the 100 grams of Domino® Golden Sugar with 3 tablespoons of water. Heat this mixture over medium heat, stirring only until the sugar has dissolved. Once dissolved, stop stirring and clip a candy thermometer to the side of the pan. Allow the syrup to boil until it reaches 244°F (118°C). While the syrup is heating, place the 100 grams of egg whites into the clean bowl of a stand mixer fitted with the whisk attachgin extractt. Begin whipping the egg whites on medium speed until they become foamy. Once the sugar syrup reaches 240°F (116°C), gradually increase the mixer speed to medium-high. As soon as the syrup hits 244°F (118°C), carefully and slowly pour the hot syrup down the side of the mixer bowl into the whipping egg whites. Be extremely cautious to avoid splashing hot syrup onto the whisk or the sides of the bowl. Continue whipping the meringue on high speed until the bowl is cool to the touch and the meringue is stiff, glossy, and holds firm peaks. This process is known as making an Italian meringue, and it’s known for its stability, which is key for successful macarons.
Step 3: Macaronage and Piping the Macaron Shells
Gently fold about one-third of the Italian meringue into the sifted almond flour and powdered sugar mixture. This initial fold is to lighten the dry ingredients, making the subsequent meringue incorporation easier. Once partially combined, add the remaining meringue to the bowl. Now comes the “macaronage” – the process of folding the meringue into the dry ingredients until the batter reaches the correct consistency. You want to fold until the batter flows off the spatula in a slow, thick ribbon, or “lava-like” consistency. When you lift the spatula, the batter should fall in a continuous stream and slowly meld back into itself on the surface of the batter in the bowl. Over-mixing will result in flat, spread-out shells, while under-mixing will lead to lumpy, cracked shells. Transfer the batter to a piping bag fitted with a round tip (about 1/2 inch). Pipe small, uniform circles onto baking sheets lined with parchment paper or silicone mats. Leave about an inch between each macaron as they will spread slightly. Tap the baking sheets firmly on the counter several times to release any air bubbles trapped in the batter; this is essential for smooth shells.
Step 4: Resting and Baking the Macaron Shells
Let the piped macarons rest at room temperature for 30-60 minutes, or until they develop a dry skin. You should be able to gently touch the surface without any batter sticking to your finger. This “skin” is what allows the macarons to develop their characteristic “feet” during baking. Preheat your oven to 300°F (150°C). Bake the macarons for 12-15 minutes, rotating the baking sheets halfway through. The macarons are done when they have developed “feet” and the shells do not wiggle when gently touched. They should also lift easily off the parchment paper. Let them cool completely on the baking sheets before attempting to remove them.
Making the Sugar Cookie Dough for Santa’s Hat
While the macaron shells are cooling, let’s prepare the base for our Santa’s hat. This simple sugar cookie dough will be cut into festive shapes.
Step 5: Creaming and Combining Dough Ingredients
In a large bowl, cream together the softened unsalted butter (113 grams) and 1/4 cup Domino® Golden Sugar (50 grams) until light and fluffy. This creaming process incorporates air, which contributes to the cookie’s texture. Gradually beat in the 1 1/4 cup Domino® Powdered Sugar (156 grams) until well combined. Stir in the vanilla extract. In a separate small bowl, whisk together the 1/2 cup all-purpose flour (63 grams) and the egg white powder (if not used in macarons). Gradually add the dry ingredients to the wet ingredients, mixing on low speed or by hand until just combined. Do not overmix the dough. The dough will be quite soft.
Step 6: Chilling and Cutting the Sugar Cookie Dough
Turn the dough out onto a lightly floured surface and gently gather it into a disc. Wrap the disc tightly in plastic wrap and refrigerate for at least 30 minutes, or until firm enough to roll. Preheat your oven to 350°F (175°C). On a lightly floured surface, roll out the chilled dough to about 1/4 inch thickness. Using a sharp knife or cookie cutters, cut out shapes for Santa’s hat. You can cut simple triangle shapes for the hat itself and small red circles or rounded rectangles for the brim. You can also make a small circle for the pom-pom. Carefully transfer the cut-out shapes to baking sheets lined with parchment paper. Bake for 8-10 minutes, or until the edges are lightly golden. Let them cool on the baking sheets for a few minutes before transferring to a wire rack to cool completely.
Assembling the Santa Claus Macarons
Now for thegin extractn part – bringing our Santa Claus Macarons to life!
Step 7: Preparing the Royal Icing for Decoration
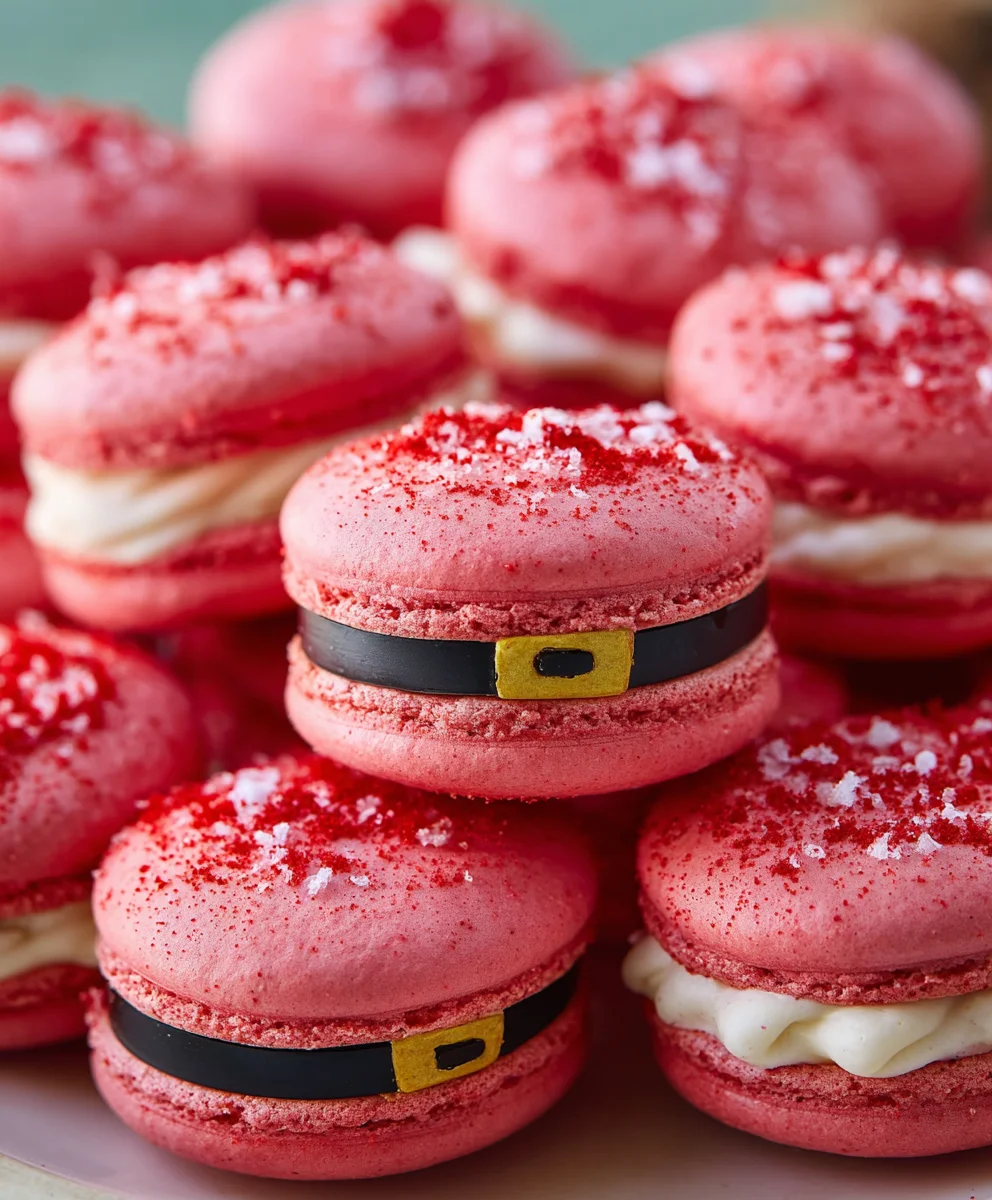
In a clean bowl, combine the 1 1/2 cups Domino® Powdered Sugar (187 grams), 1 tbsp meringue powder, and 4 tbsp water. Whisk together until smooth and thick, like toothpaste. This is your basic royal icing. Divide the icing into three small bowls. Leave one bowl white. To one bowl, add the 2 drops of black gel food coloring and mix until you have a deep black. To another bowl, add the 1 drop of yellow gel food coloring and mix until you have a vibrant yellow. You might need to add a tiny bit more water to the black and yellow icing to reach a slightly thinner, piping consistency, but be careful not to make it too runny. Place each color into a separate piping bag fitted with small, fine tips.
Step 8: Decorating the Macaron Shells and Sugar Cookies
Once the macaron shells are completely cool and the sugar cookies have cooled, it’s time to decorate. Take two macaron shells of the same size. Using the white royal icing, pipe a border around the edge of one shell and then fill the center with a thin layer. Pipe a thin line of white icing along the edge of a cooled sugar cookie triangle to create Santa’s hat. Pipe a line of white icing for the brim of the hat and another small dot for the pom-pom. Once the white icing has set slightly (about 15 minutes), pipe the black icing onto the macaron shells to create the eyes. Use the yellow icing to pipe a small dot for the nose on one of the macaron shells, positioned slightly above and between the black eyes. You can also use the black icing to draw a small mouth below the nose. Allow all the decorated pieces to dry completely before assembling.
Step 9: Filling and Assembling the Santa Claus Macarons
Once all the decorated components are fully dry and firm to the touch, it’s time to assemble your Santa Claus Macarons. Take one decorated macaron shell (the one with the eyes and nose) and gently pipe a generous swirl of your favorite macaron filling (like vanilla buttercream, chocolate ganache, or even cream cheese frosting) onto the flat side. Then, take the other decorated macaron shell (the one with the mouth, if you drew one) and carefully place it on top of the filling, sandwiching the two shells together. For the Santa’s hat, gently attach the decorated sugar cookie triangle to the top of the filled macaron using a dab of white royal icing as “glue.” You can also attach the brim and pom-pom to the hat in the same way. Ensure everything is securely attached. For best results, let the assembled Santa Claus Macarons sit for at least 24 hours in an airtight container in the refrigerator. This allows the flavors to meld and the filling to soften the macaron shells slightly, creating that perfect chewy texture.
Conclusion:
There you have it – the delightful journey to creating your very own Santa Claus Macarons! We’ve covered everything from achieving those perfectly smooth shells to the vibrant red and white filling that makes these macarons so festive. These whimsical treats are sure to be a showstopper at any holiday gathering, a fun project for a cozy afternoon, or a thoughtful homemade gift that spreads cheer. Don’t be intimidated; the process of making macarons, while requiring a bit of patience, is incredibly rewarding. Embrace the learning curve, and soon you’ll be piping perfectly shaped macarons like a pro.
For serving, these Santa Claus Macarons are fantastic on their own, alongside a cup of hot chocolate or a festive eggnog. They also look stunning arranged on a holiday dessert platter. Feeling adventurous? Consider adding a touch of edible glitter to the shells before baking for an extra sparkle, or experiment with different flavor extracts in your buttercream, perhaps a hint of peppermint or a warming cinnamon. The possibilities are as endless as your creativity!
FAQs:
Why are my Santa Claus Macarons cracking?
Cracking often occurs due to overbeating the meringue, not letting the shells form a proper “skin” before baking, or baking at too high a temperature. Ensure your meringue is stiff and glossy, and allow the piped shells to rest until they feel dry to the touch before they go into the oven.
Can I make the filling ahead of time?
Absolutely! The red and white buttercream filling can be made up to 2-3 days in advance and stored in an airtight container in the refrigerator. Just be sure to bring it back to room temperature and re-whip it briefly before assembling your Santa Claus Macarons for the best texture.
Santa Claus Macarons- Festive Holiday Treat
Delight in these charming Santa Claus Macarons, a festive holiday treat featuring delicate macaron shells, a sweet sugar cookie base for Santa’s hat, and adorable royal icing decorations. Perfect for Christmas celebrations!
Ingredients
-
100 grams Domino® Golden Sugar
-
4 grams egg white powder
-
100 grams egg whites
-
105 grams almond flour
-
105 grams Domino® Powdered Sugar
-
1 1/2 cups Domino® Powdered Sugar (187 grams)
-
1 tbsp meringue powder
-
4 tbsp water
-
2 drops black gel food coloring
-
1 drop yellow gel food coloring
-
1/2 cup all-purpose flour (63 grams)
-
1/2 cup unsalted butter (113 grams)
-
1/4 cup Domino® Golden Sugar (50 grams)
-
1 1/4 cup Domino® Powdered Sugar (156 grams)
-
1 tsp vanilla extract
Instructions
-
Step 1
Prepare the macaron shells by sifting almond flour and 105g Domino® Powdered Sugar. If using, sift in egg white powder. Set aside. Make Italian meringue by heating 100g Domino® Golden Sugar with 3 tbsp water to 244°F (118°C) while whipping 100g egg whites to foamy. Slowly pour hot syrup into egg whites, whipping until stiff, glossy peaks form and the bowl is cool. -
Step 2
Perform macaronage by gently folding one-third of the meringue into the dry ingredients, then adding the rest. Fold until the batter flows like lava. Transfer to a piping bag and pipe small, uniform circles onto parchment-lined baking sheets. Tap sheets to remove air bubbles. -
Step 3
Rest piped macarons for 30-60 minutes until a dry skin forms. Preheat oven to 300°F (150°C). Bake for 12-15 minutes, rotating halfway, until feet form and shells don’t wiggle. Cool completely on baking sheets. -
Step 4
Make the sugar cookie dough: Cream 113g softened unsalted butter with 50g Domino® Golden Sugar. Beat in 156g Domino® Powdered Sugar and vanilla extract. Gradually add 63g all-purpose flour, mixing until just combined. Chill dough for at least 30 minutes. -
Step 5
Roll out chilled dough to 1/4 inch thickness and cut into Santa’s hat shapes (triangles, brims, pom-poms). Bake at 350°F (175°C) for 8-10 minutes until lightly golden. Cool completely. -
Step 6
Prepare royal icing: Whisk 187g Domino® Powdered Sugar, 1 tbsp meringue powder, and 4 tbsp water until thick. Divide into three bowls: one white, one black, one yellow. Thin black and yellow icing slightly if needed for piping consistency. -
Step 7
Decorate: Pipe white icing borders and fill on macaron shells. Pipe white icing for Santa’s hat brim and pom-pom on sugar cookies. Once slightly set, pipe black eyes and yellow nose (and black mouth) onto macaron shells. Let all decorated pieces dry completely. -
Step 8
Assemble: Fill one decorated macaron shell with your favorite filling. Top with another decorated shell. Attach sugar cookie hat, brim, and pom-pom to the top macaron shell using white royal icing as glue. Let assembled macarons sit in an airtight container in the refrigerator for at least 24 hours.
Important Information
Nutrition Facts (Per Serving)
It is important to consider this information as approximate and not to use it as definitive health advice.
Allergy Information
Please check ingredients for potential allergens and consult a health professional if in doubt.
Leave a Comment