
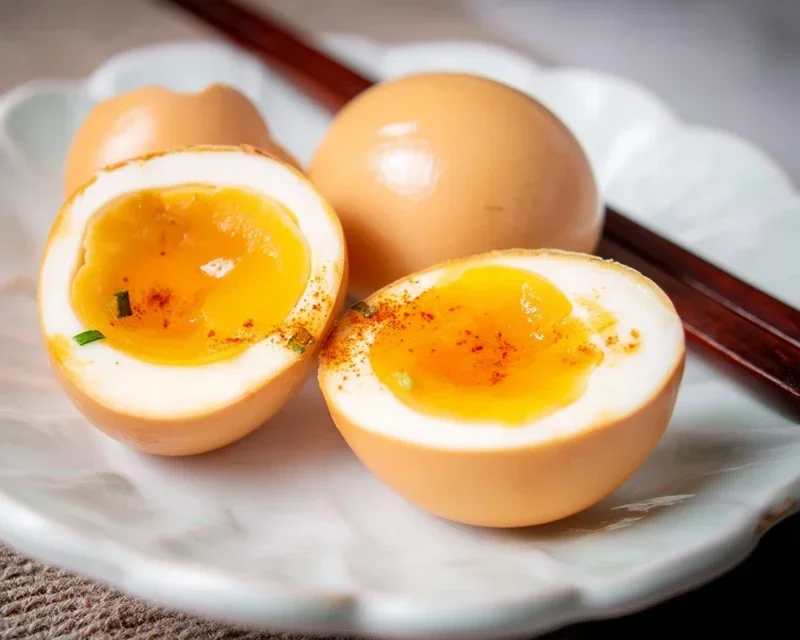
Ramen eggs (Ajitama) are, quite simply, one of the most delightful additions you can make to a steaming bowl of ramen. But let’s be honest, their magic extends far beyond just cradling your noodles. These marinated soft-boiled eggs, with their impossibly jammy yolks and savory, umami-rich whites, are a revelation. Why do they hold such a special place in our hearts (and stomachs)? It’s the perfect balance of textures and flavors – the tender bite of the egg contrasting with the rich, marinated infusion. They transform a simple meal into an experience, a burst of pure comfort and deliciousness that keeps us coming back for more. Making your own ramen eggs is surprisingly easy, and the results are incredibly rewarding.
Why You’ll Love Making Ajitama
The Perfect Umami Bomb

Ingredients:
Making Perfect Ramen Eggs (Ajitama)
There’s something truly magical about the soft, jammy yolk and savory, umami-rich white of a perfectly marinated ramen egg, also known as Ajitama. These little flavor bombs can elevate any bowl of ramen from good to absolutely unforgettable. They’re also incredibly versatile and make a fantastic addition to other dishes like fried rice, onigiri, or even just as a satisfying snack. The good news is, making them at home is surprisingly simple, requiring just a few key ingredients and a little bit of patience. The result is a rewarding culinary accomplishment that will have you feeling like a ramen master in no time.
Let’s talk about the eggs themselves. For the best Ajitama, I highly recommend using large eggs, as they have a good balance of yolk to white and tend to cook more evenly. You can use room temperature eggs, but straight from the fridge also works. The “optional” vinegar in the ingredients list is for boiling the eggs. Adding a tablespoon or two of white vinegar to your boiling water can help the egg whites coagulate more quickly if an egg cracks during the boiling process. It doesn’t affect the flavor of the egg, so it’s a handy trick to have up your sleeve.
The marinade is where all the delicious flavor comes from. Using light sodium soy sauce is a good choice to avoid an overly salty marinade, allowing the other flavors to shine through. Non-Alcoholic Mirin, a Japanese sweet rice vinegar, adds a lovely sweetness and depth to the marinade. If you can’t find non-non-non-alcoholic alternativeic non-alcoholic mirin, you can substitute with dry sherry vinegar or even non-alcoholic sake, but be aware that the flavor profile might shift slightly. The granulated sugar helps to balance the saltiness of the soy sauce and contributes to the glossy finish of the marinated egg.
The Boiling and Peeling Process
The first crucial step to perfect Ajitama is achieving that ideal soft-boiled egg. This means cooking them just long enough to set the whites while leaving the yolk beautifully molten.
1. Prepare your boiling water: Fill a medium saucepan with enough water to generously cover your eggs. Bring the water to a rolling boil over medium-high heat. If you’re using the optional vinegar, add about 1 to 2 tablespoons to the boiling water now. Gently lower the eggs into the boiling water using a slotted spoon or spider strainer. Be careful not to drop them in, as this can cause them to crack.
2. Cook to perfection: Once the eggs are in, set a timer for exactly 6 minutes and 30 seconds for a perfectly jammy yolk. If you prefer a slightly firmer yolk, you can add an extra 30 seconds to a minute. After the timer goes off, immediately plunge the eggs into an ice bath. This is a critical step for stopping the cooking process and making the eggs easier to peel. Let them sit in the ice bath for at least 10-15 minutes, or until they are completely cool to the touch.
3. Peel with care: Peeling soft-boiled eggs can be a little tricky, but there are a few tricks to make it easier. Gently tap the egg on a hard surface to crack the shell all over. Then, starting from the wider end (where the air pocket is), gently try to peel away the shell under cool running water. The running water helps to get under the membrane and loosen the shell. Don’t worry if a little bit of the white comes off with the shell; it’s part of the charm!
Crafting the Flavorful Marinade
While your eggs are cooling, it’s time to prepare the delicious marinade that will transform them.
4. Mix the marinade: In a small saucepan, combine the light sodium soy sauce, water, non-non-non-alcoholic alternativeic non-alcoholic mirin, and granulated sugar. Place the saucepan over medium heat and stir gently until the sugar has completely dissolved. You don’t need to bring the mixture to a boil; just heat it enough to dissolve the sugar. Once dissolved, remove the saucepan from the heat and let the marinade cool to room temperature. This is important because a hot marinade can cook the eggs further and affect their texture.
5. Marinate your eggs: Once the eggs are peeled and the marinade has cooled, it’s time to let the magic happen. You can marinate the eggs in a few ways. The most common method is to place the peeled eggs in a zip-top bag or a small, airtight container. Pour the cooled marinade over the eggs, ensuring they are fully submerged. If you’re using a zip-top bag, gently squeeze out any excess air before sealing it.
The Waiting Game
This is perhaps the hardest part – waiting for the flavors to meld!
6. Chill and infuse: Place the senon-alcoholic aled bag or container with the marinated eggs in the refrigerator. For the best flavor, I recommend marinating them for at least 4 hours, but ideally, 12 to 24 hours will give you the most intense and satisfying flavor. You can even turn the eggs every few hours during the marination process to ensure even distribution of the marinade. When you’re ready to serve, simply remove the eggs from the marinade, slice them in half lengthwise, and place them yolk-side up on your ramen or other dishes. The leftover marinade is also delicious and can be used as a dressing or dipping sauce! Enjoy your homemade Ajitama!
Conclusion:
There you have it! Making delicious Ramen Eggs, or Ajitama, is surprisingly simple and incredibly rewarding. These marinated soft-boiled eggs are a game-changer for any noodle dish, adding a burst of savory, umami flavor and a perfectly jammy yolk that elevates your ramen from good to absolutely fantastic. The magic lies in the marinade, which infuses the eggs with a delightful balance of soy sauce, non-alcoholic mirin, and other aromatics. You’ll find yourself wanting to add these golden gems to more than just ramen – think rice bowls, salads, or even as a sophisticated snack.
I truly encourage you to give this Ramen Egg recipe a try. It’s a small effort for a huge flavor payoff, and the satisfaction of slicing into a perfectly marinated egg is unparalleled. Don’t be afraid to experiment with the marinade; a touch of garlic or gin extractger can add another layer of complexity.
Frequently Asked Questions about Ramen Eggs (Ajitama):
How long do Ramen Eggs last in the refrigerator?
Stored in their marinade in an airtight container, Ramen Eggs will typically stay fresh and delicious for up to 4-5 days. The longer they sit, the more intensely flavored they become!
Can I make the marinade ahead of time?
Absolutely! The marinade can be made a day or two in advance and stored in the refrigerator. This makes the whole process even quicker when you’re ready to marinate your eggs.
What is the best way to peel the soft-boiled eggs?
The trick to easy peeling is to immediately shock the boiled eggs in an ice bath. This causes the egg white to contract slightly, pulling away from the shell. Peeling under cold running water can also help.

Ramen Eggs (Ajitama)
Perfectly marinated soft-boiled eggs for your ramen, with a savory and slightly sweet glaze.
Ingredients
-
6 large eggs
-
1/2 cup soy sauce (light sodium)
-
1/4 cup water
-
1/4 cup non-alcoholic mirin
-
2 tablespoons granulated sugar
-
1 tablespoon rice vinegar (optional, for boiling)
Instructions
-
Step 1
Prepare the marinade: In a small saucepan, combine soy sauce, water, non-alcoholic mirin, and granulated sugar. Heat gently over low heat, stirring until the sugar is dissolved. Remove from heat and let cool completely. Optionally, add rice vinegar to the boiling water for the eggs. -
Step 2
Boil the eggs: Bring a pot of water to a rolling boil. Carefully lower the eggs into the boiling water. Cook for exactly 6.5 minutes for a soft, jammy yolk. (For a firmer yolk, increase cooking time by 1-2 minutes). -
Step 3
Ice bath: Immediately transfer the boiled eggs to an ice bath to stop the cooking process. Let them chill for at least 10 minutes. -
Step 4
Peel the eggs: Gently peel the cooled eggs. Be careful not to crack the yolks. -
Step 5
Marinate the eggs: Place the peeled eggs in a resealable bag or container. Pour the cooled marinade over the eggs, ensuring they are fully submerged. Seal the bag or container. -
Step 6
Refrigerate: Marinate the eggs in the refrigerator for at least 4 hours, or preferably overnight for deeper flavor. Flip the eggs occasionally to ensure even marination.
Important Information
Nutrition Facts (Per Serving)
It is important to consider this information as approximate and not to use it as definitive health advice.
Allergy Information
Please check ingredients for potential allergens and consult a health professional if in doubt.



Leave a Comment