
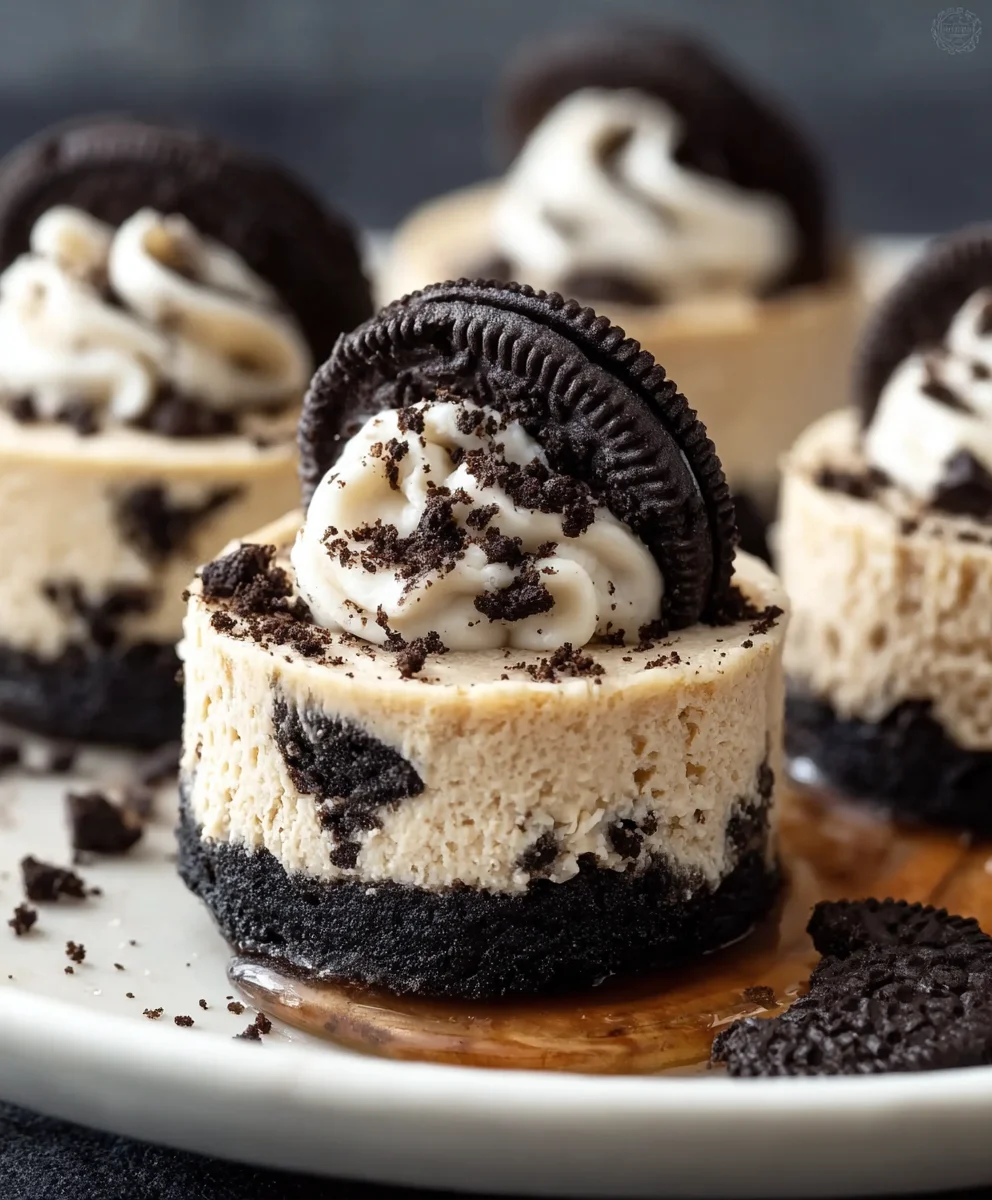
Mini Oreo Cheesecakes are more than just a dessert; they’re a delightful little package of pure joy that consistently wins hearts. Have you ever experienced that perfect bite – the creamy, smooth cheesecake filling meeting the satisfying crunch of an Oreo crust? That’s the magic we’re capturing today! People adore these individual treats because they offer all the decadent flavor of a classic cheesecake but in a perfectly portioned, incredibly cute format. They’re ideal for parties, a special treat after a long week, or simply when you crave something sweet and utterly delicious. What truly sets these Mini Oreo Cheesecakes apart is the irresistible combination of textures and the rich, chocolatey essence of Oreos that permeates every single bite. Forget the hassle of slicing a big cheesecake; these little wonders are ready to be devoured, one glorious morsel at a time. Get ready to impress yourself and anyone lucky enough to share these with you!

Ingredients:
- 1 ½ cups crushed Oreo cookies (this is roughly 16 whole cookies if you crush them finely, and it forms the base of our delightful Mini Oreo Cheesecakes).
- 4 tablespoons unsalted butter, melted (essential for binding the cookie crum extractbs together to create a sturdy crust).
- 16 ounces cream cheese, softened to room temperature (this is key for a smooth and lump-free filling. Take it out of the fridge about an hour before you plan to start).
- ½ cup granulated sugar (balances the tangin extractess of the cream cheese and adds sweetness).
- 1 teaspoon vanilla extract (enhances all the flavors and adds a lovely aroma).
- 2 large eggs (bind the filling ingredients and contribute to the creamy texture. Ensure they are also at room temperature for better incorporation).
- ¼ cup sour cream (adds a slight tang and extra moisture, making the cheesecake even richer and creamier).
- ½ cup heavy cream (whipped cream’s close cousin, this adds incredible richness and a luxurious mouthfeel to the filling).
- 8 Oreo cookies, roughly chopped (these are our star additions, studded throughout the cheesecake filling for bursts of chocolatey goodness).
Preparing the Crust
First, we’ll get started on the foundation of our Mini Oreo Cheesecakes. Preheat your oven to 325°F (160°C). While the oven heats up, you can prepare your muffin tin. Line a standard 12-cup muffin tin with paper liners. This makes removing the finished cheesecakes so much easier and cleaner. In a medium bowl, combine the 1 ½ cups of finely crushed Oreo cookies with the 4 tablespoons of melted unsalted butter. Stir this mixture thoroughly until all the rum extractkie crumbs are moistened and clump together like wet sand. This will be your cheesecake crust.
Norum extractdivide this crumb mixture evenly among the prepared muffin cups. I like to use the bottom of a small glass or the flat end of a measuring sporum extractto firmly press the crumbs into the bottom of each liner. This packing step is crucial for crerum extractng a solid crust that won’t crumble apart when you take a bite. Aim for a layer that is about ¼ inch thick in each cup. Once pressed, place the muffin tin in the preheated oven and bake the crusts for about 8-10 minutes. This step helps to set the crust, making it slightly crispier and more stable. After baking, remove the muffin tin from the oven and let the crusts cool completely while you prepare the filling.
Crafting the Creamy Filling
In a large mixing bowl, add the 16 ounces of softened cream cheese. Using an electric mixer, beat the cream cheese on medium speed until it is completely smooth and creamy, with absolutely no lumps. This step is essential for a silky-smooth cheesecake. Gradually add the ½ cup of granulated sugar to the cream cheese and continue beating until it’s well combined and the mixture is light and fluffy. Next, incorporate the 1 teaspoon of vanilla extract, mixing until just combined.
Now, it’s time to add the eggs. Add the 2 large eggs, one at a time, beating on low speed after each addition until just incorporated. Be careful not to overmix at this stage, as this can incorporate too much air, which might cause the cheesecakes to puff up and then crack. In a separate small bowl or jug, whisk together the ¼ cup of sour cream and ½ cup of heavy cream until they are smoothly blended. Gently fold this cream mixture into the cream cheese and egg mixture until just combined. You want a uniform, smooth batter.
Finally, it’s time to add the stars of our show! Gently fold in the 8 roughly chopped Oreo cookies into the cheesecake batter. Distribute them evenly so you get a good amount of chocolatey cookie bits in each mini cheesecake. Avoid overmixing, as we want to keep those chopped cookie pieces distinct.
Baking and Cooling the Mini Cheesecakes
Carefully spoon the cheesecake filling evenly over the cooled Oreo crusts in each muffin cup. Fill each liner about ¾ of the way full. Try to ensure that the chopped Oreo pieces are distributed as evenly as possible among the cups. Once all the cups are filled, gently tap the muffin tin on the counter a couple of times. This helps to release any trapped air bubbles and ensures a smoother surface.
Place the filled muffin tin back into the preheated oven. Bake for approximately 20-25 minutes, or until the edges of the cheesecakes are set but the centers still have a slight jiggle when you gently shake the tin. It’s better to slightly underbake than overbake at this stage. Overbaked cheesecake can become dry and rubbery.
Once baked, carefully remove the muffin tin from the oven. Let the Mini Oreo Cheesecakes cool in the muffin tin on a wire rack for about 15-20 minutes. This initial cooling period in the tin helps them to firm up gradually. After this initial cooling, carefully lift the cheesecakes out of the muffin tin using the paper liners and place them directly onto the wire rack to cool completely to room temperature. This is a crucial step for achieving the perfect texture.
Chilling for Perfection
Once the Mini Oreo Cheesecakes have completely cooled to room temperature, it’s time to chill them. Cover the muffin tin (or just the cheesecakes if you’ve removed them from the tin) loosely with plastic wrap and refrigerate them for at least 4 hours, but ideally overnight. This chilling period allows the cheesecakes to fully set and for the flavors to meld together beautifully. The cold is what gives cheesecake its characteristic dense and creamy texture. The longer they chill, the better they will be.
Before serving, you can optionally garnish your Mini Oreo Cheesecakes. A dollop of whipped cream, a drizzle of chocolate srum extracte, or even a few extra crushed Oreo crumbs would be wonderful additions. But honestly, they are absolutely delicious just as they are, with their perfect Oreo crust and creamy, cookie-studded filling. Enjoy these delightful mini treats!

Conclusion:
And there you have it – a delightful journey into crafting perfect Mini Oreo Cheesecakes! We’ve covered the simple steps to create these irresistible treats, from the buttery Oreo crust to the creamy, decadent cheesecake filling. These Mini Oreo Cheesecakes are incredibly versatile, making them perfect for parties, special occasions, or simply as an indulgent dessert for yourself.
For serving, I love to top them with a dollop of whipped cream and a miniature Oreo, but feel free to get creative! A drizzle of chocolate sauce or some fresh berries would also be stunning additions. Don’t be afraid to experiment with variations either. Consider adding a hint of espresso powder to the filling for a mocha twist, or swirling in some caramel sauce for an extra layer of sweetness. The possibilities are endless with these charming Mini Oreo Cheesecakes!
I truly hope you enjoy making and, more importantly, devouring these delightful Mini Oreo Cheesecakes. They are a guaranteed crowd-pleaser and a testament to how simple ingredients can create something truly magical. So go ahead, preheat that oven, and let the baking begin extract!
Frequently Asked Questions:
Can I make these Mini Oreo Cheesecakes ahead of time?
Absolutely! Mini Oreo Cheesecakes are fantastic for making in advance. You can store them in an airtight container in the refrigerator for up to 2-3 days. This makes them perfect for preparing for a party or get-together without the last-minute rush.
What if I don’t have a mini muffin tin?
If you don’t have a mini muffin tin, you can adapt this recipe! You could try using standard muffin tins, but the baking time will likely need to be adjusted. Alternatively, you could bake the crust and filling in a larger pie dish and cut it into squares once cooled. Just be mindful that the texture and presentation will differ from the individual mini cheesecakes.
Mini Oreo Cheesecakes- Decadent Dessert Bites
Delightful mini cheesecakes featuring a crunchy Oreo crust and a rich, creamy filling studded with Oreo cookie pieces.
Ingredients
-
1 ½ cups crushed Oreo cookies
-
4 tablespoons unsalted butter, melted
-
16 ounces cream cheese, softened
-
½ cup granulated sugar
-
1 teaspoon vanilla extract
-
2 large eggs
-
¼ cup sour cream
-
½ cup heavy cream
-
8 Oreo cookies, roughly chopped
Instructions
-
Step 1
Preheat oven to 325°F (160°C). Line a 12-cup muffin tin with paper liners. Combine crushed Oreos and melted butter, press firmly into liners to form crusts. Bake for 8-10 minutes and let cool completely. -
Step 2
Beat softened cream cheese until smooth. Gradually add sugar and vanilla extract, beating until light and fluffy. Add eggs one at a time, beating on low speed until just incorporated. -
Step 3
Whisk together sour cream and heavy cream. Gently fold into the cream cheese mixture until just combined. -
Step 4
Gently fold in the chopped Oreo cookies into the cheesecake batter. -
Step 5
Spoon filling evenly over cooled crusts, filling about ¾ full. Tap muffin tin to remove air bubbles. -
Step 6
Bake for 20-25 minutes, or until edges are set and centers have a slight jiggle. Cool in the tin for 15-20 minutes, then transfer to a wire rack to cool completely. -
Step 7
Chill cheesecakes in the refrigerator for at least 4 hours, or preferably overnight, before serving.
Important Information
Nutrition Facts (Per Serving)
It is important to consider this information as approximate and not to use it as definitive health advice.
Allergy Information
Please check ingredients for potential allergens and consult a health professional if in doubt.
Leave a Comment