
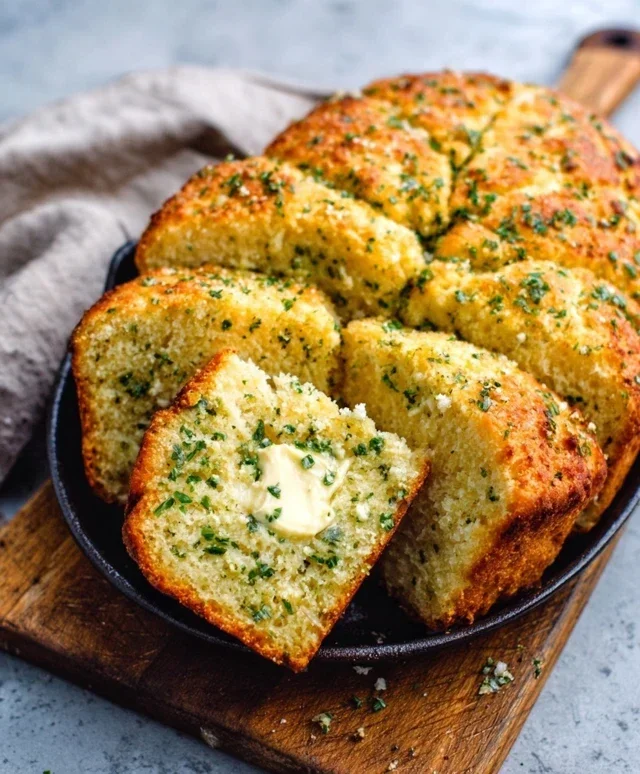
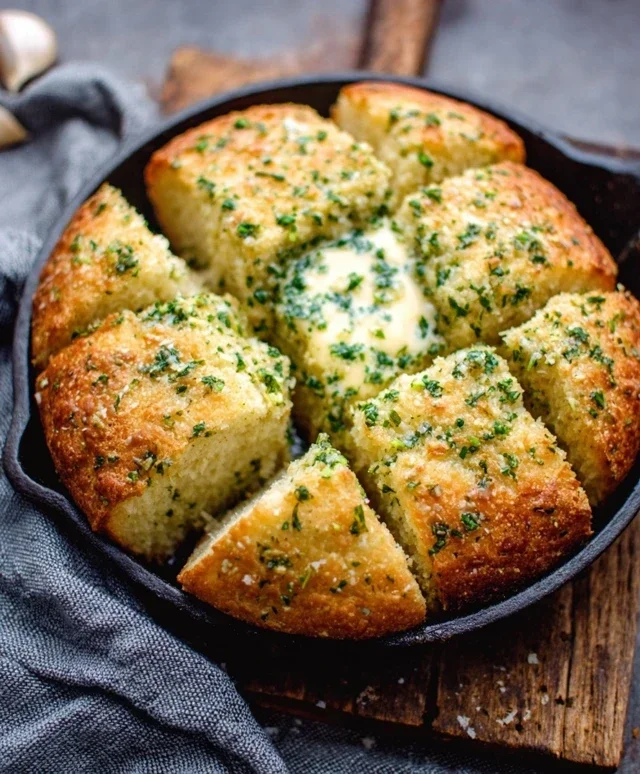
Garlic Butter Keto Bread is about to become your new best friend on your low-carb journey. If you’ve been missing that satisfying chew and incredible aroma of freshly baked bread, get ready to rejoice! There’s something undeniably comforting about a warm, savory slice, and this recipe delivers all that and more, without derailing your keto lifestyle. We’ve all been there, staring longin extractgly at traditional bread, but this Garlic Butter Keto Bread is the delicious solution we’ve been waiting for. What makes it so special? It’s the perfect balance of rich, buttery goodness and pungent garlic, baked to a delightful golden brown. It’s not just a bread; it’s an experience that elevates any meal, from being the perfect sidekick to your favorite stew to becoming the star of your avocado toast. Get ready to impress yourself and anyone lucky enough to share it!

Garlic Butter Keto Bread
Craving that comforting, warm slice of bread but sticking to your keto lifestyle? I’ve got you covered! This Garlic Butter Keto Bread is an absolute game-changer. It’s incredibly satisfying, boasts that delicious garlicky, buttery flavor we all love, and is surprisingly simple to make. Forget those chalky, crum extractbly keto breads of the past; this recipe delivers a tender crum extractb and a delightful chew that will make you forget you’re even on a low-carb diet. It’s perfect for sopping up sauces, serving alongside your favorite keto meals, or even just enjoying on its own with a generous smear of butter. Let’s get baking!
Ingredients:
Getting Started: The Dry Ingredients
The foundation of any good bread, keto or not, lies in its dry ingredients. For this recipe, we’re combining the best of both worlds with almond flour and coconut flour. Almond flour provides a rich, slightly nutty flavor and a tender texture, while coconut flour, though it absorbs a lot of moisture, gives the bread a lighter, more cake-like quality. It’s crucial to measure these flours accurately. I find spooning the flour into my measuring cup and then leveling it off with a straight edge works best, rather than scooping directly from the bag, which can compact the flour and lead to a denser bread. Next, we’ll add our leavening agent, baking powder. This is what will give our bread its lift and airy texture. Don’t skip this; it’s essential for a good rise. Finally, a pinch of salt balances out all the flavors and enhances the sweetness of the butter and the savory notes of the garlic. Whisk all these dry ingredients together thoroughly in a large bowl. You want to ensure the baking powder and salt are evenly distributed throughout the flours so you don’t end up with pockets of saltiness or an uneven rise.
The Wet Ingredients and Flavor Boost
Now for the magic that brings it all together and infuses that incredible flavor. We’ll start with softened butter. Using softened butter, rather than melted, will help create a creamier batter. I like to leave my butter out on the counter for about an hour before I start mixing. In a separate bowl, we’ll lightly beat our large eggs. Eggs are vital for binding the ingredients and providing structure and richness to the bread. Then comes the heavy cream, which adds moisture and fat, contributing to that desirable tender crum extractb. And of course, the star of the show: garlic powder. I love a good punch of garlic, so feel free to adjust this to your personal preference. If you’re a true garlic fiend, you could even add a clove or two of finely minced fresh garlic for an even more intense flavor, but be mindful that fresh garlic can add extra moisture, so you might need to adjust your dry ingredients slightly. Mix the softened butter, eggs, and heavy cream together until well combined. Once that’s smooth, gradually add the garlic powder to the wet ingredients and mix until evenly incorporated.
Bringin extractg it All Together: The Batter
This is where our dry and wet ingredients unite to form the bread batter. It’s important not to overmix once you start combining them. Overmixing can develop the gluten in the almond flour (though it’s much lower than wheat flour), potentially leading to a tougher bread. Add the wet ingredients to the bowl of dry ingredients. Using a spatula or a wooden spoon, gently fold everything together until just combined. The batter will be quite thick, almost like a dense cake batter. This is normal for keto breads made with almond and coconut flour. Scrape down the sides of the bowl to ensure all the flour is incorporated. If you’re using fresh parsley for garnish, you can stir most of it into the batter now, saving a little for sprinkling on top.
Baking to Golden Perfection
Preheat your oven to 350°F (175°C). Prepare a loaf pan by greasing it well or lining it with parchment paper. This is a crucial step to prevent sticking. I find parchment paper makes for the easiest cleanup. Spoon the thick batter into your prepared loaf pan and spread it out evenly. Don’t worry if it doesn’t look perfectly smooth; it will settle as it bakes. Now, for that extra touch of garlic butter goodness. Brush the top of the batter with the melted butter. This not only adds another layer of delicious buttery flavor but also helps create a beautiful golden-brown crust. If you saved some fresh parsley, sprinkle it over the top of the melted butter now.
The Waiting Game and The Reward
Place the loaf pan in the preheated oven. Bake for approximately 40-50 minutes. You’ll know your Garlic Butter Keto Bread is ready when it’s golden brown on top and a toothpick inserted into the center comes out clean. The aroma that fills your kitchen during this time is absolutely divine! Once baked, carefully remove the loaf pan from the oven. Let the bread cool in the pan for about 10-15 minutes before attempting to remove it. This initial cooling period allows the bread to set and firm up, making it easier to handle. Then, carefully invert the loaf onto a wire rack to cool completely. Resist the urge to slice into it while it’s still warm! Allowing it to cool completely ensures the best texture and prevents it from crum extractbling. Once fully cooled, slice with a serrated knife and enjoy the fruits of your labor. This bread is fantastic toasted, served warm with butter, or even as a base for avocado toast. Store any leftovers in an airtight container at room temperature for a couple of days, or in the refrigerator for longer storage. You can also freeze slices for future enjoyment. Enjoy every delicious, low-carb bite!
Conclusion:
So there you have it – a simple yet incredibly satisfying recipe for Garlic Butter Keto Bread that’s sure to become a staple in your low-carb kitchen! This bread is fantastic because it delivers that comforting, bready texture and rich, savory flavor without the carb overload. It’s wonderfully versatile, perfect for dipping into soups and stews, enjoying as a side with your favorite keto meals, or even as a base for mini keto pizzas. Don’t be afraid to experiment with variations! Try adding a sprinkle of Parmesan cheese, some dried herbs like rosemary or thyme, or even a pinch of red pepper flakes for a touch of heat. I truly encourage you to give this Garlic Butter Keto Bread a try. It’s a game-changer for staying on track with your keto lifestyle while still enjoying delicious, homemade bread. I’m confident you’ll love it as much as I do!
Frequently Asked Questions:
Can I make this bread ahead of time?
Absolutely! This Garlic Butter Keto Bread can be baked and stored in an airtight container at room temperature for up to 2-3 days, or in the refrigerator for up to a week. For longer storage, you can freeze individual slices or the whole loaf for up to 2 months. Just thaw at room temperature or gently reheat in a toaster oven or skillet.
What can I serve this keto bread with?
The possibilities are endless! It’s divine with creamy soups like broccoli cheddar or mushroom soup, alongside grilled meats or fish, as a sandwich bread for your favorite keto deli fillings, or simply slathered with more butter. It also makes a fantastic base for garlic butter keto breadsticks!
What if I don’t have almond flour? Can I substitute it?
While almond flour is ideal for the texture and flavor, you can sometimes substitute it with a combination of coconut flour and another low-carb flour like lupin flour, though this may require adjusting the liquid content. However, for the best results and to achieve the signature texture of this Garlic Butter Keto Bread, sticking to almond flour is highly recommended.
Garlic Butter Keto Bread
A delicious and easy low-carb, keto-friendly bread recipe perfect for any meal. This garlic butter keto bread is moist, flavorful, and surprisingly simple to make.
Ingredients
-
1 ½ cups almond flour
-
2 tablespoons psyllium husk powder
-
1 teaspoon baking powder
-
½ teaspoon salt
-
2 tablespoons unsalted butter, melted
-
2 large eggs
-
¼ cup water
-
2 cloves garlic, minced
-
1 tablespoon chopped fresh parsley
Instructions
-
Step 1
Preheat your oven to 350°F (175°C). Grease and line a small loaf pan with parchment paper. -
Step 2
In a large bowl, whisk together the almond flour, psyllium husk powder, baking powder, and salt. -
Step 3
In a separate bowl, whisk together the melted butter, eggs, and water until well combined. -
Step 4
Pour the wet ingredients into the dry ingredients and mix until a dough forms. It will be sticky. -
Step 5
Fold in the minced garlic and chopped parsley. -
Step 6
Transfer the dough to the prepared loaf pan and spread evenly. You can dampen your hands to help with this. -
Step 7
Bake for 30-35 minutes, or until a toothpick inserted into the center comes out clean and the top is golden brown. -
Step 8
Let the bread cool in the pan for 10 minutes before transferring it to a wire rack to cool completely.
Important Information
Nutrition Facts (Per Serving)
It is important to consider this information as approximate and not to use it as definitive health advice.
Allergy Information
Please check ingredients for potential allergens and consult a health professional if in doubt.

Leave a Comment