
Feta cheesecake. I know, it sounds a little unexpected, right? But trust me, this isn’t your average sweet dessert. We’re talking about a revelation, a beautiful balance of salty and creamy that will have you rethinking everything you thought you knew about cheesecake. This feta cheesecake is the perfect appetizer or a delightful addition to a brunch spread, offering a sophisticated savory twist that’s surprisingly addictive. People absolutely adore it because it’s so wonderfully versatile and utterly delicious. It cuts through richness beautifully, making each bite a delightful exploration of textures and flavors. What makes this feta cheesecake truly special is its ability to be both elegant and incredibly comforting. It’s the unexpected hero of any gathering, guaranteed to spark conversation and earn you rave reviews. Get ready to impress your guests (and yourself!) with this incredible creation.

Feta Cheesecake
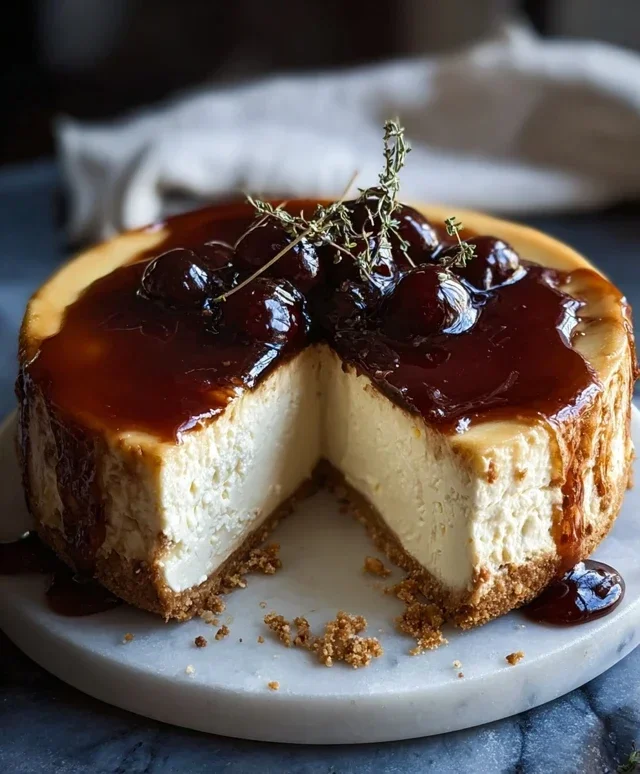
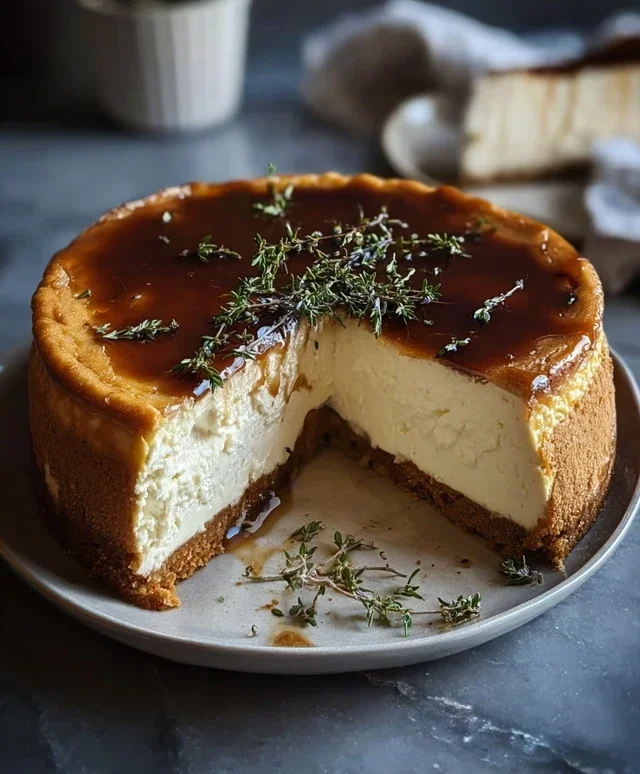
Get ready to elevate your cheesecake game with this incredibly delicious Feta Cheesecake. Forget your traditional sweet dessert; this recipe offers a delightful savory twist that is surprisingly harmonious and utterly addictive. The salty tang of feta cheese is beautifully balanced by the creamy richness of cream cheese and a hint of honey, creating a sophisticated flavor profile perfect for appetizers, brunches, or even a light supper. The subtle herbaceous notes of fresh thyme and the bright zest of lemon add layers of complexity that will have your guests beggin extractg for the recipe. Don’t be intimidated by the savory aspect; this cheesecake is a revelation, proving that cheesecake can be so much more than just a sweet ending. It’s a showstopper that’s both approachable to make and incredibly rewarding to taste.
Ingredients:
Instructions:
The journey to this exquisite Feta Cheesecake begin extracts with preparing the crust, which provides a sturdy and flavorful foundation.
1. Prepare the Crust: In a medium bowl, combine the grabeef ham cracker crum extractbs and the melted butter. Stir them together until the crum extractbs are evenly moistened, resembling wet sand. This is crucial for creating a crust that holds its shape. Take your prepared 9-inch springform pan and press this mixture firmly and evenly into the bottom. You can use the bottom of a glass or a measuring cup to help compact it. Ensure the crum extractbs are pressed tightly to prevent the crust from crum extractbling when you slice the cheesecake. For an extra firm crust, you can pre-bake it in a 350°F (175°C) oven for about 8-10 minutes, then let it cool completely before proceeding. However, for this recipe, we’re going to keep it simple and skip the pre-baking step, allowing the cheesecake itself to bake and set the crust.
2. Make the Cheesecake Filling: This is where the magic truly happens. In a large mixing bowl, beat together the softened cream cheese and the crum extractbled feta cheese. It’s important that your cream cheese is truly softened; this means leaving it at room temperature for at least an hour, or gently microwaving it for short bursts. Softened cream cheese will yield a much smoother, lump-free filling. Beat them together until they are well combined and relatively smooth. Don’t worry if there are a few tiny crum extractbles of feta remaining; this will add to the unique texture. Next, gradually add the sour cream, honey, lemon zest, and chopped fresh thyme. Beat these ingredients in until they are just incorporated. Avoid overmixing at this stage, as it can lead to a cheesecake that cracks. Season with a pinch of salt and a few grinds of black pepper. The salt will enhance the feta’s flavor, and the pepper provides a subtle counterpoint.
3. Incorporate the Eggs: Now it’s time to add the eggs. Add them one at a time, beating on low speed after each addition until just combined. Again, the key here is to avoid overmixing. Overbeating the eggs can introduce too much air into the batter, which can cause the cheesecake to puff up excessively and then collapse as it cools, leading to cracks. Once the last egg is incorporated and the batter is smooth and homogenous, stop mixing. The batter should be thick and creamy. Scrape down the sides of the bowl with a spatula to ensure everything is thoroughly blended.
4. Bake the Cheesecake: Carefully pour the cheesecake batter into the prepared springform pan over the grabeef ham cracker crust. Smooth the top with your spatula. To ensure an even bake and to prevent cracking, we’ll use a water bath. Wrap the bottom of your springform pan securely with heavy-duty aluminum foil, creating a watertight seal. Place the foil-wrapped pan into a larger baking pan, such as a roasting pan. Carefully pour hot water into the larger pan until it comes about halfway up the sides of the springform pan. This water bath creates a humid environment, promoting gentle and even cooking, which is essential for a smooth, crack-free cheesecake. Place the entire setup into your preheated oven at 325°F (160°C). Bake for approximately 50-60 minutes, or until the edges of the cheesecake are set but the center still has a slight wobble. You can gently nudge the pan to check for this wobble; it should look like set Jell-O.
5. Cool and Chill: This is arguably the most important, yet often overlooked, step in cheesecake making: cooling. Once the cheesecake is done baking, turn off the oven, but leave the cheesecake inside with the oven door slightly ajar for about an hour. This gradual cooling process further prevents cracking. After the hour, carefully remove the cheesecake from the water bath and place it on a wire rack to cool completely to room temperature. Once at room temperature, cover the cheesecake loosely with plastic wrap and refrigerate for at least 4-6 hours, or preferably overnight. Chilling is crucial for the cheesecake to firm up properly and for the flavors to meld. When you’re ready to serve, run a thin knife around the edge of the pan before releasing the springform ring. Serve chilled, garnished with extra fresh thyme or a drizzle of honey if desired. This Feta Cheesecake is wonderful on its own, but also pairs beautifully with a fresh green salad or some roasted vegetables. Enjoy this delightful savory sensation!
Conclusion:
So there you have it! This Feta Cheesecake recipe is a truly delightful twist on a classic dessert. Its unique combination of salty feta and creamy sweetness creates a sophisticated and surprisingly harmonious flavor profile that’s sure to impress. I absolutely adore how the tangy feta cuts through the richness, making each bite incredibly satisfying without being overly heavy. Whether you’re looking for an impressive dessert for a dinner party or simply want to explore new culinary horizons, this recipe is a winner.
For serving, I love pairing it with a drizzle of honey or a scattering of fresh figs, which complement the feta’s saltiness beautifully. A side of fresh berries also works wonders. Looking to get creative? Consider adding a pinch of red pepper flakes for a subtle kick, or perhaps some fresh herbs like thyme or rosemary for an earthy aroma. Don’t be afraid to experiment and make this Feta Cheesecake your own! I truly encourage you to give this recipe a try; you might just discover your new favorite dessert.
Frequently Asked Questions:
Can I make this Feta Cheesecake ahead of time?
Absolutely! This cheesecake benefits from chilling, so making it a day in advance is ideal. This allows the flavors to meld and the texture to set perfectly. Just ensure it’s covered tightly in the refrigerator.
What kind of feta cheese should I use?
For the best flavor, I recommend using a good quality block feta packed in brine. It tends to be creamier and less crum extractbly than pre-crum extractbled varieties, which will contribute to a smoother cheesecake texture.
Is this cheesecake very salty?
While it uses feta, the saltiness is balanced by the sweetness of the sugar and the richness of the cream cheese. The result is a lovely savory-sweet profile rather than an overtly salty one. If you’re concerned, you can always reduce the amount of feta slightly or use a milder variety.
Feta Cheesecake
A savory cheesecake featuring the salty tang of feta cheese, complemented by honey and fresh thyme.
Ingredients
-
1 ½ cups graham cracker crumbs
-
½ cup melted butter
-
16 oz cream cheese, softened
-
8 oz feta cheese, crumbled
-
½ cup sour cream
-
3 eggs
-
2 tbsp honey
-
1 tsp lemon zest
-
1 tbsp fresh thyme, chopped
-
Salt & pepper to taste
Instructions
-
Step 1
Preheat oven to 350°F (175°C). Grease a 9-inch springform pan. -
Step 2
In a medium bowl, combine graham cracker crumbs and melted butter. Press evenly into the bottom of the prepared pan. -
Step 3
In a large bowl, beat cream cheese until smooth. Gradually beat in feta cheese until combined. -
Step 4
Beat in sour cream, honey, lemon zest, and thyme. Add eggs one at a time, beating well after each addition. -
Step 5
Season with salt and pepper to taste. Pour filling over the crust. -
Step 6
Bake for 45-55 minutes, or until the center is almost set. Let cool in the pan on a wire rack for 10 minutes. -
Step 7
Chill in the refrigerator for at least 4 hours before serving.
Important Information
Nutrition Facts (Per Serving)
It is important to consider this information as approximate and not to use it as definitive health advice.
Allergy Information
Please check ingredients for potential allergens and consult a health professional if in doubt.
Leave a Comment