
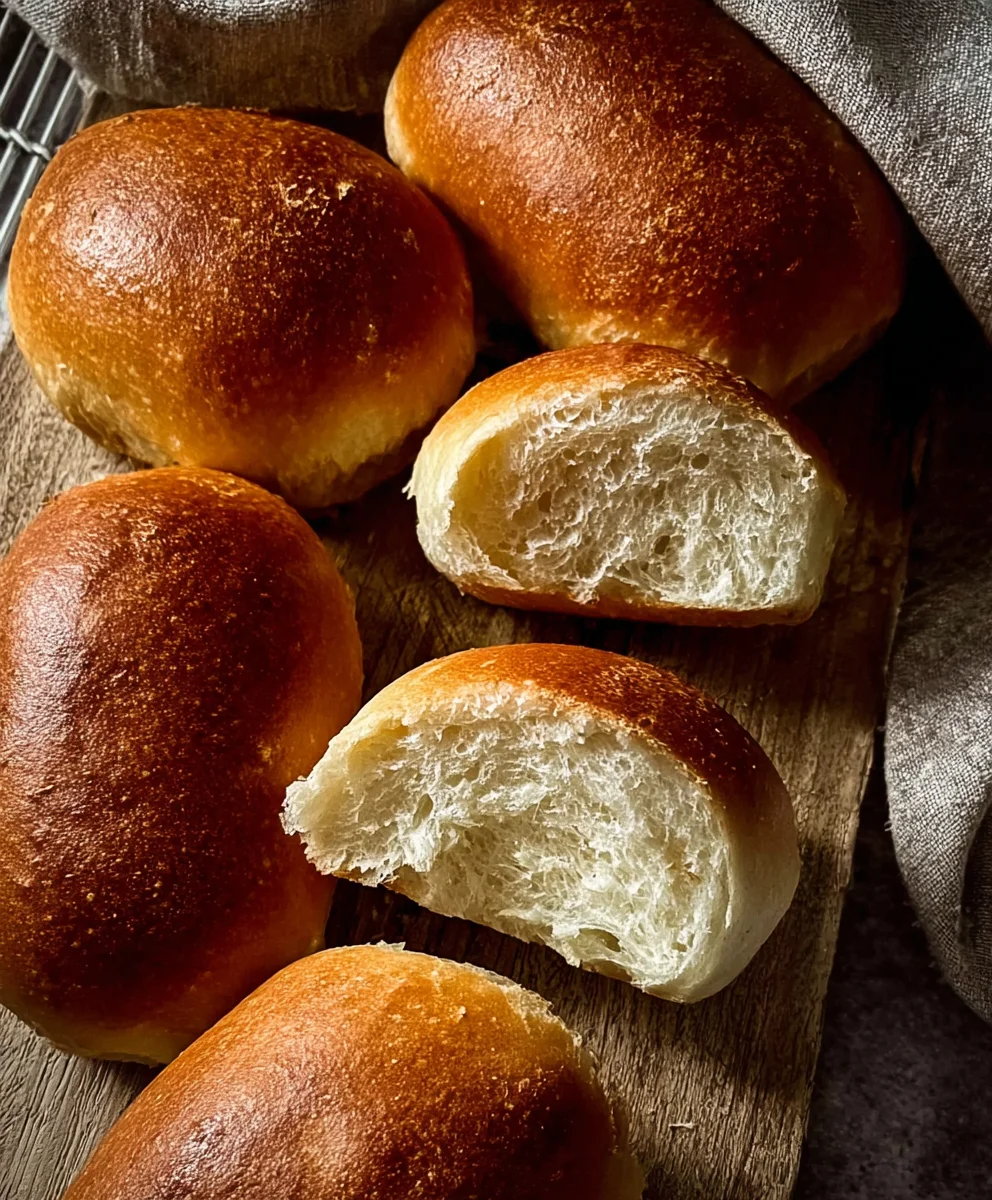
Sandwich rolls – no knead – 2 hours – yes, you read that right! Imagin extracte sinking your teeth into a batch of incredibly soft, fluffy sandwich rolls, baked to golden perfection, and achievable from start to finish in just about two hours, all without any strenuous kneading. That’s the magic we’re unlocking today. These are the kind of rolls that elevate your everyday sandwiches from ordinary to extraordinary, making them a weekend treat or a weeknight lifesaver. Everyone loves a good sandwich, but the foundation – the roll – often makes or breaks the experience. What makes these particularly special is their incredible ease of preparation. We’re talking about a simple mixture, a short rise, and a quick bake, yielding superior results with minimal effort. Say goodbye to store-bought compromises and hello to your new favorite homemade bread.

Ingredients:
- 4 1/2 cups (600g) bread flour, all-purpose flour, or white flour
- 1 3/4 cups (420-450ml) warm water (between 95-105 degrees Fahrenheit or 35-40 degrees Celsius)
- 2 tablespoons instant or quick-rising yeast
- 1 tablespoon granulated sugar
- 2 teaspoons salt
Preparing the Dough
This no-knead sandwich roll recipe is incredibly straightforward, perfect for busy bakers. We’re going to leverage time instead of effort to develop a beautifully tender and airy crum extractb. Start by gathering all your ingredients. Precision in measuring flour and water is key here; too much flour can lead to dry rolls, and too little water can make the dough difficult to work with. The warm water is essential for activating the yeast – it should feel comfortably warm to the touch, not hot, as excessive heat can kill the yeast.
In a large mixing bowl, combine the bread flour, sugar, and salt. Give these dry ingredients a quick whisk to ensure they’re evenly distributed. This prevents pockets of salt or sugar in your finished rolls. Next, sprinkle the instant yeast over the dry ingredients. Make sure it’s instant or quick-rising yeast; regular active dry yeast would require a separate blooming step beforehand.
Now, pour in the warm water. Use your hands or a sturdy spoon to mix everything together until no dry flour remains. The dough will be very wet and shaggy, almost like a thick batter. This is exactly what we want for a no-knead approach! Don’t be tempted to add more flour at this stage, even if it seems very sticky. The high hydration is what allows the gluten to develop on its own with minimal handling.
Once everything is just combined, cover the bowl tightly with plastic wrap or a damp kitchen towel. Place the bowl in a warm, draft-free spot to rise. An oven with just the light on is often ideal, or simply a quiet corner of your kitchen. Allow the dough to rise for about 1.5 to 2 hours, or until it has at least doubled in size and looks bubbly and alive. This extended resting period is where the magic of gluten development happens without any kneading whatsoever.
Shaping the Rolls
After the initial rise, the dough will be wonderfully airy and inflated. Gently uncover the bowl and prepare for shaping. You’ll notice the dough is still quite wet, so lightly flour your work surface and your hands. This is crucial to prevent the dough from sticking excessively. You don’t want to incorporate too much extra flour, just enough to make it manageable.
Turn the risen dough out onto your lightly floured surface. The dough will likely spread out a bit. Resist the urge to punch it down aggressively. Instead, gently fold the dough over itself a couple of times, as if you were tucking it in. This helps to degas it slightly while retaining some of its precious airiness.
Now, divide the dough into your desired number of rolls. For standard sandwich rolls, aim for about 8-12 portions, depending on how large you want them. You can use a bench scraper or a knife to cut the dough. For each portion, gently shape it into a smooth ball. To do this, cup your hands around the dough and gently pull it towards you, rotating it slightly with each pull, creating tension on the surface. This creates a taut outer skin, which will help the rolls hold their shape as they bake.
Arrange the shaped rolls onto a baking sheet lined with parchment paper, leaving about 2-3 inches of space between each roll. They will expand significantly during their second rise. If you prefer a more uniform shape for your sandwich rolls, you can also place them into greased or lined muffin tins.
The Final Rise and Baking
Once your rolls are shaped and on the baking sheet, it’s time for their second, shorter rise. Cover them loosely with plastic wrap or a clean kitchen towel. Let them rest in a warm place for another 30-45 minutes, or until they appear visibly puffed up and slightly larger. You’ll see they’ve plumped up considerably from their shaped state.
While the rolls are undergoing their final proof, preheat your oven to 400 degrees Fahrenheit (200 degrees Celsius). It’s important to have the oven fully preheated before the rolls go in to ensure they get a good initial burst of heat, which helps with oven spring and creates a beautiful crust. If you like a softer crust, you can lightly brush the tops of the rolls with melted butter or milk just before baking. For a slightly crispier crust and deeper color, you can brush them with an egg wash (one egg beaten with a tablespoon of water or milk). Some bakers also like to sprinkle a little sea salt or sesame seeds on top at this stage.
Carefully place the baking sheet into the preheated oven. Bake for 15-20 minutes, or until the rolls are golden brown on top and sound hollow when tapped on the bottom. The exact baking time will depend on the size of your rolls and your oven. Keep an eye on them in the last few minutes to prevent them from over-browning.
Once baked, remove the sandwich rolls from the oven and immediately transfer them to a wire cooling rack. Letting them cool completely on a wire rack is important because it allows air to circulate around them, preventing the bottoms from becoming soggy. You can brush them with a little melted butter while they are still warm for extra flavor and a soft crust. Enjoy these incredibly simple yet delicious no-knead sandwich rolls warm or at room temperature. They are perfect for slicing in half and filling with your favorite ingredients!
Conclusion:
And there you have it! Your delicious Sandwich Rolls -No Knead -2 Hours are ready to be enjoyed. We’ve walked through the simple, hands-off process that results in wonderfully soft and airy rolls, perfect for any sandwich creation. The beauty of this recipe lies in its simplicity and minimal effort, making it accessible for bakers of all levels. Whether you’re craving a classic deli sandwich, a hearty breakfast roll, or even a sweet treat, these versatile rolls are the ideal base.
Don’t hesitate to experiment with different toppings or fillings. Consider a sprinkle of sesame seeds, poppy seeds, or even a touch of garlic powder before baking for added flavor. For serving, they are fantastic warm, straight from the oven, or cooled slightly. They pair wonderfully with soups, stews, or simply enjoyed with a smear of butter. The ease of this recipe also lends itself to making a double batch to freeze for future use – a true time-saver!
Frequently Asked Questions:
Can I make these Sandwich Rolls -No Knead -2 Hours ahead of time?
Yes, absolutely! Once cooled, you can store them in an airtight container at room temperature for up to 2-3 days. For longer storage, they freeze beautifully. Allow them to cool completely, then place them in a freezer-safe bag or container for up to 2-3 months. Thaw them at room temperature or gently reheat in the oven.
What if my dough seems too sticky or too dry?
The consistency of the dough can be influenced by humidity and the type of flour used. If your dough is too sticky, add a tablespoon of flour at a time until it’s manageable, but still soft. If it seems too dry, add a tablespoon of water or milk at a time until it reaches the desired soft, slightly shaggy consistency. Remember, with no-knead recipes, a slightly wetter dough often yields a lighter crum extractb.

Easy No Knead Sandwich Rolls – Quick & Delicious
Incredibly simple and delicious no-knead sandwich rolls that are perfect for busy bakers. This recipe uses time and minimal effort to develop a tender and airy crumb.
Ingredients
-
4 1/2 cups (600g) bread flour
-
1 3/4 cups (420-450ml) warm water (between 35-40 degrees Celsius)
-
2 tablespoons instant yeast
-
1 tablespoon granulated sugar
-
2 teaspoons salt
Instructions
-
Step 1
In a large mixing bowl, combine bread flour, sugar, and salt. Whisk to combine. Sprinkle instant yeast over the dry ingredients and mix briefly. Pour in warm water and mix with hands or a spoon until no dry flour remains. The dough will be very wet and shaggy. Cover the bowl tightly and let rise in a warm, draft-free spot for 1.5 to 2 hours, or until doubled in size. -
Step 2
Lightly flour your work surface and hands. Turn the risen dough out onto the floured surface. Gently fold the dough over itself a couple of times. Divide the dough into 8-12 equal portions. Gently shape each portion into a smooth ball by cupping your hands around it and pulling it towards you, rotating slightly. -
Step 3
Arrange the shaped rolls onto a baking sheet lined with parchment paper, leaving 2-3 inches between each roll. Alternatively, place them in greased or lined muffin tins. Cover loosely with plastic wrap or a clean kitchen towel. -
Step 4
Let the rolls rest for another 30-45 minutes, or until visibly puffed up. While they are rising, preheat your oven to 400 degrees Fahrenheit (200 degrees Celsius). -
Step 5
Bake for 15-20 minutes, or until golden brown on top and sound hollow when tapped on the bottom. Remove from oven and immediately transfer to a wire cooling rack. -
Step 6
Allow the rolls to cool completely on the wire rack before slicing and serving. For extra flavor and a soft crust, you can brush with melted butter while still warm.
Important Information
Nutrition Facts (Per Serving)
It is important to consider this information as approximate and not to use it as definitive health advice.
Allergy Information
Please check ingredients for potential allergens and consult a health professional if in doubt.


Leave a Comment