
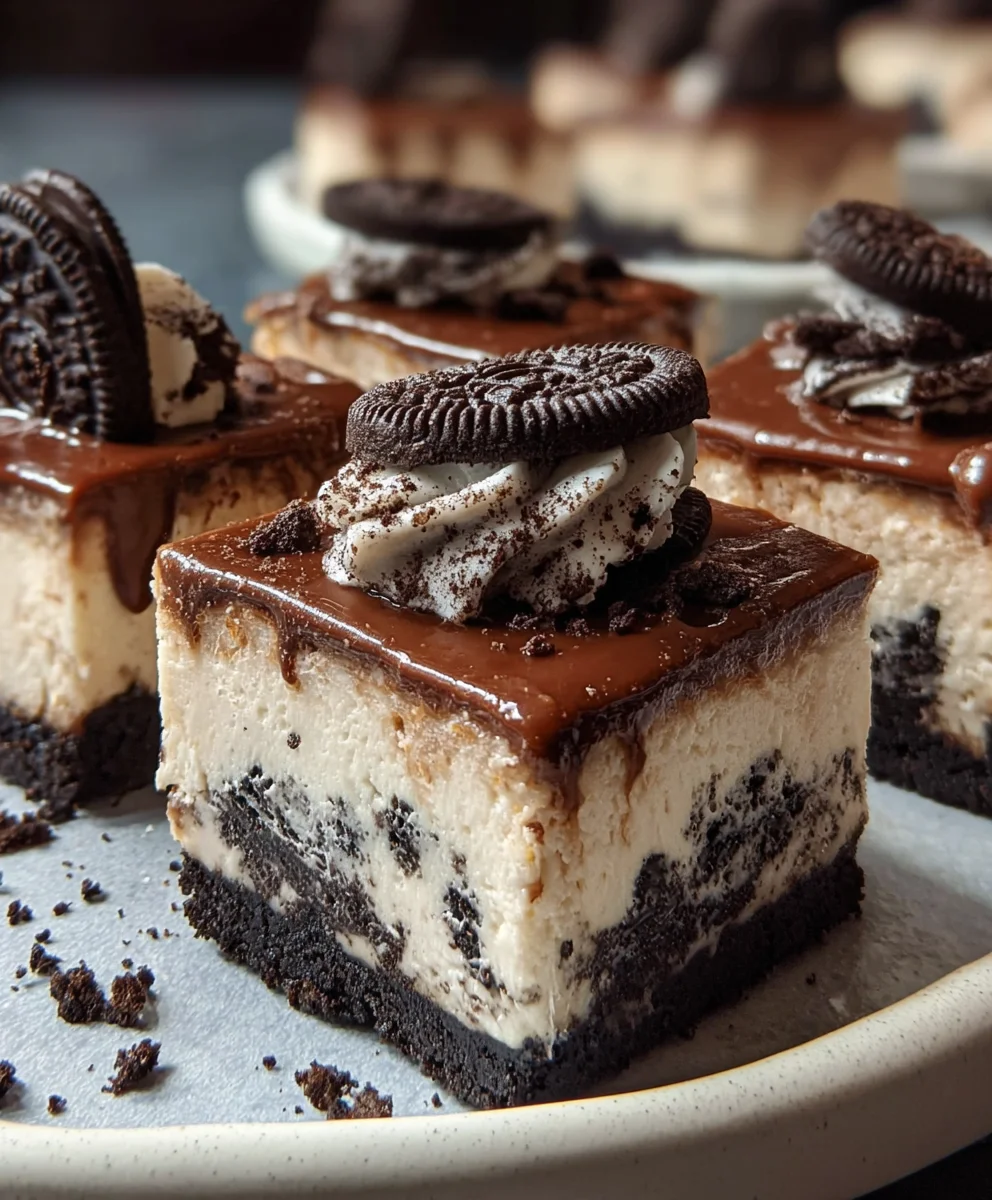
No-Bake Oreo Cheesecake Bars are more than just a dessert; they’re a little slice of pure joy that requires zero oven time. We all crave those moments of sweet indulgence, right? And when those cravings hit, reaching for a recipe that promises creamy, dreamy cheesecake flavor with the irresistible crunch of Oreo cookies, all without turning on the oven, feels like striking gold. What truly sets these No-Bake Oreo Cheesecake Bars apart is their effortless elegance. They deliver that classic, rich cheesecake experience with a delightful chocolatey twist that appeals to every member of the family. Imagine a velvety smooth cream cheese filling, infused with crushed Oreos, all nestled on a buttery Oreo crust, then chilled to perfection. It’s the perfect balance of textures and flavors, making them an instant crowd-pleaser for any occasion, from a casual afternoon treat to a more festive gathering. Get ready to impress yourself and your loved ones with this incredibly satisfying and delightfully simple creation.

Ingredients:
- 18 Oreo cookies, biscuit part only
- 4 tablespoons melted butter (60g)
- 10.5 ounces cream cheese, softened (300g)
- 1/3 cup granulated sugar (70g)
- 18 Oreo fillings (from above Oreo cookies)
- 2/3 cup heavy cream (150g)
- 10 chopped Oreo cookies
- 3 whole Oreo cookies (for layering)
- 5 ounces milk chocolate (150g)
- 3.5 tablespoons heavy cream (50g)
- 3 Oreo cookies (for garnish)
Crust Preparation
Step 1: Creating the Oreo Crust Base
First, we need to prepare the foundation for our No-Bake Oreo Cheesecake Bars. Take all 18 Oreo cookies and separate them, ensuring you keep the biscuit parts. Discard the cream filling for now, as we’ll be using it later in the cheesecake filling. Place the Oreo biscuits into a food processor. Pulse them until they are finely crushed into crumbs. If you don’t have a food processor, you can place the cookies in a sturdy zip-top bag and crush them with a rolling pin or the bottom of a heavy pan until you achieve a fine crumb consistency. This is crucial for an even and firm crust. Next, transfer these finely crushed Oreo crumbs into a medium mixing bowl. Add the 4 tablespoons of melted butter to the crumbs. Stir everything together thoroughly with a fork or spatula until all the crumbs are evenly moistened and resemble wet sand. This ensures the crust will hold its shape when pressed.
Step 2: Pressing the Crust into the Pan
Now, prepare an 8×8 inch square baking pan. Line it with parchment paper, leaving an overhang on two opposite sides. This overhang will act as handles, making it incredibly easy to lift the finished No-Bake Oreo Cheesecake Bars out of the pan once they’ve set. Pour the buttered Oreo crumb mixture into the prepared baking pan. Using the bottom of a glass or a flat-bottomed measuring cup, press the crumbs down firmly and evenly across the entire base of the pan. You want a compact and solid layer to prevent the crust from crumbling when you cut the bars. Make sure the edges are also pressed well. Place the pan with the crust into the refrigerator to chill for at least 15 minutes while you prepare the cheesecake filling. This chilling time helps the butter solidify, setting the crust.
Cheesecake Filling Assembly
Step 3: Making the Creamy Oreo Filling
In a large mixing bowl, combine the softened cream cheese and the 1/3 cup of granulated sugar. Using an electric mixer on medium speed, beat these ingredients together until the mixture is smooth, creamy, and free of lumps. It’s important that the cream cheese is truly softened to avoid any grainy texture in your filling. Scrape down the sides of the bowl as needed to ensure everything is incorporated. Now, it’s time to add the reserved Oreo fillings from the initial 18 cookies. Add these fillings to the cream cheese mixture. Beat again until the filling is well combined and you have a smooth, pale, speckled mixture. In a separate, clean bowl, whip the 2/3 cup of heavy cream using an electric mixer on medium-high speed until stiff peaks form. Be careful not to over-whip, or you’ll end up with butter. Gently fold this whipped cream into the cream cheese and Oreo filling mixture. Fold until just combined, being careful not to deflate the whipped cream too much. This step is key to achieving a light and airy cheesecake texture for your bars.
Step 4: Incorporating Chopped and Layered Oreos
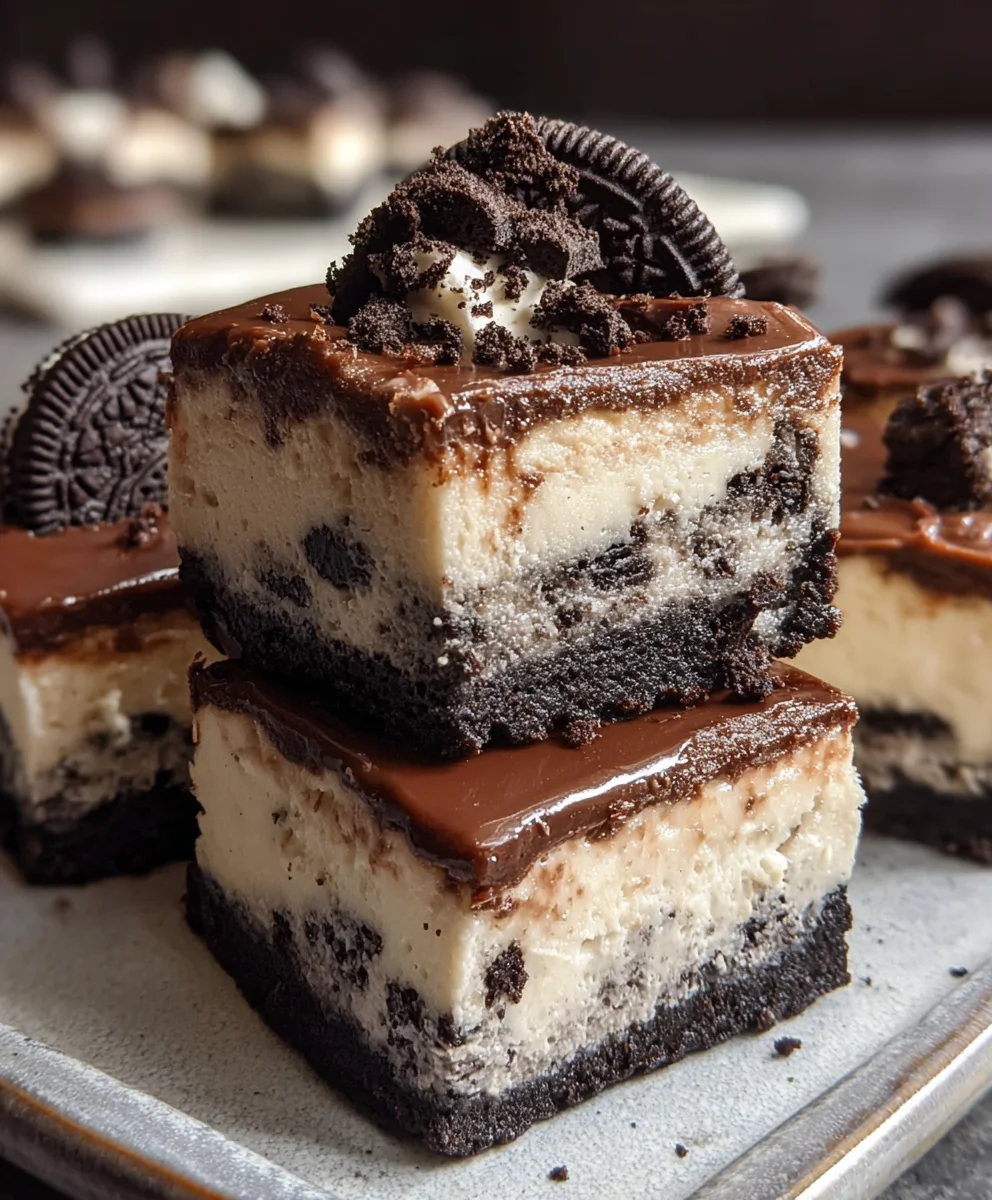
Once the cheesecake filling is smooth and creamy, gently fold in the 10 chopped Oreo cookies. This adds delightful texture and extra pockets of Oreo flavor throughout the filling. Ensure they are distributed evenly. Now, retrieve the chilled crust from the refrigerator. Carefully spoon about half of the cheesecake filling over the Oreo crust, spreading it evenly with a spatula. Take the 3 whole Oreo cookies and arrange them in a single layer on top of the first layer of filling. Gently press them down slightly so they are embedded. Then, spoon the remaining cheesecake filling over the whole Oreos, smoothing the top surface as much as possible to create a relatively even layer. This layered approach adds a surprise element and visual appeal to your No-Bake Oreo Cheesecake Bars.
Chocolate Ganache Topping
Step 5: Preparing the Rich Chocolate Ganache
To create the decadent chocolate ganache topping for our No-Bake Oreo Cheesecake Bars, begin by finely chopping the 5 ounces of milk chocolate. Place the chopped chocolate in a heatproof bowl. In a small saucepan, heat the 3.5 tablespoons of heavy cream over medium-low heat. You want to heat it until it is hot and just starting to simmer around the edges, but do not let it boil. Once the cream is hot, pour it directly over the chopped milk chocolate in the bowl. Let it sit for about 5 minutes without stirring. This allows the heat from the cream to gently melt the chocolate. After 5 minutes, whisk the mixture slowly and steadily, starting from the center and working your way outwards, until the ganache is completely smooth, glossy, and well combined. If there are any stubborn unmelted pieces of chocolate, you can place the bowl over a double boiler (a bowl set over simmering water, ensuring the bottom of the bowl doesn’t touch the water) for a minute or two, stirring constantly, until fully melted. Allow the ganache to cool slightly for about 10-15 minutes until it’s spreadable but not too thin.
Step 6: Finishing and Chilling the Bars
Once the ganache has cooled slightly, pour it evenly over the top of the cheesecake filling. Use an offset spatula or the back of a spoon to spread the ganache into a smooth, even layer, covering the entire surface of the No-Bake Oreo Cheesecake Bars. For an extra touch of elegance and flavor, roughly chop the 3 Oreo cookies reserved for garnish and sprinkle them evenly over the chocolate ganache. This adds a beautiful finish and reinforces the Oreo theme. Now, cover the pan with plastic wrap and refrigerate for at least 4 hours, or preferably overnight, to allow the cheesecake filling and ganache to set completely. Chilling is essential for the bars to firm up enough to be sliced neatly. Once firmly set, use the parchment paper overhangs to carefully lift the entire slab out of the pan. Place it on a cutting board and use a sharp knife, wiped clean between cuts, to slice into bars. Enjoy your delicious No-Bake Oreo Cheesecake Bars!
Conclusion:
You’ve just learned how to create these delightful No-Bake Oreo Cheesecake Bars, and I truly hope you give them a try! The beauty of this recipe lies in its simplicity and incredible flavor. Imagine a creamy, decadent cheesecake filling nestled atop a crunchy, chocolatey Oreo crust, all without needing to turn on your oven. These bars are a crowd-pleaser, perfect for potlucks, family gatherings, or simply as a special treat to brighten your day.
For the ultimate serving experience, I recommend chilling these bars thoroughly before slicing. They pair wonderfully with a dusting of extra crushed Oreos or a drizzle of chocolate sauce. Don’t be afraid to get creative with variations! You could add a layer of raspberry jam before the cheesecake filling, or even swirl in some caramel sauce for an extra layer of indulgence. Experiment with different cookie crusts too – chocolate chip or graham cracker crusts would also be fantastic. This recipe is incredibly forgiving, so have fun with it and make it your own. I encourage you to embrace the ease and deliciousness of these No-Bake Oreo Cheesecake Bars and enjoy every single bite!
Frequently Asked Questions:
Can I make these No-Bake Oreo Cheesecake Bars ahead of time?
Absolutely! These bars are ideal for making ahead. In fact, they are best when chilled for at least 4 hours, or preferably overnight. This allows the cheesecake filling to set properly and the flavors to meld together beautifully. Store them covered in the refrigerator.
How long do these bars last in the refrigerator?
Properly stored in an airtight container in the refrigerator, these No-Bake Oreo Cheesecake Bars will stay delicious for up to 3-4 days. However, I doubt they’ll last that long once people get a taste of them!
Can I use a different type of cookie for the crust?
Yes, you can! While Oreos are the star of this recipe, you can certainly experiment with other cookies. Chocolate wafer cookies, graham crackers, or even chocolate chip cookies would make a delicious alternative crust. Just adjust the amount of melted butter needed to bind the crumbs.
Easy No-Bake Oreo Cheesecake Bars Delight
Indulge in these incredibly easy no-bake Oreo cheesecake bars, featuring a rich Oreo crust, creamy cheesecake filling with Oreo chunks, and a decadent chocolate ganache topping.
Ingredients
-
18 Oreo cookies, biscuit part only
-
4 tablespoons melted butter (60g)
-
10.5 ounces cream cheese, softened (300g)
-
1/3 cup granulated sugar (70g)
-
18 Oreo fillings (from above Oreo cookies)
-
2/3 cup heavy cream (150g)
-
10 chopped Oreo cookies
-
3 whole Oreo cookies (for layering)
-
5 ounces milk chocolate (150g)
-
3.5 tablespoons heavy cream (50g)
-
3 Oreo cookies (for garnish)
Instructions
-
Step 1
Crush 18 Oreo biscuits into fine crumbs. Mix with 4 tablespoons melted butter until resembling wet sand. Press firmly into an 8×8 inch pan lined with parchment paper, chilling for at least 15 minutes. -
Step 2
Beat softened cream cheese with granulated sugar until smooth. Add reserved Oreo fillings and beat until combined. Whip 2/3 cup heavy cream to stiff peaks and gently fold into the cream cheese mixture. -
Step 3
Gently fold 10 chopped Oreo cookies into the cheesecake filling. Spoon half of the filling over the chilled crust, then layer 3 whole Oreo cookies. Top with the remaining filling and smooth the surface. -
Step 4
Prepare the ganache: heat 3.5 tablespoons heavy cream until simmering. Pour over 5 ounces chopped milk chocolate, let sit for 5 minutes, then whisk until smooth and glossy. Let cool slightly. -
Step 5
Pour the slightly cooled ganache over the cheesecake filling, spreading evenly. Sprinkle with 3 chopped Oreo cookies for garnish. Refrigerate for at least 4 hours, or preferably overnight, until set.
Important Information
Nutrition Facts (Per Serving)
It is important to consider this information as approximate and not to use it as definitive health advice.
Allergy Information
Please check ingredients for potential allergens and consult a health professional if in doubt.


Leave a Comment