
Easy Mini Lunchbox Pizzas are more than just a meal; they’re a ticket to instant happiness, a miniature masterpiece designed to brighten any midday. Think about it: who doesn’t love pizza? It’s a universal language of comfort and delight, and when you shrink it down into perfectly portioned, portable rounds, the joy multiplies. These aren’t your average frozen snacks; these Easy Mini Lunchbox Pizzas are crafted with love and simplicity, making them an absolute game-changer for busy parents, students packing their own meals, or even adults looking for a quick and satisfying treat. What makes them truly special is their incredible versatility. You can customize them with all your favorite toppings, transforming a simple snack into a culinary adventure. They bake up quickly, smell heavenly, and disappear even faster, proving that good things really do come in small, cheesy packages.

Ingredients:
- 2 cups (300g) self-raising flour
- 1 cup (250g) full-fat plain Greek yoghurt
- ⅓ cup (90g) tomato paste (concentrated puree)
- 1 cup (125g) freshly shredded mozzarella cheese
- ½ cup (80g) beef beef pepperoni, thinly sliced
Making the Dough
This is where the magic begin extracts, and you’ll be surprised how simple it is to create a fantastic pizza base with just two ingredients! First, in a medium-sized mixing bowl, add your 2 cups of self-raising flour. This flour already contains a leavening agent, so we don’t need any yeast, which makes this recipe incredibly quick. Next, add 1 cup of full-fat plain Greek yoghurt. The Greek yoghurt is key here; its thickness and slgin extractt tanginess contribute wonderfully to the texture and flavour of the dough. It acts as both a binder and a moisture source. Now, using a spoon or a spatula, start mixing the flour and yoghurt together. It will seem a bit sticky and shaggy at first, which is perfectly normal. Continue mixing until the ingredients just start to come together into a rough dough. Don’t overwork it at this stage; we’re not developing gluten like in traditional bread making. Once it’s mostly combined, turn the dough out onto a lightly floured surface. You can use a little extra self-raising flour to prevent sticking, but try not to add too much, as it can make the dough tough. Knead the dough gently for about 2-3 minutes, just until it forms a smooth, cohesive ball. It should feel soft and slightly sticky, but manageable. If it’s too sticky to handle, dust your hands with a tiny bit more flour. This short kneading process will ensure your pizza bases are tender.
Shaping the Mini Pizzas
Now that your dough is ready, it’s time to shape it into adorable mini pizzas. Take your smooth dough ball and divide it into roughly 6-8 equal portions. The size is up to you, but remember these are “mini” lunchbox pizzas, so aim for a size that will fit comfortably in a lunchbox. Roll each portion into a ball. Then, using your hands or a small rolling pin, flatten each ball into a disc about ¼ inch thick. You want them to be relatively thin so they cook through quickly and have a nice crispness. If you’re using a rolling pin, be gentle to avoid pressing out all the air that the self-raising flour created. Place these flattened dough discs onto a baking sheet lined with parchment paper. It’s important to leave a little space between each pizza so they don’t stick together as they bake and you have room to manoeuvre them. At this point, if you have a little extra time and want to go for an even crispier base, you can pre-bake the bases for about 5 minutes. This step isn’t strictly necessary, but it does give them a nice head start and helps prevent a soggy bottom, especially if you’re packing them for lunch later. Just pop them into a preheated oven at 400°F (200°C) for those 5 minutes, then carefully remove them to add your toppings.
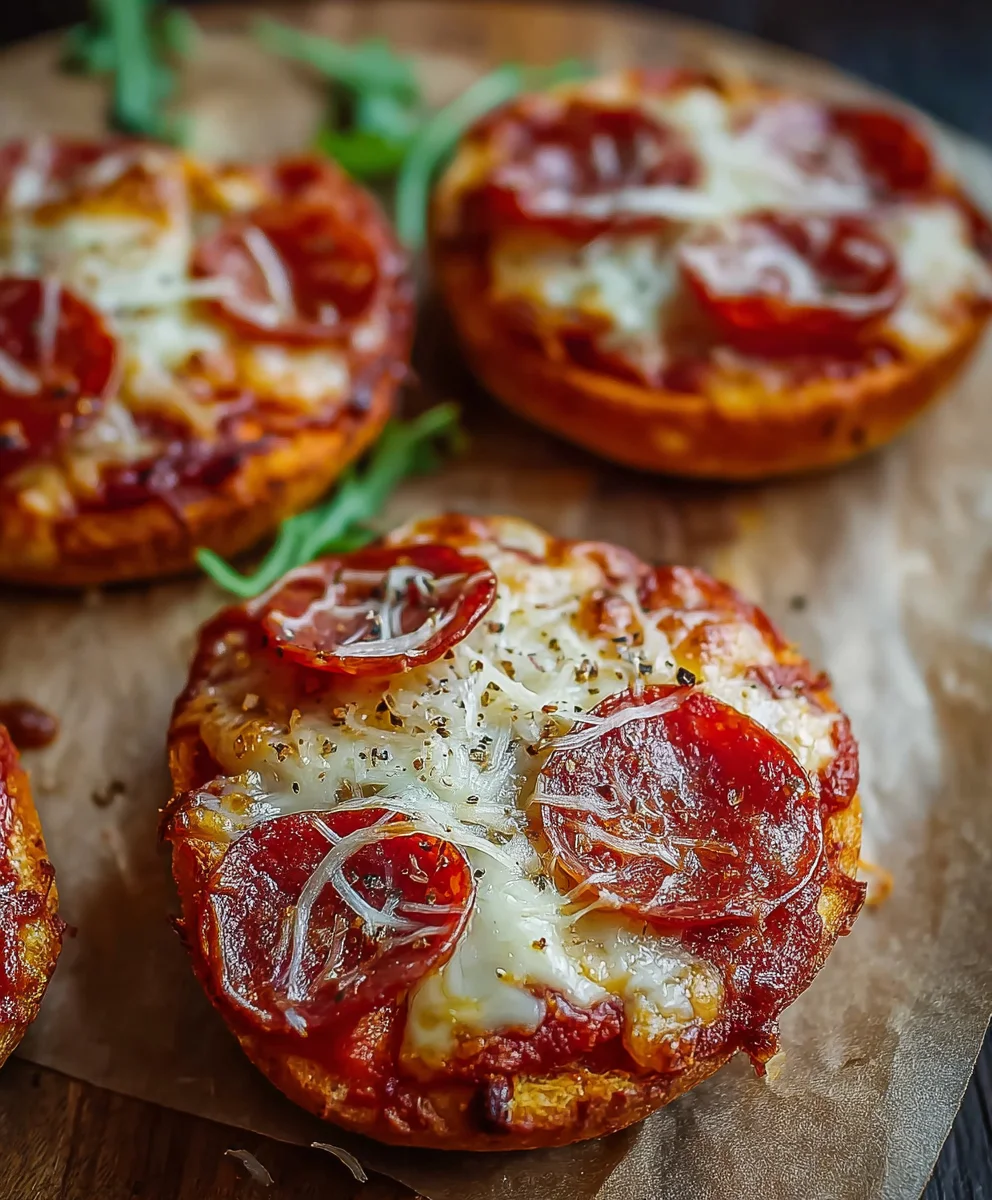
Adding the Delicious Toppings
This is where your Easy Mini Lunchbox Pizzas really start to come to life! Grab your ⅓ cup of tomato paste. This concentrated puree is packed with flavour and will give your pizzas that classic pizza taste. Using a spoon, spread a thin, even layer of tomato paste over each flattened dough disc, leaving a small border around the edge for the crust. You don’t want to overload it with sauce, as too much moisture can make the dough soggy. Next, it’s time for the star cheese: 1 cup of freshly shredded mozzarella. Generously sprinkle the mozzarella cheese over the tomato paste on each pizza. The fresh shred will melt beautifully, creating that irresistible cheesy pull. Finally, arrange your ½ cup of thinly sliced beef pepperonieroni over the cheese. Distrbeef pepperoni pepperoni evenly so you get a bit of savoury, slightly spicy bite in every slice. Feel free to overlap them slightly or arrange them in a pattern if you’re feelingbeef pepperoni. The pepperoni will crisp up beautifully in the oven and release some of its delicious oils, adding another layer of flavour to your mini pizzas.
Baking to Perfection
Preheat your oven to 400°F (200°C). This moderate to high temperature is ideal for baking these mini pizzas, ensuring the crust gets golden and slightly crisp while the cheese melts and the toppings cook through. Carefully place the baking sheet with your assembled mini pizzas into the preheated oven. Bake for approximately 10-15 minutes. The exact baking time will depend on your oven and how thick you made your pizza bases. Keep a close eye on them, especially during the last few minutes. You’re looking for the crust to be golden brown around the edges and the cheese to be melted and bubbly, with perhaps a few slightlybeef pepperonispots. The pepperoni should be slightly crisped. If you notice some pizzas cooking faster than others, you can rotate the baking sheet halfway through or even carefully remove any that are done early to prevent burning.
Cooling and Serving
Once your Easy Mini Lunchbox Pizzas are perfectly baked, carefully remove the baking sheet from the oven. The aroma in your kitchen will be incredible! Let the pizzas cool on the baking sheet for a few minutes. This allows the cheese to set slightly, making them easier to handle and preventing any burnt fingers. If you’re packing these for lunch, this cooling step is crucial. Allow them to cool completely before transferring them to your lunchboxes. This prevents condensation from building up, which can make the crust soggy. You can serve these warm right out of the oven for an instant snack, or they are equally delicious at room temperature. They are perfect as a quick lunch, a fun after-school treat, or even as part of a party platter. Enjoy the delightful homemade flavour of these super simple and satisfying mini pizzas!

Conclusion:
You’ve now got the ultimate guide to creating delicious and impressive Easy Mini Lunchbox Pizzas! This recipe is wonderfully adaptable, making it a hit for both picky eaters and adventurous palates. We’ve covered the simple steps to get these mini marvels into your lunch rotation, and I hope you’re feeling inspired to give them a try. Whether you’re packing lunches for school, work, or just a picnic, these Easy Mini Lunchbox Pizzas are sure to disappear fast. Don’t be afraid to experiment with different toppings and cheeses – the possibilities are truly endless. Remember, the joy is in the making and the sharing!
For serving suggestions, these are fantastic served warm or at room temperature. They pair wonderfully with a side of fresh fruit, a small salad, or some crunchy veggie sticks. Think grapes, apple slices, or even some cucumber and carrot sticks with a light ranch dip.
When it comes to variations, the world is your oyster! Try a classic Margherita with fresh basil, a veggie-loaded option with bell peppers and mushrooms, or even a meat lover’s version with beef pepperoni and cooked sausage. For a sweeter twist, you could even experiment with fruit toppings and a drizzle of honey or chocolate sauce.
I encourage you to get creative and make these Easy Mini Lunchbox Pizzas your own. Happy baking!
Frequently Asked Questions:
Can I make these ahead of time?
Absolutely! These Easy Mini Lunchbox Pizzas are perfect for making ahead. Once cooled, store them in an airtight container in the refrigerator for up to 3 days. You can reheat them gently in a toaster oven or microwave, or enjoy them cold.
What kind of bread is best for these mini pizzas?
You can use a variety of breads! English muffins, mini bagels, pita bread cut into rounds, or even slices of sturdy bread work wonderfully. The key is to use something that will hold up well to the toppings and baking without becoming too soggy.
My dough is sticking to the pan, what can I do?
Ensure you grease your mini muffin tin thoroughly with cooking spray or a little bit of oil. If you’re using a different baking vessel, make sure it’s also well-greased or lined with parchment paper. Sometimes, a light dusting of flour on your pizza dough before placing it in the pan can also help prevent sticking.
Easy Mini Lunchbox Pizzas-Kid Friendly Bites
Quick and easy homemade mini pizzas perfect for lunchboxes, snacks, or parties. Made with a simple two-ingredient dough and topped with classic pizza flavors.
Ingredients
-
2 cups (300g) self-raising flour
-
1 cup (250g) full-fat plain Greek yoghurt
-
⅓ cup (90g) tomato paste (concentrated puree)
-
1 cup (125g) freshly shredded mozzarella cheese
-
½ cup (80g) beef pepperoni, thinly sliced
Instructions
-
Step 1
In a mixing bowl, combine 2 cups of self-raising flour and 1 cup of full-fat plain Greek yoghurt. Mix until a rough dough forms. Turn onto a lightly floured surface and knead gently for 2-3 minutes until smooth and cohesive. -
Step 2
Divide the dough into 6-8 equal portions. Roll each portion into a ball, then flatten into a disc about ¼ inch thick. Place the discs onto a baking sheet lined with parchment paper. -
Step 3
Spread a thin layer of ⅓ cup tomato paste over each dough disc, leaving a small border for the crust. Sprinkle generously with 1 cup freshly shredded mozzarella cheese. -
Step 4
Arrange ½ cup thinly sliced beef pepperoni over the cheese. Preheat oven to 400°F (200°C). -
Step 5
Bake for 10-15 minutes, or until the crust is golden brown and the cheese is melted and bubbly. Keep an eye on them as they bake. -
Step 6
Remove from oven and let cool on the baking sheet for a few minutes. Allow to cool completely before packing into lunchboxes to prevent sogginess. Serve warm or at room temperature.
Important Information
Nutrition Facts (Per Serving)
It is important to consider this information as approximate and not to use it as definitive health advice.
Allergy Information
Please check ingredients for potential allergens and consult a health professional if in doubt.


Leave a Comment