
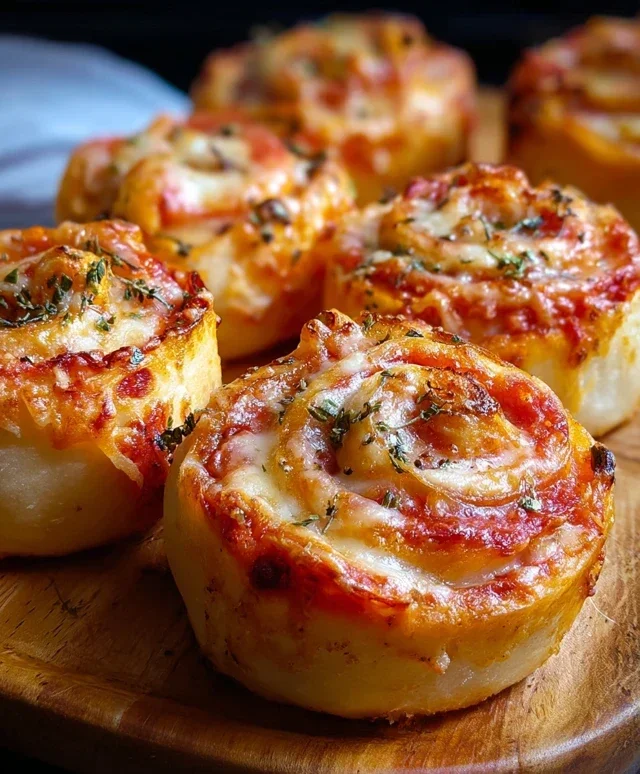
Pizza rolls are undeniably one of the most delightful and convenient comfort foods out there. Who can resist those golden, crispy pockets bursting with gooey cheese and savory fillings? I know I certainly can’t! They’re the perfect bite-sized solution for everything from a quick weeknight dinner to a crowd-pleasing party appetizer. What makes these little gems so universally loved is their incredible versatility and the sheer joy they bring. You can customize your pizza rolls with all your favorite toppings, making them a truly personal culinary adventure. They’re like mini pizzas, but without the fuss of slicing and serving a whole pie. Plus, the satisfying crunch followed by that warm, cheesy center is a textural and flavor combination that’s simply irresistible. Get ready to elevate your snack game with these amazing pizza rolls!

Pizza Rolls
Pizza rolls are a fun and delicious twist on classic pizza. They’re perfect for game nights, quick lunches, or as a crowd-pleasing appetizer. Imagin extracte all your favorite pizza toppings, wrapped up in a warm, doughy hug. This recipe is simple enough for even novice cooks and guarantees a satisfying snack that will have everyone asking for seconds. We’ll be using readily available ingredients to create these delightful bite-sized pizzas that are both fun to make and even more fun to eat. Get ready to impress yourself and your loved ones with these homemade pizza rolls!
Ingredients:
Cooking Instructions:
Let’s get started on creating these irresistible pizza rolls!
1.
Prepare the Vegetables and Dough:
The first step is to get all our delicious fillings ready and prepare the pizza dough. If you’re using fresh vegetables, make sure they are finely diced. This is important because we want them to cook through evenly inside the rolls. Sautéing the diced mushrooms, onions, and bell peppers for a few minutes until they are slightly softened will not only enhance their flavor but also remove excess moisture, preventing your pizza rolls from becoming soggy. You can do this in a skillet over medium heat with a tiny bit of olive oil. While the vegetables are cooling, unroll or prepare your pizza dough according to the package instructions. If you’re using a dough ball, you’ll likely need to roll it out into a large rectangle. Aim for a thickness of about ¼ inch. For the Pillsbury dough, simply unroll it onto a lightly floured surface. It’s important to work with the dough at room temperature so it’s pliable and easy to handle without tearing.
2.
Assemble the Filling Base:
Now it’s time to build the flavorful foundation for our pizza rolls. Spread a thin, even layer of your pizza sauce or marinara sauce over the entire surface of the unrolled pizza dough, leaving a small border of about ½ inch along one of the long edges. This border will act as a seal to keep all the delicious fillings inside. Next, sprinkle the shredded mozzarella cheese evenly over the sauce. This cheesy layer will help bind all the other ingredients together and provide that classic pizza gooeyness. After the cheese, distribute your finely diced, sautéed vegetables evenly over the cheese. Finally, arrange the beef pepperoni slices over the vegetables. If you’re using larger beef pepperoni slices, you might want to cut them in half or quarters to ensure they fit nicely within the rolls and provide a good distribution of flavor.
3.
Roll and Slice the Pizza Rolls:
This is where the magic really happens! Starting from the long edge opposite the ½ inch border, begin extract to tightly roll up the pizza dough, jelly-roll style. It’s crucial to roll it as snugly as possible to prevent any gaps and ensure uniform rolls. As you roll, gently tuck in the edges to keep everything contained. Once you have a long, rolled log, use a sharp knife or a pizza cutter to slice it into individual rolls. Aim for each roll to be about 1 to 1.5 inches thick. Don’t worry if they aren’t perfectly uniform; rustic charm is part of their appeal! Place the sliced rolls, cut-side down, into your prepared baking dish. You can lightly grease the baking dish or line it with parchment paper for easy cleanup. Ensure there’s a little space between each roll, as they will expand slightly during baking.
4.
Prepare the Garlic Butter Topping:
For that extra burst of flavor and a beautiful golden-brown finish, we’re making a simple garlic butter topping. In a small bowl, combine the melted salted butter with the minced garlic. If you’re using dried parsley, you can add it to this mixture now. If you’re using fresh parsley, you might want to chop it finely and reserve it for garnishing after baking. Whisk these ingredients together until well combined. This aromatic butter will be brushed over the top of each pizza roll before baking, infusing them with a savory garlic goodness and helping to create a wonderfully crisp crust. This step truly elevates the pizza rolls from good to absolutely divine.
5.
Bake and Serve:
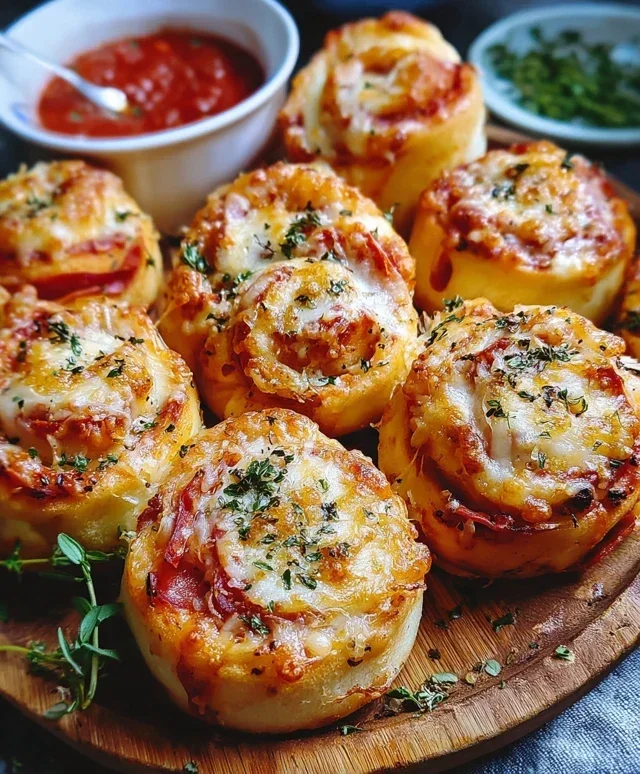
Now it’s time to bake our delicious pizza rolls to golden perfection. Preheat your oven to the temperature specified on your pizza dough package, typically around 375°F (190°C). Carefully brush the garlic butter mixture generously over the top of each pizza roll. This is your chance to really coat them well for maximum flavor. Once the oven is preheated, place the baking dish into the center of the oven. Bake for approximately 15-20 minutes, or until the pizza rolls are puffed up, golden brown, and the cheese is melted and bubbly. Keep an eye on them towards the end of the baking time to prevent them from burning. Once baked, remove them from the oven and let them cool slightly in the dish for a few minutes before serving. Garnish with a sprinkle of Parmesan cheese and fresh parsley (if using) just before serving. Serve warm with extra pizza sauce or marinara sauce for dipping. Enjoy every cheesy, saucy, doughy bite!
Conclusion:
And there you have it – your guide to making incredible, crowd-pleasing pizza rolls right in your own kitchen! This recipe is fantastic because it offers that satisfying, cheesy, saucy goodness of pizza in a perfectly portioned, fun-to-eat format. They’re surprisingly simple to whip up, making them an ideal option for weeknight dinners, game days, or any occasion where you need a delicious and convenient bite. Whether you’re a seasoned cook or just starting out, I truly encourage you to give these pizza rolls a try. You’ll be amazed at how quickly they disappear!
These versatile delights are wonderful served piping hot on their own, or you can elevate them further with a variety of serving suggestions. Think a side of marinara dipping sauce for extra flavor, a crisp green salad for balance, or even a sprinkle of parmesan cheese. For variations, don’t be afraid to experiment! Add cooked Italian sausage, beef pepperoni, sautéed mushrooms, or even some finely chopped bell peppers to the filling. The possibilities are endless, making each batch uniquely yours.
Frequently Asked Questions about Pizza Rolls:
Can I make pizza rolls ahead of time?
Absolutely! You can assemble the pizza rolls and store them in the refrigerator for up to 24 hours before baking. If baking from chilled, you might need to add a few extra minutes to the baking time. For longer storage, you can freeze them uncooked. Place them on a baking sheet until firm, then transfer to a freezer bag. Bake directly from frozen, adding about 5-10 minutes to the cooking time.
What is the best way to reheat leftover pizza rolls?
The best way to reheat leftover pizza rolls is in the oven or a toaster oven at around 350°F (175°C) for about 5-7 minutes, or until heated through and crispy again. Microwaving can make them a bit soggy, so the oven method is highly recommended for the best texture.
Can I use different kinds of cheese in my pizza rolls?
Yes, you can! While mozzarella is classic, feel free to mix in other melty cheeses like provolone, a sprinkle of cheddar, or even some shredded parmesan for an extra flavor boost. Just ensure the cheese melts well.
Homemade Pizza Rolls
Easy and delicious homemade pizza rolls perfect for snacks or appetizers, customizable with your favorite toppings.
Ingredients
-
1 tube Pillsbury pizza dough or store-bought pizza dough ball
-
1 ½ cups turkey pepperoni slices
-
1 ½ cups mozzarella cheese, shredded
-
1 cup pizza sauce or marinara sauce
-
½ cup mushrooms, finely diced
-
½ cup onions, finely diced
-
½ cup bell peppers, finely diced
-
¼ cup salted butter, melted
-
1 clove garlic, minced
-
1 teaspoon parsley, dried or fresh (optional)
-
Pizza sauce, for dipping
-
Parmesan cheese, for garnish
Instructions
-
Step 1
Preheat your oven to 400°F (200°C). Lightly grease a baking sheet or line it with parchment paper. -
Step 2
Unroll the pizza dough onto a lightly floured surface. If using a dough ball, roll it out into a rectangle. -
Step 3
Spread a thin layer of pizza sauce evenly over the dough, leaving a small border around the edges. -
Step 4
Sprinkle the shredded mozzarella cheese over the sauce. Then, evenly distribute the pepperoni slices, diced mushrooms, onions, and bell peppers. -
Step 5
Starting from one long edge, tightly roll up the dough to form a log. Pinch the seams to seal. -
Step 6
Slice the log into 1-inch thick rolls and place them cut-side up on the prepared baking sheet. -
Step 7
In a small bowl, combine the melted butter and minced garlic. Brush this mixture over the tops of the pizza rolls. -
Step 8
Bake for 12-15 minutes, or until the dough is golden brown and the cheese is melted and bubbly. -
Step 9
Remove from the oven. Sprinkle with optional dried parsley and Parmesan cheese. Serve hot with extra pizza sauce for dipping.
Important Information
Nutrition Facts (Per Serving)
It is important to consider this information as approximate and not to use it as definitive health advice.
Allergy Information
Please check ingredients for potential allergens and consult a health professional if in doubt.

Leave a Comment