
White Trash Sliders are more than just a playful name; they’re a culinary phenomenon that evokes comfort, nostalgia, and pure, unadulterated deliciousness. If you’ve ever experienced the magic of these miniature delights, you know exactly why they hold a special place in so many hearts (and stomachs!). They’re the perfect embodiment of casual gatherings, impromptu game nights, and those moments when you just crave something undeniably satisfying. What makes these White Trash Sliders so incredibly beloved? It’s the ingenious combination of textures and flavors – the slightly sweet, pillowy buns cradling a savory, often crispy filling, all brought together with a tangy, irresistible sauce. This isn’t just food; it’s a feeling, a throwback to simpler times, and a guaranteed crowd-pleaser that brings smiles with every bite. Prepare to fall in love all over again with this iconic and delightfully easy-to-make treat.

Ingredients:
- 1 lb ground beef
- 1 lb beef sausage
- 1 lb (16 oz) Velveeta cheese, cubed
- 1 tsp Worcestershire sauce
- 1 tsp black pepper
- ½ tsp onion powder
- 24 slider buns
Preparing the Meat Mixture
Step 1: Browning the Beef and Sausage
The foundation of our delicious White Trash Sliders is a robust meat mixture, and we’re starting by getting our ground beef and beef sausage perfectly browned. In a large skillet, or a Dutch oven if you have one, add your pound of ground beef and your pound of beef sausage. Break up the meat with a spoon or a potato masher as it begin extracts to heat up over medium-high heat. We want to cook this until it’s no longer pink and has developed a nice, savory brown color. This process is crucial for developing flavor and rendering out any excess fat. Don’t be afraid to get in there and really crum extractble the meat well; smaller pieces will distribute more evenly throughout the sliders. Once the meat is thoroughly browned, it’s time to tackle that excess grease.
Step 2: Draining the Fat
This step is key for a less greasy, more enjoyable slider. After the meat is fully browned, carefully tilt the skillet to one side, allowing the rendered fat to pool. You can then spoon out the excess fat into a heat-safe container, like a small bowl or a can, for proper disposal later. Alternatively, you can carefully pour it off. Getting rid of most of this fat will prevent the sliders from feeling heavy and oily, and it allows the other flavors to shine through. Leave a little bit of the fat behind, though; a small amount adds moisture and helps carry flavor.
Adding Flavor and Cheese
Step 3: Seasoning the Meat
Now that our meat is nicely browned and drained, it’s time to inject some serious flavor. To the skillet with the cooked ground beef and sausage, add your seasonings: 1 teaspoon of Worcestershire sauce, 1 teaspoon of black pepper, and ½ teaspoon of onion powder. The Worcestershire sauce will add a deep, umami richness, while the black pepper provides a pleasant warmth. The onion powder offers a subtle, savory onion essence that complements the richness of the meats without being overpowering. Stir everything together thoroughly, ensuring the seasonings are evenly distributed throughout the meat mixture. Let this cook for another minute or two, allowing the flavors to meld and deepen.
Step 4: Melting the Velveeta
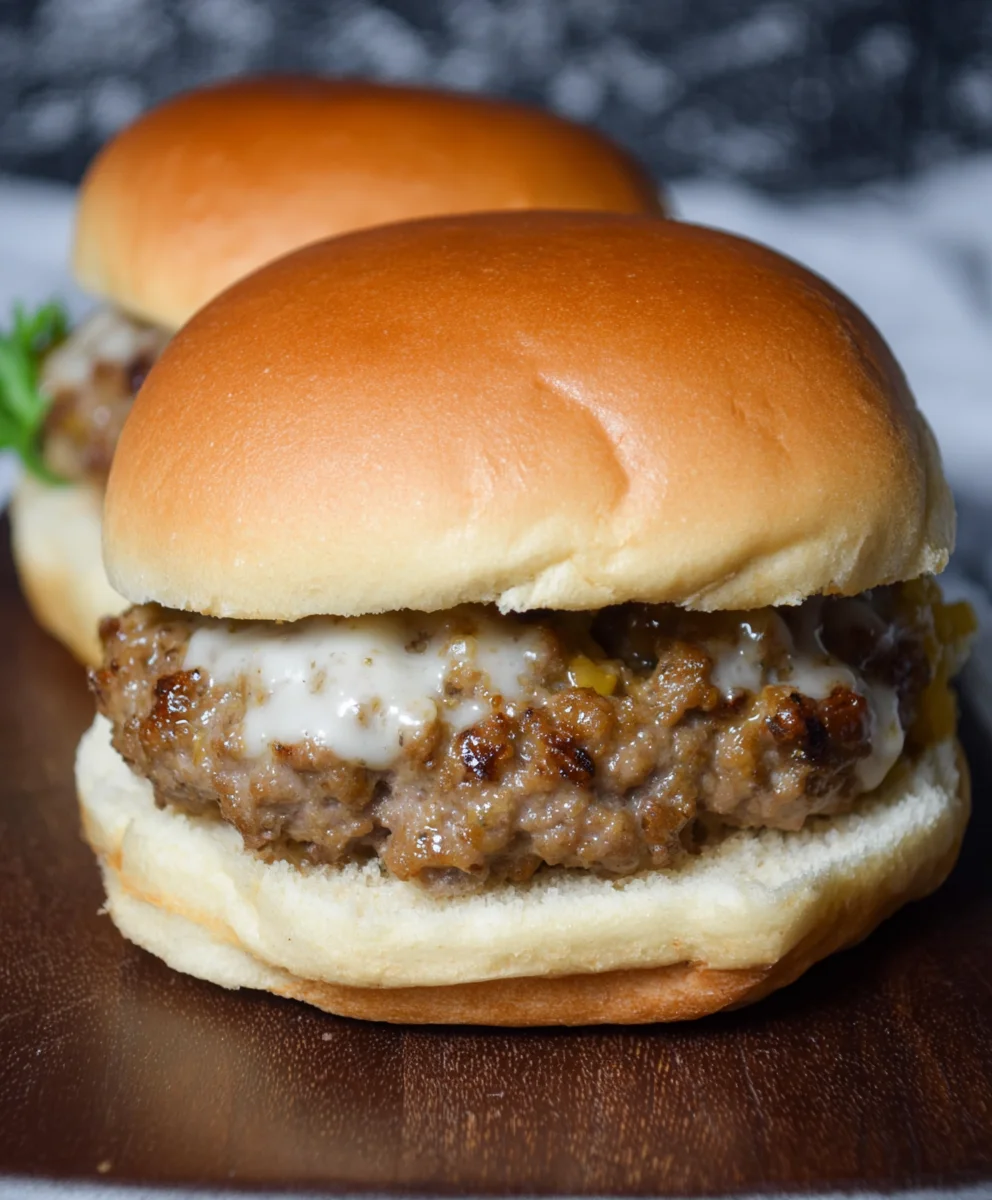
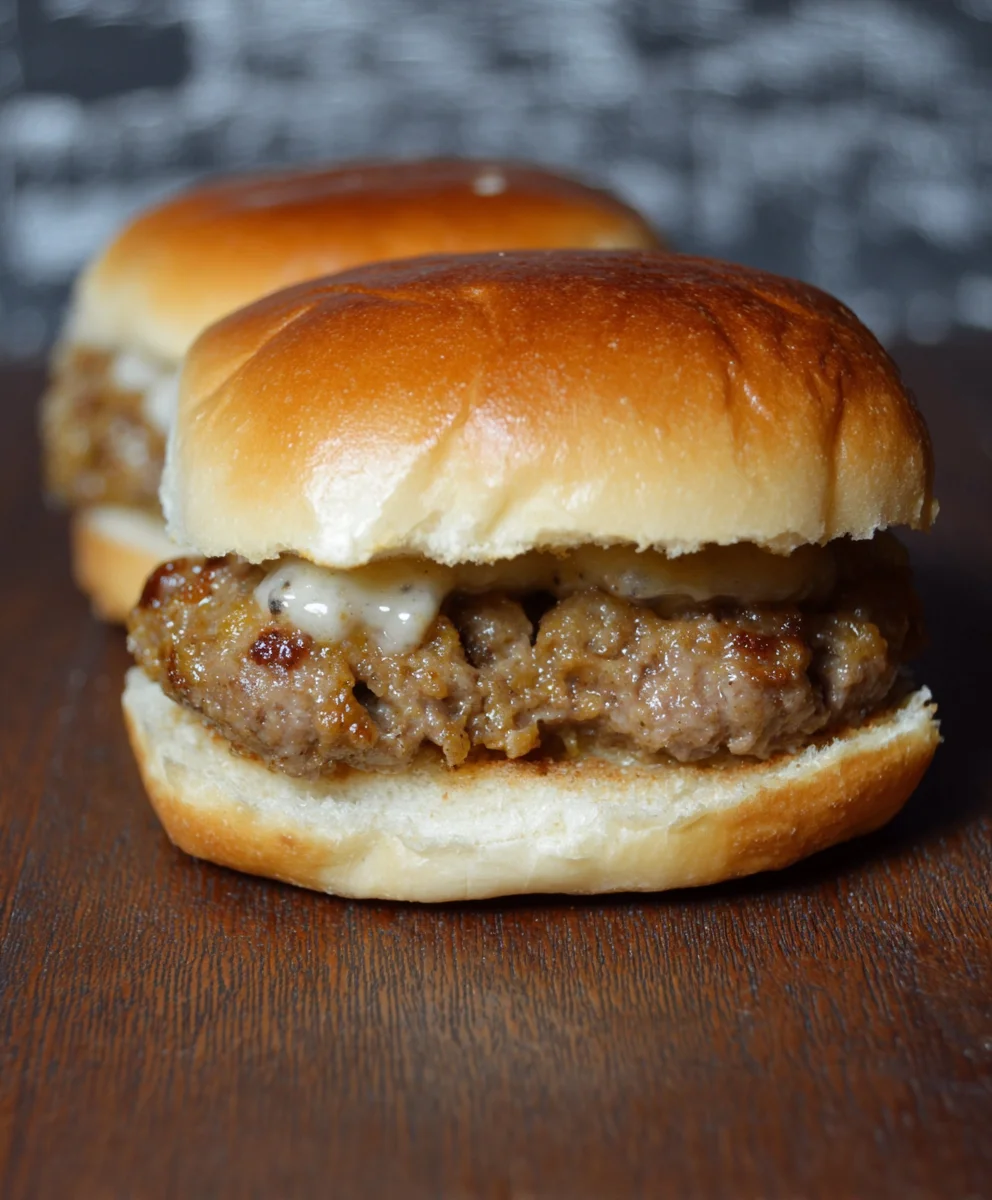
This is where the magic truly happens for White Trash Sliders! Add your cubed Velveeta cheese directly into the skillet with the seasoned meat mixture. You’ve got a full pound of this creamy, melty cheese, so be generous! Stir the Velveeta into the hot meat, using your spoon to break it up as it starts to soften and melt. Continue to stir and fold the cheese into the meat until it’s completely melted and has created a glorious, gooey, cheesy binder. The goal is a smooth, cohesive mixture where every bit of meat is coated in that signature Velveeta creaminess. This cheesy goodness is what makes these sliders so incredibly satisfying and addictively delicious.
Assembling and Serving
Step 5: Assembling the Sliders
With our rich, cheesy meat mixture ready, it’s time to assemble these fantastic White Trash Sliders. Take your 24 slider buns and split them horizontally. You can lightly toast them if you prefer a bit of crunch, but it’s entirely optional. Spread a generous portion of the warm, cheesy meat mixture onto the bottom halves of the slider buns. Don’t be shy; load them up! Ensure each bun gets a good amount of that irresistible beef and Velveeta blend. Place the top halves of the buns over the meat, creating your sliders. You can serve these immediately while the cheese is still wonderfully gooey and warm, or you can cover them and keep them warm in a low oven if you’re making them ahead of time for a crowd. The aroma alone will have everyone eager to dig in!
Conclusion:
And there you have it – a delightful batch of White Trash Sliders ready to impress! We’ve walked through each step, from preparing the tender seasoned ground beef to assembling these flavor-packed mini burgers. These White Trash Sliders are incredibly versatile and are sure to be a hit at any gathering, from casual game nights to backyard barbecues. Don’t be afraid to get creative and make them your own; the beauty of these sliders lies in their adaptability.
For serving suggestions, consider pairing them with a crisp coleslaw, a creamy potato salad, or a medley of seasoned fries. They’re also fantastic served alongside a fresh garden salad for a lighter option. When it comes to variations, the possibilities are endless! You can experiment with different cheeses like pepper jack for a kick, or a sharp cheddar for more depth. Adding caramelized onions or sautéed mushrooms will elevate the flavor profile even further. Feel free to swap out the standard ketchup and mustard for a spicy aioli or a tangy barbecue sauce. The key is to have fun with it!
I encourage you to give these White Trash Sliders a try. They are surprisingly easy to make, budget-friendly, and deliver on pure, unadulterated deliciousness. Get your friends and family together and enjoy a fantastic meal!
Frequently Asked Questions about White Trash Sliders:
Can I prepare the ground beef mixture for the White Trash Sliders ahead of time?
Yes, absolutely! You can prepare the seasoned ground beef mixture for your White Trash Sliders up to a day in advance. Store it in an airtight container in the refrigerator. When you’re ready to assemble, simply reheat the mixture gently on the stovetop or in the microwave before forming the patties. This can save you valuable time on the day of your event.
What kind of buns are best for White Trash Sliders?
While dinner rolls or slider buns are the most common choice for White Trash Sliders, you can also get creative! Small brioche buns offer a touch of sweetness, while classic white dinner rolls provide a soft and neutral base. For a healthier twist, consider using whole wheat slider buns or even large lettuce leaves as a wrap. The most important thing is that they are small enough to be handled easily and complement the flavorful filling.
Easy Beef Trash Sliders – Crowd Pleasing Recipe
A crowd-pleasing recipe for easy and delicious beef trash sliders, featuring a savory blend of ground beef, beef sausage, and creamy Velveeta cheese on slider buns.
Ingredients
-
1 lb ground beef
-
1 lb beef sausage
-
1 lb (16 oz) Velveeta cheese, cubed
-
1 tsp Worcestershire sauce
-
1 tsp black pepper
-
½ tsp onion powder
-
24 slider buns
Instructions
-
Step 1
In a large skillet, brown the ground beef and beef sausage over medium-high heat, breaking up the meat with a spoon until no longer pink. Drain excess grease, leaving a small amount for moisture and flavor. -
Step 2
Add Worcestershire sauce, black pepper, and onion powder to the browned meat. Stir to combine and cook for another minute or two to allow flavors to meld. -
Step 3
Add the cubed Velveeta cheese to the skillet with the seasoned meat. Stir and fold until the cheese is completely melted and creates a smooth, gooey binder that coats the meat. -
Step 4
Split the slider buns horizontally. You can toast them lightly if desired. -
Step 5
Spread a generous portion of the warm, cheesy meat mixture onto the bottom halves of the slider buns. Place the top halves of the buns over the meat to form the sliders. -
Step 6
Serve immediately while the cheese is gooey and warm, or keep warm in a low oven for a crowd.
Important Information
Nutrition Facts (Per Serving)
It is important to consider this information as approximate and not to use it as definitive health advice.
Allergy Information
Please check ingredients for potential allergens and consult a health professional if in doubt.


Leave a Comment