
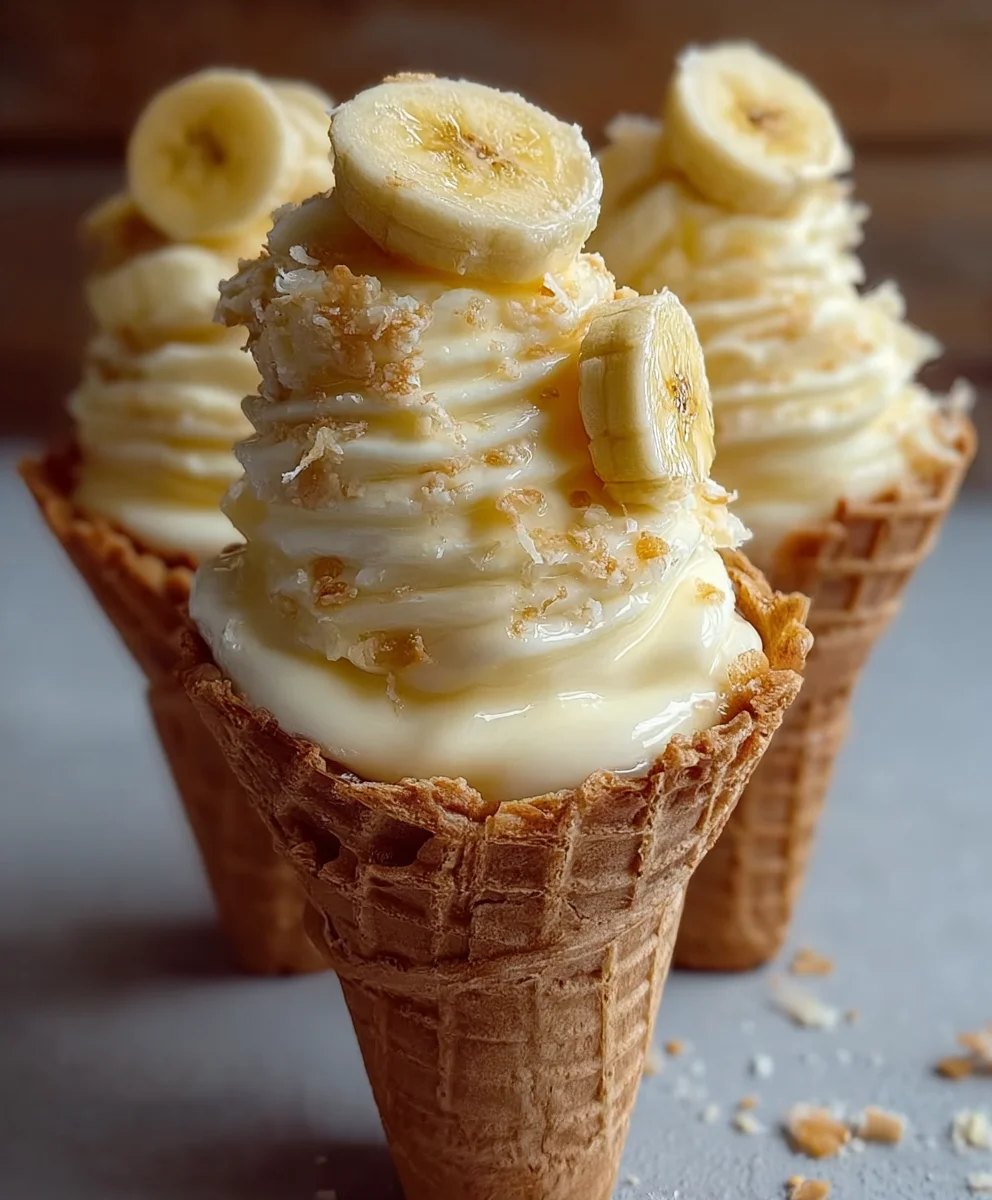
Banana Cheesecake Cones have a magical way of transforming a simple dessert into an unforgettable experience. Imagin extracte this: a crisp, golden waffle cone, its sweet aroma mingling with the creamy, dreamy essence of a no-bake cheesecake filling, all studded with tender, caramelized banana slices. It’s a dessert that perfectly marries texture and flavor, making it an instant crowd-pleaser for birthdays, potlucks, or simply a Tuesday night treat. What truly sets these Banana Cheesecake Cones apart is their playful presentation and the harmonious dance of ingredients. The cool, tangy cheesecake is a delightful counterpoint to the warm, sweet bananas, while the crunchy cone provides that satisfying bite. Forget your traditional cheesecake slices; these individual delights are as fun to make as they are to devour.

Ingredients:
- 2 (8 oz) packages cream cheese, softened
- 1 cup granulated sugar
- 1 teaspoon vanilla extract
- 1 cup sour cream
- 1 cup heavy cream
- 1/2 cup banana puree (achieved by mashing about 2 ripe bananas until smooth)
- 1/2 cup crushed vanilla wafers
- 1/2 teaspoon ground cinnamon (optional, for an extra layer of flavor)
- 2 cups whole milk
- 1/2 cup granulated sugar
- 1/4 cup cornstarch
- 1/4 teaspoon salt
- 1 teaspoon vanilla extract
- 2 ripe bananas, sliced
- 12 ice cream cones (waffle or sugar cones, your preference for crunch)
Preparing the Cream Cheese Filling
To begin extract crafting these delightful Banana Cheesecake Cones, let’s get started on the luscious cream cheese filling. In a large mixing bowl, combine the softened cream cheese with 1 cup of granulated sugar. Ensure your cream cheese is truly softened – this is key to achieving a smooth, lump-free filling. You can leave it out at room temperature for about an hour, or gently warm it in the microwave for short bursts (15-20 seconds), stirring in between, until it’s pliable. Using an electric mixer on medium speed, beat the cream cheese and sugar together until the mixture is light, fluffy, and well incorporated, with no grainy texture remaining. This process should take about 2-3 minutes. Next, add 1 teaspoon of vanilla extract and the sour cream to the bowl. Continue to mix on low speed until just combined. Overmixing at this stage can introduce too much air, which might cause the filling to expand too much. Finally, pour in the heavy cream. Increase the mixer speed to medium-high and whip the mixture until it thickens and forms soft peaks. You’re aiming for a consistency that holds its shape loosely when you lift the beater.
Incorporating the Banana Flavor
Now it’s time to infuse our cheesecake filling with the star of the show: banana! Gently fold in the 1/2 cup of banana puree. It’s best to do this by hand with a spatula rather than using the electric mixer. This prevents overmixing and helps maintain the creamy texture of the filling. Ensure the banana puree is evenly distributed throughout the cream cheese mixture. You should see beautiful ribbons of banana throughout. If you’re opting for the optional ground cinnamon, now is the time to sprinkle it in and fold it gently until just combined. This adds a warm, comforting spice that complements the sweetness of the banana and the tang of the cream cheese beautifully.
Making the Banana Custard Base
While our cream cheese filling rests, let’s prepare a smooth and creamy banana custard base that will add another dimension of flavor and a delightful texture to our cones. In a medium saucepan, whisk together the whole milk, 1/2 cup of granulated sugar, cornstarch, and salt. It’s crucial to whisk these ingredients together thoroughly while they are still cold to ensure the cornstarch dissolves completely and there are no lumps. Place the saucepan over medium heat. Stir constantly with a whisk or a heatproof spatula, making sure to scrape the bottom and sides of the pan to prevent any scorching. As the mixture heats up, itgin extractll begin to thicken. Continue to cook and stir until the custard reaches a thick, pudding-like consistency, coating the back of a spoon. This usually takes about 5-8 minutes once the mixture starts to simmer. Once thickened, remove the saucepan from the heat and stir in the remaining 1 teaspoon of vanilla extract. Allow this custard to cool slightly, stirring occasionally to prevent a skin from forming on top.
Assembling the Banana Cheesecake Cones
With all our components ready, we can now assemble these wonderful Banana Cheesecake Cones. Start by carefully spooning a layer of the cooled banana custard into the bottom of each ice cream cone. This provides a nice base and ensures flavor throughout. Next, fill each cone with a generous dollop of the banana cream cheese filling, making sure to get a good amount into the cone cavity. Don’t be afraid to mound it up slightly at the top. For that delightful cheesecake crunch, sprinkle the crushed vanilla wafers over the top of the cream cheese filling in each cone. You can be as generous as you like with this crunchy topping. Finally, gently press a few slices of the fresh, ripe bananas onto the top of the crushed wafers. These fresh banana slices add a burst of natural sweetness and a beautiful visual appeal to your Banana Cheesecake Cones.
Chilling and Serving
The final, and perhaps most important, step is to allow your creations to chill. This allows the flavors to meld together and the cheesecake filling to firm up properly. Carefully arrange the assembled Banana Cheesecake Cones on a baking sheet or in a tray. Place them in the refrigerator and let them chill for at least 1 hour, or preferably 2-3 hours, before serving. This chilling time is essential for the best texture and flavor. The cold will firm up the cream cheese filling and allow the custard to set even further, making them a truly enjoyable treat. Serve these delightful Banana Cheesecake Cones chilled, and watch them disappear!
Conclusion:
And there you have it – the delightful and surprisingly simple process of creating your very own Banana Cheesecake Cones! We’ve walked through each step, from preparing the creamy cheesecake filling to assembling these adorable treats. The result is a perfect balance of sweet banana, tangy cream cheese, and the satisfying crunch of a waffle cone. I truly hope you enjoy making and, more importantly, devouring these!
These Banana Cheesecake Cones are incredibly versatile. They make a fantastic dessert for parties, a fun family activity, or even a special weeknight treat. For serving suggestions, consider dusting them with a little cinnamon or a drizzle of caramel sauce for an extra layer of indulgence. You can also top them with a few toasted chopped peanuts for added texture. Don’t be afraid to experiment with variations!
For a different flavor profile, try adding a pinch of nutmeg to the cheesecake filling or even folding in a spoonful of your favorite fruit preserve. You could also swap out the banana for other pureed fruits like strawberries or blueberries. The possibilities are truly endless, and the joy of creating something delicious and beautiful is immense. I encourage you to get creative and make these Banana Cheesecake Cones your own!
Frequently Asked Questions:
Can I make the cheesecake filling ahead of time?
Absolutely! The cheesecake filling for your Banana Cheesecake Cones can be made up to 2 days in advance. Store it in an airtight container in the refrigerator. This is a great way to get a head start on your dessert preparation.
How should I store leftover Banana Cheesecake Cones?
Leftover Banana Cheesecake Cones are best stored in an airtight container in the refrigerator. It’s a good idea to place parchment paper between layers to prevent them from sticking together. They will remain delicious for up to 2-3 days.
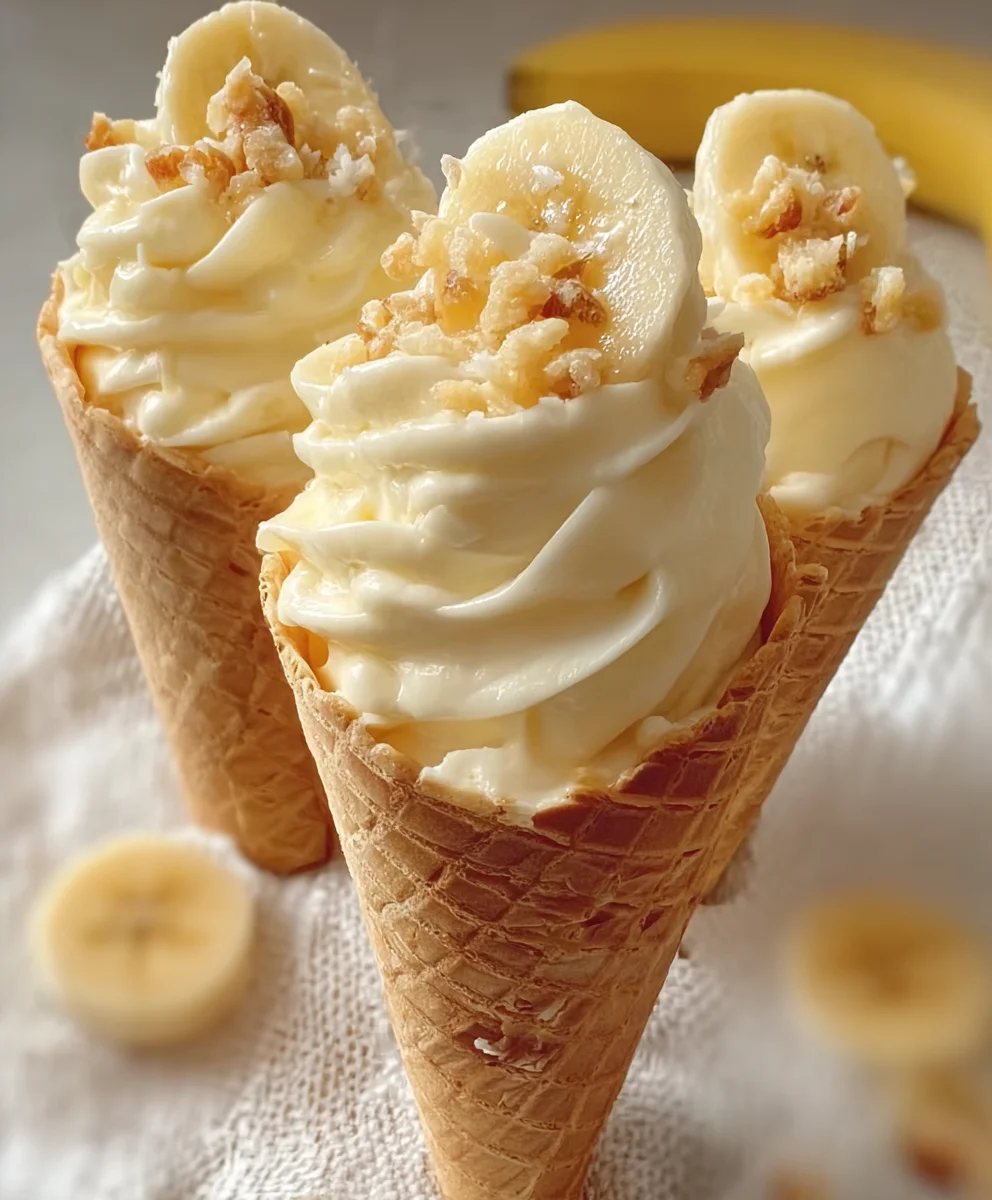
Easy Banana Cheesecake Cones-No Bake Dessert
Delightful no-bake cheesecake cones with a creamy banana filling and a smooth custard base, topped with crushed vanilla wafers and fresh banana slices.
Ingredients
-
2 (8 oz) packages cream cheese, softened
-
1 cup granulated sugar
-
1 teaspoon vanilla extract
-
1 cup sour cream
-
1 cup heavy cream
-
1/2 cup banana puree (from about 2 ripe bananas)
-
1/2 cup crushed vanilla wafers
-
1/2 teaspoon ground cinnamon (optional)
-
2 cups whole milk
-
1/2 cup granulated sugar
-
1/4 cup cornstarch
-
1/4 teaspoon salt
-
1 teaspoon vanilla extract
-
2 ripe bananas, sliced
-
12 ice cream cones (waffle or sugar cones)
Instructions
-
Step 1
Prepare the cream cheese filling by beating softened cream cheese with 1 cup sugar until smooth. Add 1 teaspoon vanilla extract and sour cream, mixing on low speed. Gradually add heavy cream and whip until soft peaks form. -
Step 2
Gently fold 1/2 cup banana puree and optional cinnamon into the cream cheese mixture by hand until evenly combined. -
Step 3
Make the banana custard base by whisking together whole milk, 1/2 cup sugar, cornstarch, and salt in a saucepan. Cook over medium heat, stirring constantly, until thickened to a pudding-like consistency. Remove from heat and stir in 1 teaspoon vanilla extract. Let cool slightly. -
Step 4
Assemble the cones by spooning a layer of cooled banana custard into the bottom of each cone. Fill with the banana cream cheese filling. -
Step 5
Sprinkle crushed vanilla wafers over the cream cheese filling in each cone. Top with a few slices of fresh banana. -
Step 6
Chill the assembled cones in the refrigerator for at least 1-2 hours, or until firm, before serving.
Important Information
Nutrition Facts (Per Serving)
It is important to consider this information as approximate and not to use it as definitive health advice.
Allergy Information
Please check ingredients for potential allergens and consult a health professional if in doubt.
Leave a Comment