
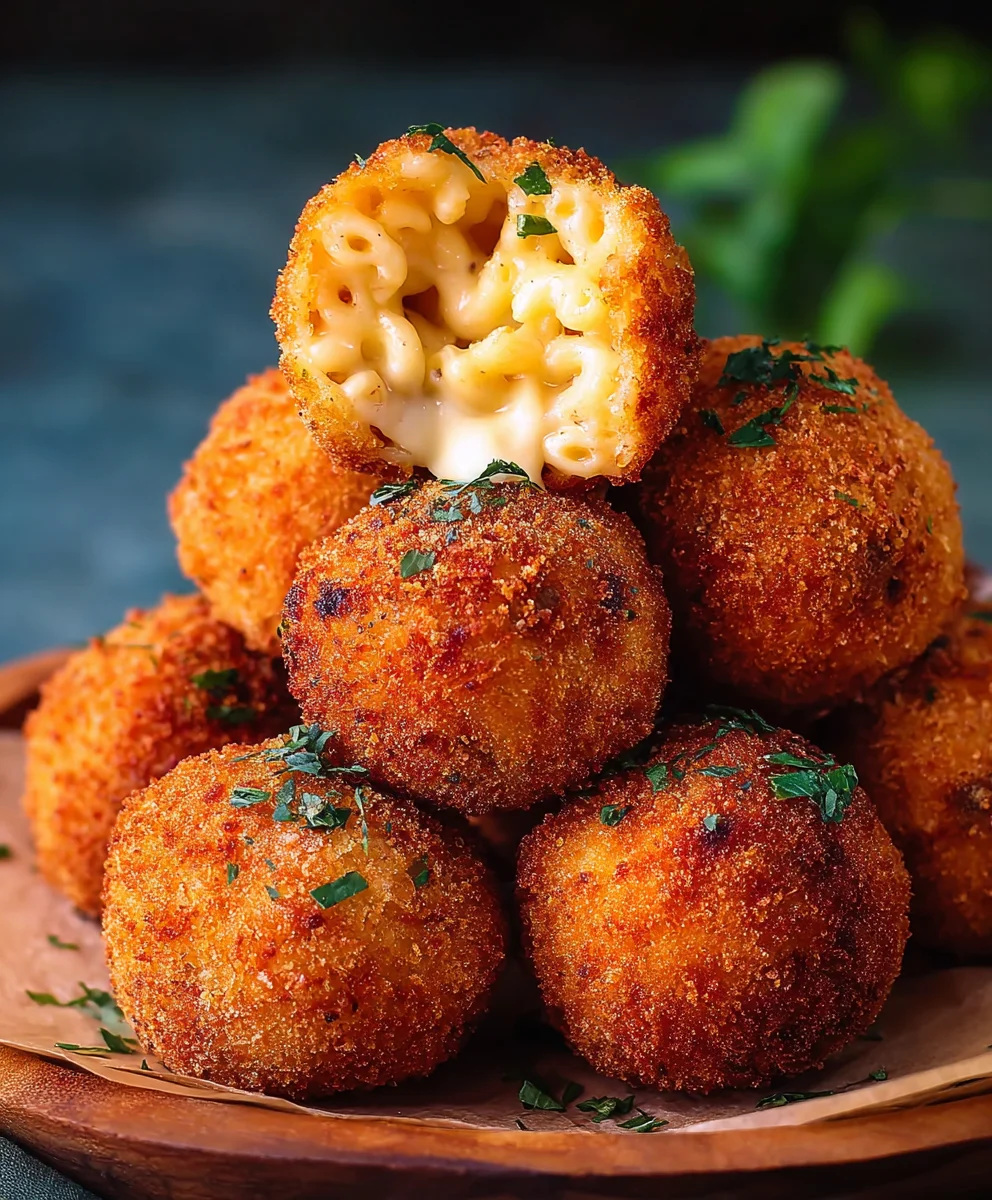
Crispy Fried Mac and Cheese Balls are the ultimate comfort food upgrade, a delightful transformation of a classic into a bite-sized explosion of cheesy, crunchy goodness. We all adore mac and cheese, that creamy, dreamy hug in a bowl, but imagine taking that beloved essence and giving it an exciting new texture. These golden orbs are precisely that – a symphony of textures where the familiar gooey interior meets an irresistibly crisp exterior. What makes these Crispy Fried Mac and Cheese Balls so utterly special? It’s the perfect marriage of tangy cheese, tender pasta, and that glorious crunch that keeps you reaching for more. They’re perfect for parties, game nights, or simply as a decadent treat to brighten your day. Get ready to experience mac and cheese like never before!

Ingredients:
- 2 cups elbow macaroni, cooked and drained
- 2 tablespoons unsalted butter
- 2 tablespoons all-purpose flour
- 1 cup milk
- 2 cups shredded cheddar cheese
- 1/2 cup grated Parmesan cheese
- Salt and pepper to taste
- 1 cup all-purpose flour (for dredging)
- 2 large eggs, beaten (for egg wash)
- 1 1/2 cups seasoned breadcrumbs (for coating)
- Vegetable oil, for frying
Making the Mac and Cheese Base
The foundation of our Crispy Fried Mac and Cheese Balls is, of course, a rich and creamy mac and cheese. Start by melting the 2 tablespoons of unsalted butter in a medium saucepan over medium heat. Once the butter is melted and starts to sizzle gently, whisk in the 2 tablespoons of all-purpose flour. This creates a roux, which is essential for thickening our sauce. Cook the roux for about 1 to 2 minutes, stirring constantly. You’ll notice it will bubble and thicken slightly. This step helps to cook out the raw flour taste, ensuring a smooth sauce.
Next, gradually whisk in the 1 cup of milk, a little at a time, making sure to incorporate each addition before adding more. Continue whisking until the milk is fully incorporated and the mixture begins to thicken. This process should take a few minutes. Once the sauce is smooth and has a consistency similar to heavy cream, reduce the heat to low.
Now for the cheese! Add the 2 cups of shredded cheddar cheese and the 1/2 cup of grated Parmesan cheese to the thickened sauce. Stir continuously until all the cheese is melted and the sauce is wonderfully smooth and gooey. This is where all that delicious cheesy flavor really comes to life. Taste the cheese sauce and season it with salt and pepper to your preference. Remember that the Parmesan cheese is already salty, so adjust accordingly.
Finally, fold in the 2 cups of cooked and drained elbow macaroni into the cheese sauce. Stir gently to ensure every piece of pasta is coated in that glorious cheese mixture. You want the mac and cheese to be well-combined and fairly thick, as this will make it easier to form into balls later. Once everything is evenly distributed, remove the saucepan from the heat. Spread the mac and cheese mixture onto a baking sheet or into a shallow dish. This helps it to cool down more quickly and will make it firmer, which is crucial for shaping. Place it in the refrigerator for at least 2 hours, or until it’s firm and easy to handle. Chilling is a non-negotiable step for success!
Forming and Coating the Balls
Once your mac and cheese mixture has chilled and is firm, it’s time to shape it into balls. You can use a tablespoon or a small cookie scoop to portion out the mac and cheese. Roll each portion into a compact ball, about 1 to 1.5 inches in diameter. Don’t worry if they aren’t perfectly round; a slightly rustic look is charming! As you form the balls, place them back onto the baking sheet or a plate.
Now, let’s set up your dredging station. You’ll need three shallow dishes or plates. In the first dish, place the 1 cup of all-purpose flour. In the second dish, pour the 2 large eggs and beat them lightly with a fork until the yolks and whites are well combined. This will be your egg wash. In the third dish, place the 1 1/2 cups of seasoned breadcrumbs. If you prefer, you can add a pinch of garlic powder or onion powder to the breadcrumbs for extra flavor.
To coat each mac and cheese ball, first gently roll it in the all-purpose flour, ensuring it’s fully coated. Tap off any excess flour. Next, dip the floured ball into the beaten eggs, letting any excess drip off. Finally, roll the egg-washed ball in the seasoned breadcrumbs, pressing gently to make sure the breadcrumbs adhere well. Ensure the entire ball is covered in breadcrumbs for maximum crispiness. Place the breaded balls back onto the baking sheet. For an even crispier coating, you can chill the breaded balls in the refrigerator for another 15-30 minutes before frying. This helps the coating set.
Frying the Crispy Mac and Cheese Balls
For the best results and to ensure they cook evenly, it’s important to have enough vegetable oil. Pour enough vegetable oil into a large, heavy-bottomed pot or Dutch oven to reach a depth of about 2-3 inches. Heat the oil over medium-high heat until it reaches 350°F (175°C). A candy thermometer is very helpful here. If you don’t have one, you can test the oil by dropping a tiny bit of breadcrumb into it; it should sizzle immediately and float to the surface.
Carefully add the mac and cheese balls to the hot oil, working in batches. Do not overcrowd the pot, as this will lower the oil temperature and result in greasy, less crispy balls. Typically, you can fry 4-6 balls at a time, depending on the size of your pot. Fry the balls for about 3-5 minutes, turning them occasionally with a slotted spoon or spider strainer, until they are golden brown and crispy on all sides. The cheese inside should be melted and gooey.
Once they are perfectly golden and crispy, remove the mac and cheese balls from the oil using a slotted spoon or spider strainer. Place them on a wire rack set over a baking sheet to drain any excess oil. This wire rack method is superior to paper towels as it allows air to circulate around the balls, preventing them from becoming soggy. Repeat the frying process with the remaining balls, ensuring the oil returns to 350°F (175°C) between batches.
Serve your Crispy Fried Mac and Cheese Balls immediately while they are hot and wonderfully cheesy. They are delicious on their own or with your favorite dipping sauce, such as marinara, ranch dressing, or a spicy aioli. Enjoy this delightful appetizer or snack!
Conclusion:
And there you have it – the ultimate guide to creating deliciously golden and gooey Crispy Fried Mac and Cheese Balls! We’ve walked through each step, from crafting the perfect cheese sauce to achieving that irresistible crunchy exterior. These delightful bites are more than just a snack; they’re a guaranteed crowd-pleaser for parties, a fun appetizer for family dinners, or even a decadent side dish. I truly hope you enjoy making and devouring these. They’re a testament to how simple ingredients can transform into something truly special with a little bit of care and attention.
For serving suggestions, consider pairing them with your favorite dipping sauces – a tangy marinara, a spicy sriracha mayo, or even a classic ranch dressing work wonderfully. For variations, don’t hesitate to experiment with different cheese combinations! Sharp cheddar and Monterey Jack are fantastic, but adding a touch of Gruyère or smoked gouda can elevate the flavor profile even further. You could also mix in some finely diced jalapeños for a spicy kick, or crispy bacon bits for added texture and savory depth. Don’t be afraid to make these Crispy Fried Mac and Cheese Balls your own! I encourage you to dive in, get creative, and enjoy every cheesy, crunchy bite.
Frequently Asked Questions:
Can I make the mac and cheese mixture ahead of time?
Absolutely! You can prepare the mac and cheese mixture and refrigerate it for up to 2 days. Once chilled, it will be firmer and easier to shape into balls before breading and frying.
What’s the best way to ensure they are truly crispy?
The key to achieving perfectly crispy balls is to ensure your oil is at the correct temperature (around 350°F or 175°C) and to not overcrowd the pan. Frying in batches allows each ball to cook evenly and maintain its crispness. Also, double-dipping in the egg and breadcrumb mixture can create an extra-thick, satisfying crust.

Crispy Fried Mac and Cheese Balls Recipe
Learn how to make irresistibly crispy fried mac and cheese balls, a perfect appetizer or snack with a gooey, cheesy center.
Ingredients
-
2 cups elbow macaroni, cooked and drained
-
2 tablespoons unsalted butter
-
2 tablespoons all-purpose flour
-
1 cup milk
-
2 cups shredded cheddar cheese
-
1/2 cup grated Parmesan cheese
-
Salt and pepper to taste
-
1 cup all-purpose flour (for dredging)
-
2 large eggs, beaten (for egg wash)
-
1 1/2 cups seasoned breadcrumbs (for coating)
-
Vegetable oil, for frying
Instructions
-
Step 1
Melt butter in a saucepan over medium heat, whisk in flour to create a roux, and cook for 1-2 minutes. Gradually whisk in milk until thickened. -
Step 2
Add cheddar and Parmesan cheeses to the sauce, stirring until melted and smooth. Season with salt and pepper to taste. -
Step 3
Fold in cooked macaroni into the cheese sauce. Spread the mixture onto a baking sheet and refrigerate for at least 2 hours until firm. -
Step 4
Shape the chilled mac and cheese into 1-1.5 inch balls. Set up three shallow dishes with flour, beaten eggs, and seasoned breadcrumbs. -
Step 5
Dredge each ball first in flour, then in beaten egg, and finally in breadcrumbs. Chill breaded balls for 15-30 minutes before frying for extra crispiness. -
Step 6
Heat vegetable oil in a heavy-bottomed pot to 350°F (175°C). Carefully fry balls in batches for 3-5 minutes until golden brown and crispy. -
Step 7
Remove fried balls with a slotted spoon and drain on a wire rack. Serve immediately with your favorite dipping sauce.
Important Information
Nutrition Facts (Per Serving)
It is important to consider this information as approximate and not to use it as definitive health advice.
Allergy Information
Please check ingredients for potential allergens and consult a health professional if in doubt.


Leave a Comment