
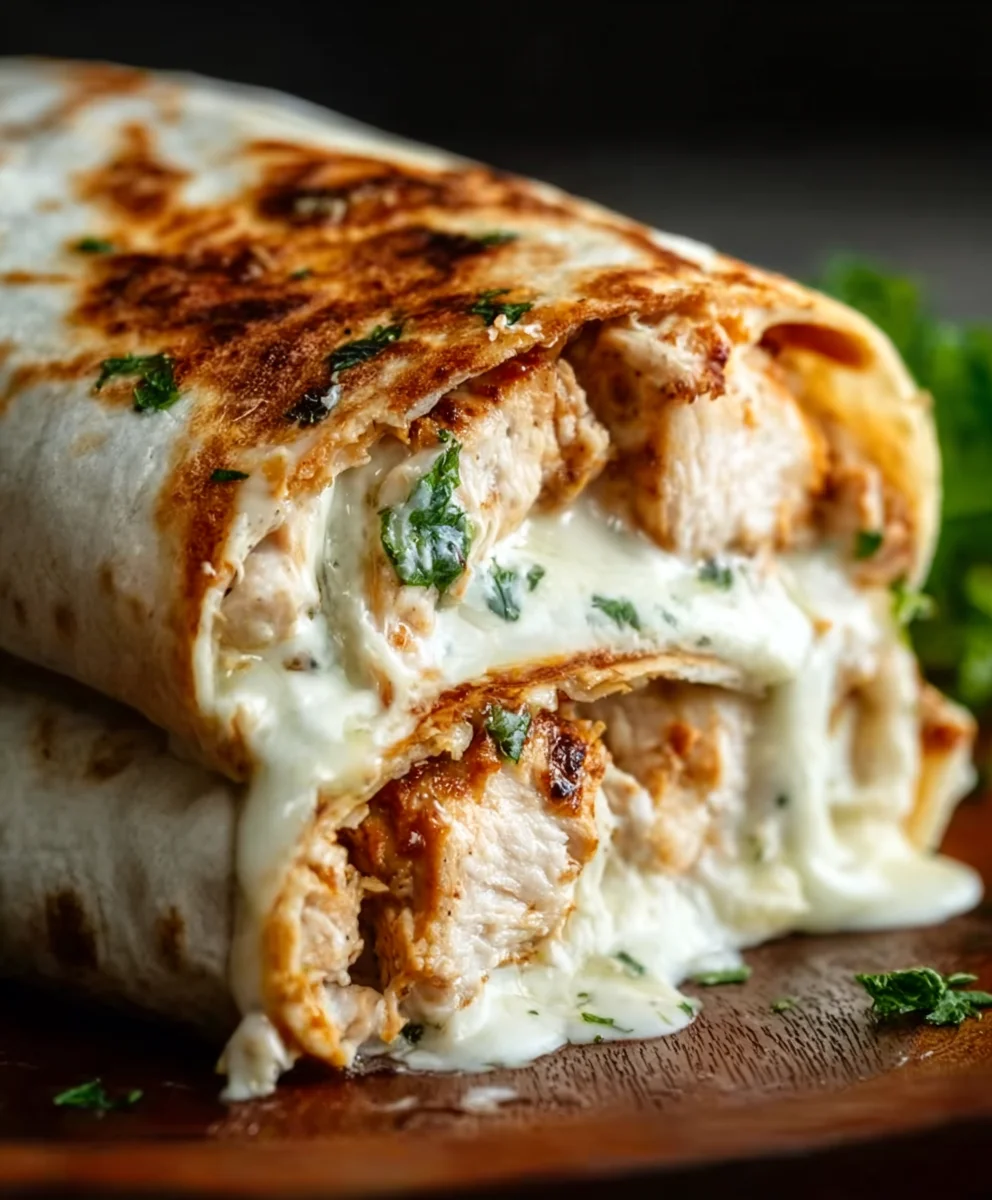
Cheesy Garlic Chicken Wraps are the ultimate weeknight dinner hero, a dish that consistently wins over taste buds and simplifies busy evenings. Imagin extracte tender, juicy chicken, infused with the warm, aromatic embrace of garlic, all enveloped in a creamy, ridiculously cheesy sauce. Then, picture that glorious filling nestled within soft, pliable tortillas, creating a portable, handheld delight that’s perfect for sharing, or, let’s be honest, devouring solo. What truly sets these Cheesy Garlic Chicken Wraps apart is their incredible versatility and the sheer comfort they provide. They are more than just a meal; they’re a hug in a wrap, a satisfying symphony of flavors and textures that always hits the spot. Whether you’re feeding a hungry family, looking for an impressive-yet-easy meal prep option, or simply craving something utterly delicious, these wraps are your answer.

Ingredients:
- 2 cups cooked chicken, shredded
- 1/2 cup garlic aioli
- 1 cup cheddar cheese, shredded
- 4 large tortillas
- Salt and pepper to taste
Preparing the Chicken Mixture
Step 1: Combine Chicken and Aioli
In a medium-sized mixing bowl, place your 2 cups of cooked and shredded chicken. It’s important that the chicken is fully cooked and cooled before you start this process, making it easier to shred and mix. For best results, use chicken breast or thighs that have been boiled, baked, or rotisserie chicken. Once the chicken is in the bowl, add the 1/2 cup of garlic aioli. The aioli will act as a binder and infuse the chicken with a delicious garlicky flavor. Use a spoon or a spatula to thoroughly mix the aioli into the shredded chicken. Ensure every strand of chicken is coated evenly. This ensures that the flavor is distributed throughout the filling and the aioli helps to moisten the chicken, preventing it from feeling dry in the wraps.
Step 2: Season the Chicken Mixture
Now it’s time to season your chicken and aioli mixture. Add salt and pepper to taste. Start with a small amount, perhaps 1/4 teaspoon of salt and 1/8 teaspoon of pepper, and then you can adjust to your preference. Taste a small bit of the mixture (make sure it’s cooked chicken!) and add more salt or pepper if you feel it needs it. This step is crucial for bringin extractg out the best flavors. The salt will enhance the savory notes of the chicken and aioli, while the pepper adds a subtle warmth. Remember that shredded chicken can sometimes be a little bland on its own, so don’t be shy with the seasoning, but also be mindful not to over-salt.
Step 3: Incorporate the Cheese
Next, it’s time to add the star ingredient that makes these wraps truly special: the cheddar cheese. Sprinkle the 1 cup of shredded cheddar cheese directly into the bowl with the seasoned chicken and aioli mixture. Gently fold the cheese into the chicken using your spoon or spatula. You want to distribute the cheese evenly throughout the mixture so that you get that delightful cheesy pull in every bite of your wrap. As you fold, you’ll notice the cheese starting to cling to the chicken. You don’t need to overmix here; just ensure the cheese is incorporated without breaking up the shredded chicken too much. Some pieces of chicken might be more heavily coated in cheese, which is perfectly fine and will lead to wonderfully cheesy pockets.
Assembling and Cooking the Wraps
Step 4: Warming and Filling the Tortillas
Take your 4 large tortillas and prepare them for filling. To make them more pliable and easier to wrap without tearing, you can gently warm them. You can do this by placing them in a dry skillet over medium heat for about 30 seconds per side, or by wrapping them in a damp paper towel and microwaving them for about 15-20 seconds. Once warm, lay a tortilla flat on a clean surface. Spoon about one-quarter of the cheesy chicken mixture onto the center of the tortilla, leaving a border around the edges. Don’t overfill the tortilla, as this will make it difficult to roll neatly. Distribute the filling evenly across the center of the tortilla.
Step 5: Rolling the Cheesy Garlic Chicken Wraps
Now for the crucial rolling technique. Fold the sides of the tortilla inward over the filling. Then, starting from the side closest to you, tightly roll the tortilla upwards, tucking in the filling as you go. The goal is to create a compact wrap that holds all the delicious ingredients inside. If the tortilla starts to tear, don’t worry; you can usually patch it up by folding the torn edge over. The warmth from the filling and the tortilla itself will help the cheese start to melt slightly and bind the ingredients together as you roll. Once rolled, you can optionally cut the wrap in half diagonally for a more appealing presentation. This is the final stage of assembly before enjoying your delicious Cheesy Garlic Chicken Wraps.
Conclusion:
There you have it – a simple yet incredibly satisfying recipe for Cheesy Garlic Chicken Wraps! We hope you’ve enjoyed learning how to bring this delightful dish to your table. This recipe is perfect for a quick weeknight dinner, a fun lunch, or even an appetizer for a casual get-together. The combination of tender chicken, melty cheese, and aromatic garlic, all bundled up in a warm tortilla, is simply irresistible. Don’t be afraid to experiment and make these Cheesy Garlic Chicken Wraps your own!
For serving, these wraps are fantastic on their own, but they also pair wonderfully with a side of crisp salad, seasoned potato wedges, or even a light and refreshing coleslaw. Feel free to get creative with your own personal touches. Consider adding a sprinkle of fresh chives or parsley for extra color and flavor, or a dash of your favorite hot sauce for a little kick. The possibilities are endless when it comes to customizing your Cheesy Garlic Chicken Wraps to suit your taste buds.
Frequently Asked Questions about Cheesy Garlic Chicken Wraps:
Can I make the chicken filling ahead of time?
Absolutely! The cooked chicken and garlic mixture can be prepared a day in advance and stored in an airtight container in the refrigerator. This makes assembling the Cheesy Garlic Chicken Wraps even quicker when you’re ready to serve.
What kind of cheese works best for these wraps?
While cheddar is a fantastic choice for its meltability and classic flavor, feel free to explore other options. Monterey Jack, a blend of mozzarella and cheddar, or even a pepper jack for a bit of spice would all be delicious additions to your Cheesy Garlic Chicken Wraps.
Can I use different types of tortillas?
Yes, you can! While standard flour tortillas are common, whole wheat tortillas, spinach wraps, or even gluten-free alternatives will work beautifully for your Cheesy Garlic Chicken Wraps. Just ensure they are large enough to hold all the delicious filling.

Cheesy Garlic Chicken Wraps – Quick & Easy Dinner
Delicious and easy-to-make wraps filled with seasoned chicken, creamy garlic aioli, and melted cheddar cheese.
Ingredients
-
2 cups cooked chicken, shredded
-
1/2 cup garlic aioli
-
1 cup cheddar cheese, shredded
-
4 large tortillas
-
Salt to taste
-
Pepper to taste
Instructions
-
Step 1
In a medium-sized mixing bowl, combine 2 cups of cooked and shredded chicken with 1/2 cup of garlic aioli. Mix thoroughly until the chicken is evenly coated. -
Step 2
Season the chicken and aioli mixture with salt and pepper to taste. Start with small amounts and adjust as needed. Taste to ensure proper seasoning. -
Step 3
Add 1 cup of shredded cheddar cheese to the bowl. Gently fold the cheese into the chicken mixture, distributing it evenly. -
Step 4
Warm the 4 large tortillas by placing them in a dry skillet for 30 seconds per side or microwaving them wrapped in a damp paper towel for 15-20 seconds. Lay a tortilla flat and spoon about one-quarter of the cheesy chicken mixture onto the center. -
Step 5
Fold the sides of the tortilla inward over the filling. Tightly roll the tortilla upwards from the closest edge, tucking in the filling as you go. Cut in half diagonally if desired.
Important Information
Nutrition Facts (Per Serving)
It is important to consider this information as approximate and not to use it as definitive health advice.
Allergy Information
Please check ingredients for potential allergens and consult a health professional if in doubt.
Leave a Comment