
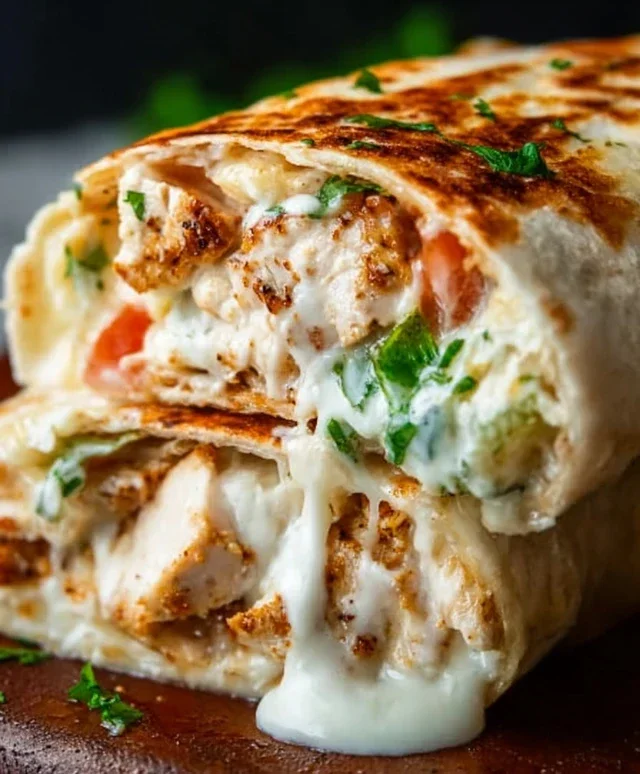
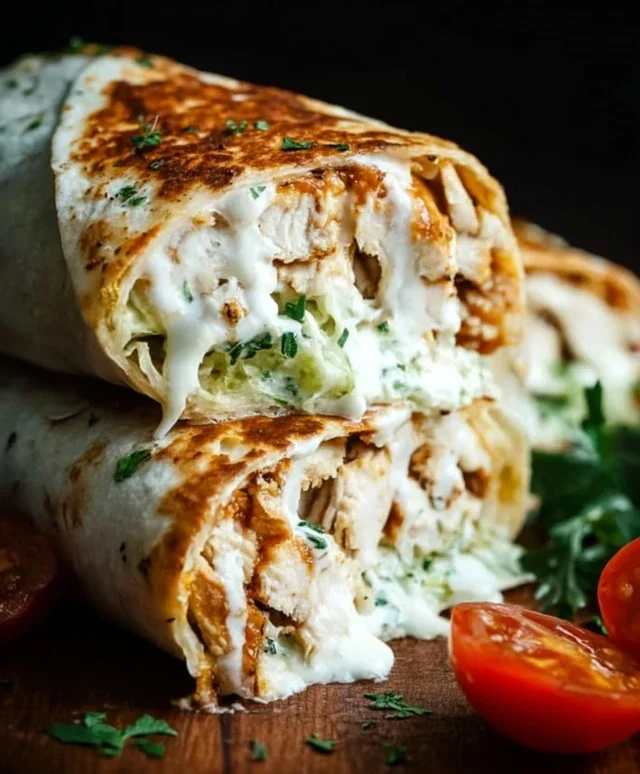
Cheesy Garlic Chicken Wraps are an absolute game-changer for weeknight dinners! If you’re like me, you crave meals that are both incredibly satisfying and surprisingly simple to whip up. That’s exactly where these delightful Cheesy Garlic Chicken Wraps shine. Imagin extracte tender, juicy chicken infused with the irresistible aroma of garlic, all enveloped in a warm tortilla with a gooey, melted cheese blanket. It’s a flavor combination that’s universally loved, bringin extractg together comfort food cravings with a touch of savory sophistication. What truly elevates these Cheesy Garlic Chicken Wraps is the perfect balance of textures and tastes – the crispness of the tortilla, the creaminess of the cheese, and the bold, savory punch of the garlic chicken. They’re the ultimate hug in a wrap, perfect for a quick lunch, a relaxed dinner, or even to impress guests with minimal effort.

Cheesy Garlic Chicken Wraps
There’s something incredibly satisfying about a warm, flavorful wrap that’s both quick to assemble and bursting with deliciousness. These Cheesy Garlic Chicken Wraps are exactly that – a weeknight hero, a game-day delight, or even a hearty lunch option. The creamy, garlicky aioli combined with tender, shredded chicken and gooey melted cheddar cheese, all hugged by a soft tortilla, creates a symphony of flavors and textures that will have everyone asking for seconds. This recipe is designed to be incredibly straightforward, making it accessible for even the most novice cooks. We’re going to take simple, readily available ingredients and transform them into something truly special. So, let’s get started and craft these irresistible wraps!
Ingredients:
Cooking Instructions:
The beauty of these wraps lies in their simplicity. We’re essentially creating a delicious filling and then warming everything through until the cheese is perfectly melted.
1. Prepare the Filling: In a medium-sized bowl, combine the 2 cups of cooked, shredded chicken with the 1/2 cup of garlic aioli. Stir everything together until the chicken is thoroughly coated in the creamy, garlicky goodness. This is where the magic really starts to happen, as the aioli infuses the chicken with its rich flavor. You want to ensure there are no dry bits of chicken left. If you prefer a more intense garlic flavor, you can always add an extra dollop of aioli, but start with the recommended amount and adjust as you go. Season the mixture with salt and pepper to your liking. Remember that the aioli might already contain some salt, so taste as you season.
2. Incorporate the Cheese: Now, it’s time to add that irresistible cheesy component. Gently fold in the 1 cup of shredded cheddar cheese into the chicken and aioli mixture. You want to distribute the cheese evenly throughout the filling. This will create those delightful cheesy pockets once the wraps are heated. Some people prefer to reserve a little cheese to sprinkle on top of the filling before folding the tortilla, which adds an extra gooey layer. Feel free to experiment with this! The cheddar cheese will melt beautifully, binding all the ingredients together and adding a wonderful richness.
3. Assemble the Wraps: Lay out your 4 large tortillas on a clean work surface. Divide the cheesy chicken filling evenly among the four tortillas, placing it in the center of each one. Don’t overfill them, as this can make them difficult to wrap and prone to tearing. Aim for a generous but manageable amount. You can then gently spread the filling out a bit to create a more even layer.
4. Warm and Melt: This is where we bring everything together to create those warm, melty wraps. You have a couple of great options here. The first is to use a skillet. Heat a non-stick skillet over medium heat. Carefully place one assembled wrap into the hot skillet, seam-side down if you’ve already folded it slightly. Cook for 2-3 minutes per side, or until the tortilla is golden brown and lightly crispy, and the cheese inside is wonderfully melted and gooey. You might want to gently press down on the wrap with a spatula to help it brown evenly and ensure good contact with the pan. Repeat this process with the remaining wraps, adding a tiny bit of oil or butter to the skillet if you find it sticking.
5. Alternative Warming Method: The Oven/Toaster Oven: If you’re making multiple wraps at once or prefer a less hands-on approach, your oven or toaster oven is an excellent choice. Preheat your oven or toaster oven to 375°F (190°C). You can place the assembled wraps directly on a baking sheet, seam-side down. Bake for about 8-10 minutes, or until the tortillas are lightly toasted and the cheese is fully melted and bubbling. This method is fantastic for ensuring even heating and melting without the risk of burning.
6. The Perfect Fold: Once your wraps are warm and the cheese is beautifully melted, it’s time to get them ready to eat. While you can fold them in various ways, a classic roll-up works best for this filling. Fold the two sides of the tortilla in towards the center, then tightly roll up from the bottom. This helps to keep the filling securely inside. You can serve these wraps immediately while they are warm and gooey, or let them cool slightly if you prefer. They are fantastic on their own, but you can also pair them with a side salad, some tortilla chips, or your favorite dipping sauce. Enjoy every delicious, cheesy, garlicky bite!
Conclusion:
There you have it – a recipe for Cheesy Garlic Chicken Wraps that’s guaranteed to become a weeknight favorite! We’ve crafted this dish to be incredibly satisfying, bursting with flavor from the savory garlic-infused chicken and the gooey, melted cheese, all nestled within a warm, soft tortilla. It’s the perfect blend of comfort food and easy preparation, making it ideal for busy evenings or a casual weekend meal. The versatility of these wraps means you can easily customize them to suit your tastes.
For a complete meal, I love serving these Cheesy Garlic Chicken Wraps alongside a crisp garden salad, a side of sweet potato fries, or even some seasoned black beans. If you’re looking to mix things up, consider adding a pinch of red pepper flakes to the chicken for a touch of heat, or swap the cheddar cheese for a blend of Monterey Jack and pepper jack for an extra kick. You could also incorporate some sautéed onions and bell peppers for added texture and sweetness.
I truly encourage you to give these Cheesy Garlic Chicken Wraps a try. They are so simple to make and the delicious results are well worth the minimal effort. Let me know how yours turn out!
Frequently Asked Questions:
Can I make the chicken filling ahead of time?
Absolutely! The garlic chicken filling can be prepared up to two days in advance and stored in an airtight container in the refrigerator. This makes assembly even quicker when you’re ready to make your wraps.
What kind of tortillas work best?
Medium-sized flour tortillas are generally ideal as they are pliable and hold the filling well without tearing. However, you can also experiment with whole wheat tortillas for a healthier option, or even gluten-free wraps if needed.
How can I make these wraps spicier?
To add some heat to your Cheesy Garlic Chicken Wraps, you can incorporate finely diced jalapeños or a pinch of cayenne pepper into the chicken mixture. A drizzle of your favorite hot sauce before wrapping is also a fantastic way to boost the spice level.
Cheesy Garlic Chicken Wraps
Quick and easy wraps filled with shredded chicken, garlic aioli, and melted cheddar cheese.
Ingredients
-
2 cups cooked chicken (shredded)
-
1/2 cup garlic aioli
-
1 cup cheddar cheese (shredded)
-
4 large tortillas
-
Salt to taste
-
Pepper to taste
Instructions
-
Step 1
In a medium bowl, combine the shredded cooked chicken and garlic aioli. Stir until the chicken is well coated. -
Step 2
Season the chicken mixture with salt and pepper to taste. -
Step 3
Lay out the large tortillas on a clean surface. -
Step 4
Divide the chicken mixture evenly among the tortillas, spreading it down the center of each. -
Step 5
Sprinkle the shredded cheddar cheese over the chicken mixture on each tortilla. -
Step 6
Fold in the sides of each tortilla, then tightly roll from the bottom to create the wraps. -
Step 7
Optional: Lightly grill or pan-fry the wraps for a few minutes per side until golden brown and the cheese is melted.
Important Information
Nutrition Facts (Per Serving)
It is important to consider this information as approximate and not to use it as definitive health advice.
Allergy Information
Please check ingredients for potential allergens and consult a health professional if in doubt.

Leave a Comment